
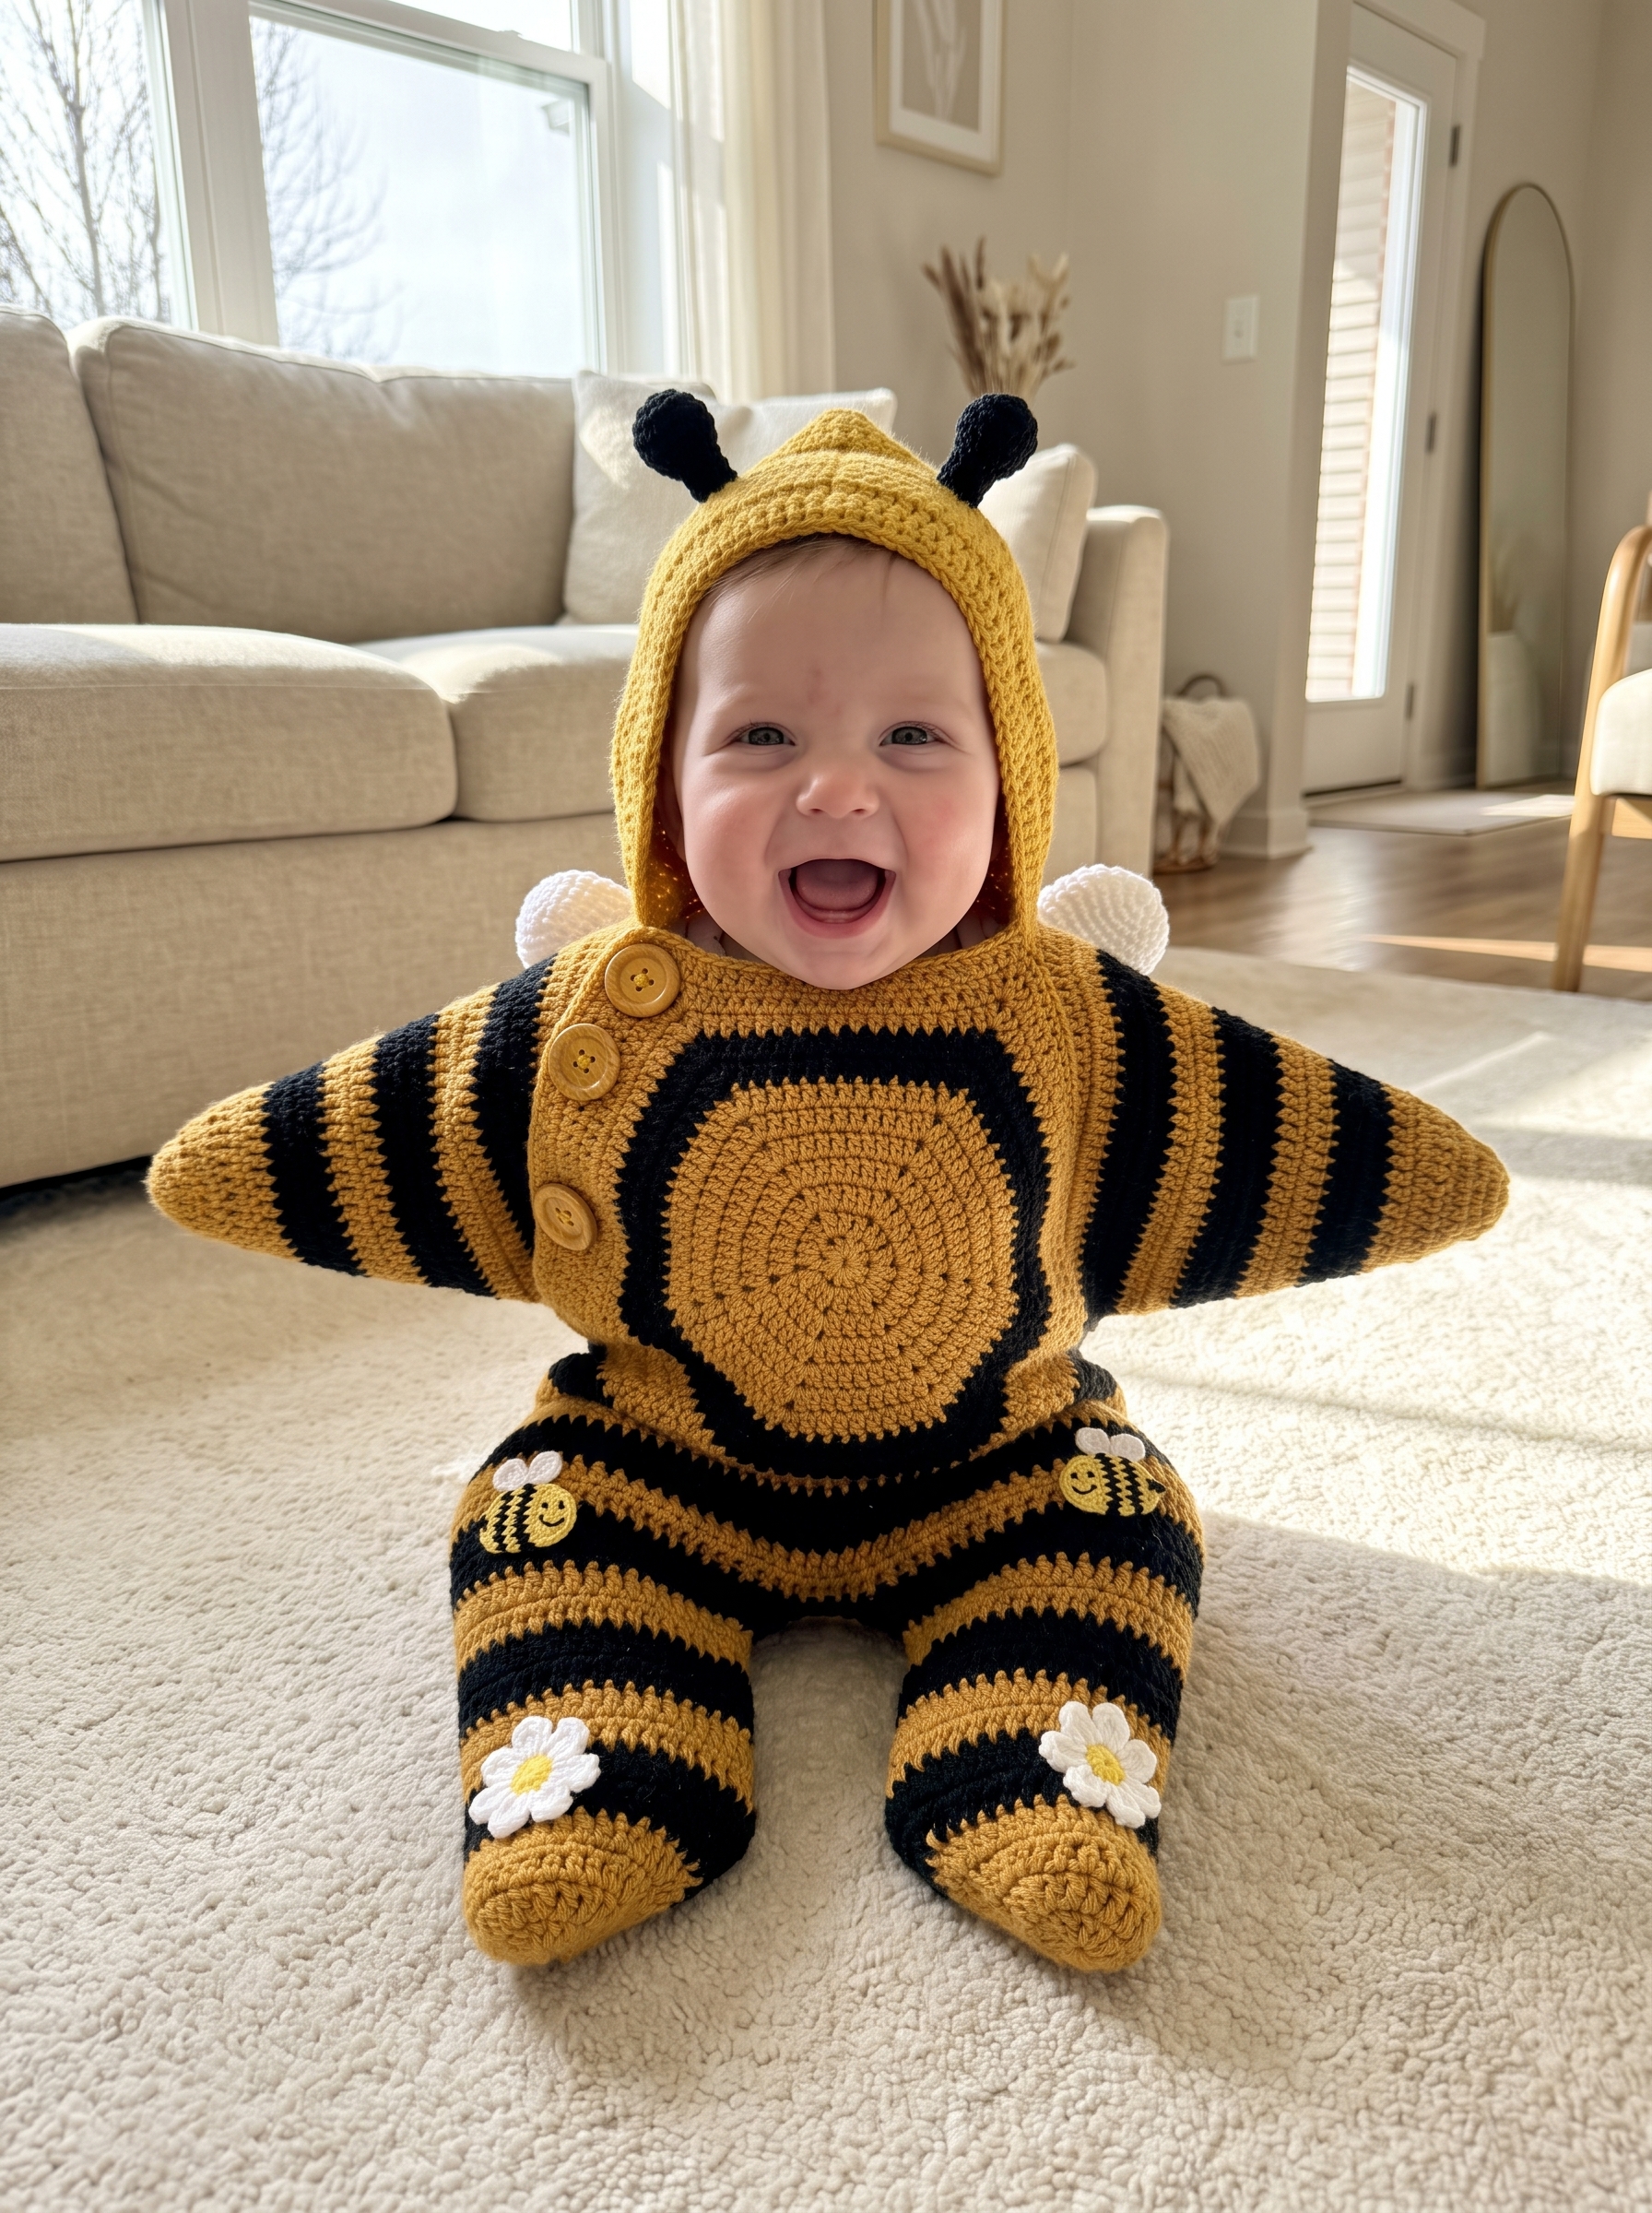
There’s something about a baby dressed as a bumblebee that just melts every heart in the room, and this bee baby cocoon crochet pattern was designed to capture exactly that feeling. Built on my tested and true star-shaped cocoon body, this design takes the same cozy, huggable silhouette my followers have come to love and dresses it up in bold black-and-gold stripes, a hooded top complete with wobbly little antennae, soft white wings, and the sweetest hand-finished details: a two-tone chest panel, tiny bee appliqués on the legs, and cheerful daisy appliqués on the toes.
This pattern is written for confident beginner to intermediate crocheters who are comfortable with basic shaping, simple colorwork, and sewing on appliqués. Every section below walks through the shaping in the same order you’ll actually crochet it, with full row-by-row instructions, so you can follow along piece by piece rather than jumping around.
Size
Newborn to 6 months, matching the proportions shown in the finished sample. Finished measurements will vary slightly depending on yarn weight, hook size, and tension, so it’s worth working up a small gauge swatch before diving into the full body pieces.
Materials
Main suit:
- Worsted weight (WW / Size 4) yarn in Gold/Mustard (MC) and Black (CC)
- 5 mm (H/8) crochet hook
- 3 buttons, ¾”–1″, for the front placket closure
- Stitch markers
- Tapestry/yarn needle
Chest circle panel:
- Small amount of Gold worsted yarn and Black for the border round
- 5 mm (H/8) hook
- 6 stitch markers plus 1 contrasting marker
Bee appliqués (make 2):
- Small amounts of Yellow, Black, White, and Pink worsted yarn
- 3.5 mm and 4 mm crochet hooks
- Four 7.5 mm black safety eyes
- Tapestry needle
Daisy appliqués (make 2):
- Small amounts of White and Yellow worsted yarn
- Hook sized to your yarn for a tight, tidy little flower
Antennae (make 2):
- Small amount of Black yarn for the ball toppers
- Small amount of Gold or Black yarn for the stems
- A pinch of stuffing
Color Note: This pattern is shown in classic bumblebee gold and black, but feel free to use any yarn colors you love! Pastels, brights, or a completely different palette all work beautifully in this same base — make it your own.
Gauge
Main suit: 12 dc x 6 rows = 4″ x 4″ with 5mm hook. Chest panel: first 3 rounds ≈ 5″ diameter. Appliqués: gauge isn’t critical — fit visually against the suit.
Abbreviations
| Abbrev. | Meaning |
|---|---|
| ch | chain |
| sl st | slip stitch |
| sc | single crochet |
| hdc | half double crochet |
| dc | double crochet |
| dc dec | double crochet decrease |
| inc | increase |
| dec | decrease |
| mr | magic ring |
| st(s) | stitch(es) |
| rep | repeat |
| sk | skip |
| ( ) | stitch count at end of round/row |
| [ ] | work enclosed instructions the stated number of times |
Safety Note
This suit includes safety eyes, sewn buttons, and small appliqués. Once inserted with the locking washer, safety eyes are permanent and should never be substituted with buttons or beads. This suit is intended for supervised wear and photos only, not for unsupervised sleep, per standard small-parts guidance for children under 3. Reinforce every appliqué and button attachment point with a doubled thread pass.
The Pattern
Pentagon Body (Make 2 — mark one “Front Upper,” one “Back”)
With Gold (MC):
- Row 1: Ch 3, 9 hdc in 3rd ch from hook. (10 dc)
- Row 2: Ch 4. 2 dc in next 2 dc, ch 1; rep to last dc, 2 dc in last dc, dc in beginning st. Join to 3rd ch of 4. (20 dc, 5 ch-1 sps)
- Row 3: Ch 4, 2 dc in next dc, dc in next 2 dc, 2 dc in next dc, ch 1; rep to end. (30 dc)
- Row 4: Ch 4, 2 dc in next dc, dc in next st, 2 dc in next 2 sts, dc in next st, 2 dc in next st, ch 1; rep to end.
- Row 5: Ch 4, 2 dc in next dc, dc in next 2 sts, 2 dc in next st, dc in next 2 sts, 2 dc in next st, dc in next 2 sts, 2 dc in next dc, ch 1; rep to end.
Pattern note: from Row 5 on, every round begins with ch 4 and works each of the five segments in turn; each segment ends with a dc in the beginning stitch.
- Row 6: Ch 4, 2 dc in next st, dc in next 12 sts, 2 dc in next 2 sts, ch 1; rep to end.
- Row 7: Ch 4, 2 dc in next st, dc in next 14 sts, 2 dc in next 2 sts, ch 1; rep to end.
- Row 8: Ch 4, 2 dc in next st, dc in next 16 sts, 2 dc in next 2 sts, ch 1; rep to end. Fasten off, weave in ends.
Work stripe colorwork (switch to Black for 1–2 rows, back to Gold) on whichever rows you like from Row 4 on — color changes don’t affect the shaping above.
Working the Back Pentagon
Lay the Back pentagon flat-side up; place a marker on that top edge to stay oriented. On each of the 4 non-marked sides:
- Work 2 rows evenly across the edge.
- Work one decrease at each side every row until 4 sts remain: dc in 1st st, dc dec, dc in last st. Fasten off.
- Repeat for the other 3 non-marked edges.
The Marked Edge (Hat Portion)
Attach yarn in end stitch.
- Row 1: [Dc in next 3 sts, 2 dc in next st] twice, dc in next 4 sts, [2 dc in next st, dc in next 3 sts] twice.
- Row 2: Dc evenly across.
- Rows 3–5: Dc in 1st st, dc dec in next, dc to last 3 sts, dc dec, dc in last st.
- Row 6: Dc in 1st st, dc dec in next, dc in next 3 sts, dc dec, dc in next 4 sts, dc dec, dc in next 3 sts, dc dec, dc in last st.
- Row 7: Dc in 1st st, dc dec, dc in next 3 sts, dc dec twice, dc in next 3 sts, dc dec, dc in last st.
- Rows 8–11: Continue as established for the other points.
Mark the top flat edge. Work the two lower edges and the edge immediately to the right (as viewed) of the marked edge the same way as the matching points on the Back pentagon.
The Front Pentagon
- Work 2 rows of dc evenly. Fasten off, weave in ends. (22 dc per row)
The Open Edge
- Ch 24.
- Row 1: Dc in 4th ch from hook and each ch across. (22 dc)
- Work remaining rows as established for the other points.
The Sleeve
Built the same way as the other points, directly from the pentagon edge.
The Hat Section
- Ch 30.
- Row 1: Dc in 4th ch from hook and each ch across. (28 dc)
- Row 2: Dc evenly across. (28 dc)
- Row 3: Dc in 1st dc, dc dec in next, dc to last 3 sts, dc dec, dc in last. (26 dc)
- Rows 4–6: Work as Row 3, adding one extra dec in the middle each row.
- Row 7: Work as Row 3, but make 2 dec in the middle.
- Row 8: Work as Row 4.
- Continue as established for the other points. Fasten off, weave in ends.
Point-shaping note: for each point (hood, sleeves, legs), work 3 hdc in the center dc sts to form a nicely defined point.
Antennae (make 2)
Ball (Black, continuous rounds, do not join):
- Rnd 1: 6 sc in mr. (6)
- Rnd 2: inc in each st. (12)
- Rnd 3: [sc 1, inc] x6. (18)
- Rnds 4–5: sc even, 2 rounds. (18)
- Rnd 6: [sc 1, dec] x6. (12)
- Rnd 7: dec x6. (6) — stuff lightly here.
- Rnd 8: dec x3. (3) Fasten off, cinch closed.
Stem:
- Ch 8. Sl st in 2nd ch from hook and each ch across. (7 sl st)
Sew stem to top of ball; sew stem’s other end to hood tip, spaced about 1″–1.25″ apart, angled slightly outward.
Chest Circle Panel
With Gold, continuous rounds, do not join:
- Rnd 1: 6 sc in mr. (6)
- Rnd 2: 2 sc in each st. (12)
- Rnd 3: [2 sc, 1 sc] x6. (18)
- Rnd 4: [1 sc x2, 2 sc] x6. (24)
- Rnd 5: [1 sc, 2 sc, 1 sc x2] x6. (30)
- Rnd 6: [2 sc, 1 sc x4] x6. (36)
- Continue shifting one increase between markers each round (never stacking an increase directly over the one below) until the circle measures about 4″–4.5″ across.
- Switch to Black and work one final round of sc evenly, no increases, for the bordered look. Fasten off, leaving a long tail.
Bee Appliqués (make 2, Small size)
Head: With Yellow, 3.5mm hook:
- Rnd 1: 6 sc in mr. (6)
- Rnd 2: 6 inc. (12)
- Rnd 3: [1 sc, 1 inc] x6. (18)
- Rnd 4: [1 sc x2, 1 inc] x6. (24)
- Switch to Black, 4mm hook.
- Rnd 5: sc 6. Switch to 3.5mm hook. 1 sc, place marker, ch 4, turn, 2 sc in 2nd ch from hook, sl st in next 2 ch, sl st in marked st, sc 2. Repeat the same antenna steps once more. Switch back to 4mm hook, sc 14.
Body: With Yellow, 3.5mm hook:
- Row 1: ch 2.
- Row 2: turn, 1 sc in 2nd ch from hook, place marker. (1)
- Row 3: ch 1, turn, 1 inc. (2)
- Row 4: ch 1, turn, inc in each st. (4)
- Row 5: ch 1, turn, 1 inc, sc 2, 1 inc. (6)
- Switch to Black.
- Rows 6–7: ch 1, turn, sc even. (6)
- Switch to Yellow.
- Row 8: ch 1, turn, 1 inc, sc 4, 1 inc. (8)
- Row 9: ch 1, turn, sc even. (8)
- Switch to Black.
- Row 10: ch 1, turn, sc even. (8)
- Row 11: ch 1, turn, 1 dec, sc 4, 1 dec. (6)
- Switch to Yellow.
- Rows 12–13: ch 1, turn, sc even. (6)
- Switch to Black.
- Row 14: ch 1, turn, sc even. (6)
- Do not turn. Switch to 4mm hook, work 10 sc evenly along the edge to the marker. Switch to 3.5mm hook. 1 sc in marked st, ch 2, turn, 1 sc in next ch, 1 sc in marked st. Switch to 4mm hook, work 10 sc evenly along the opposite edge. Leave a long tail for sewing.
Wings (make 4, White):
- Ch 8. Starting in 2nd ch from hook: sl st 2, sc 3, hdc 1, 4 hdc in last ch; continue along opposite side of chain: hdc 1, sc 3, sl st 2, sl st. Leave a long tail.
Face: Place eyes between Rounds 2–3 of the head. Embroider a simple mouth.
Assembly: Sew head to body. Attach wings to the inside of the body, one on each side, hiding about 0.8″/1.5cm of each wing inside before sewing.
Daisy Appliqués (make 2, Small Flower)
With Color A (White), magic circle:
- Round 1: Ch 1, 6 sc in mr, join with sl st. (6)
- Fasten off Color A, leaving a long tail. Join Color B (Yellow) in any stitch.
- Round 2: [Ch 2, dc 1, ch 2, sl st 1] in same st; repeat [sl st 1, ch 2, dc 1, ch 2, sl st 1] in each of next 5 sts. (6 petals)
- Fasten off, weave in ends.
Assembly
Bring the main suit pieces together in this order:
- Align the hat (hood) piece to the hat point of the Back pentagon and join the edges with sc.
- Align the loose sleeve/arm piece with the adjoining back portion and join with sc.
- Add the front portion, working around the remaining points, and join everything with sc as established.
- When you return to your starting point, turn the piece and work a crab stitch (reverse single crochet) across the hood edge for a finished look.
- Start joining at the right side (as viewed) edge of the hood, so the round ends back at that same point when you finish.
Before closing the front into the round, finish these steps while the fabric is still flat:
- Sew the finished chest circle panel onto the Front Upper pentagon, centered inside the button placket line.
- Attach a bee appliqué to the front of each leg point, above the ankle stripe.
- Attach a daisy appliqué to the top of each foot, just above the toe tip.
- Sew the wings to the inside of the upper back, hiding about 0.8″/1.5cm of each wing inside the seam before stitching.
To finish:
- Sew 3 buttons along the opening edge — no buttonholes needed, the dc fabric has enough natural gaps for the buttons to pass through.
Tips
- Swatch your main suit gauge before diving into the full pieces.
- Sew the chest panel on before joining the front pentagon into the round — flat fabric is much easier to work with.
- Pre-lay all appliqués and pin them in place before sewing anything down.
- Keep the antenna stuffing light so the ball-to-stem join stays neat.
- Weave every appliqué tail through the base fabric in more than one direction.
- Carry your non-working stripe color loosely up the inside of the work rather than cutting at every change.
- Work crab stitch from left to right (opposite of regular sc) for the classic corded texture.
- If this suit is meant for actual wear, consider swapping sewn buttons for snap closures underneath decorative button covers.
Notes & Variations
This bee cocoon is built on the same star-shaped base used across all of my seasonal cocoon designs, so once you’ve made this one, the shell adapts easily to other themes. The chest panel, appliqués, and antennae can all be swapped out or left off depending on the look you’re going for.
“If you love this bee cocoon, don’t miss the original Purple Star Cocoon Crochet Pattern — the same cozy silhouette in a soft lavender colorway.”
© Maria Lynn — Crochet Corner, Savorgastronomy. All rights reserved.
Thank you for making this pattern! If you finish a bee suit of your own, I’d love to see it;