
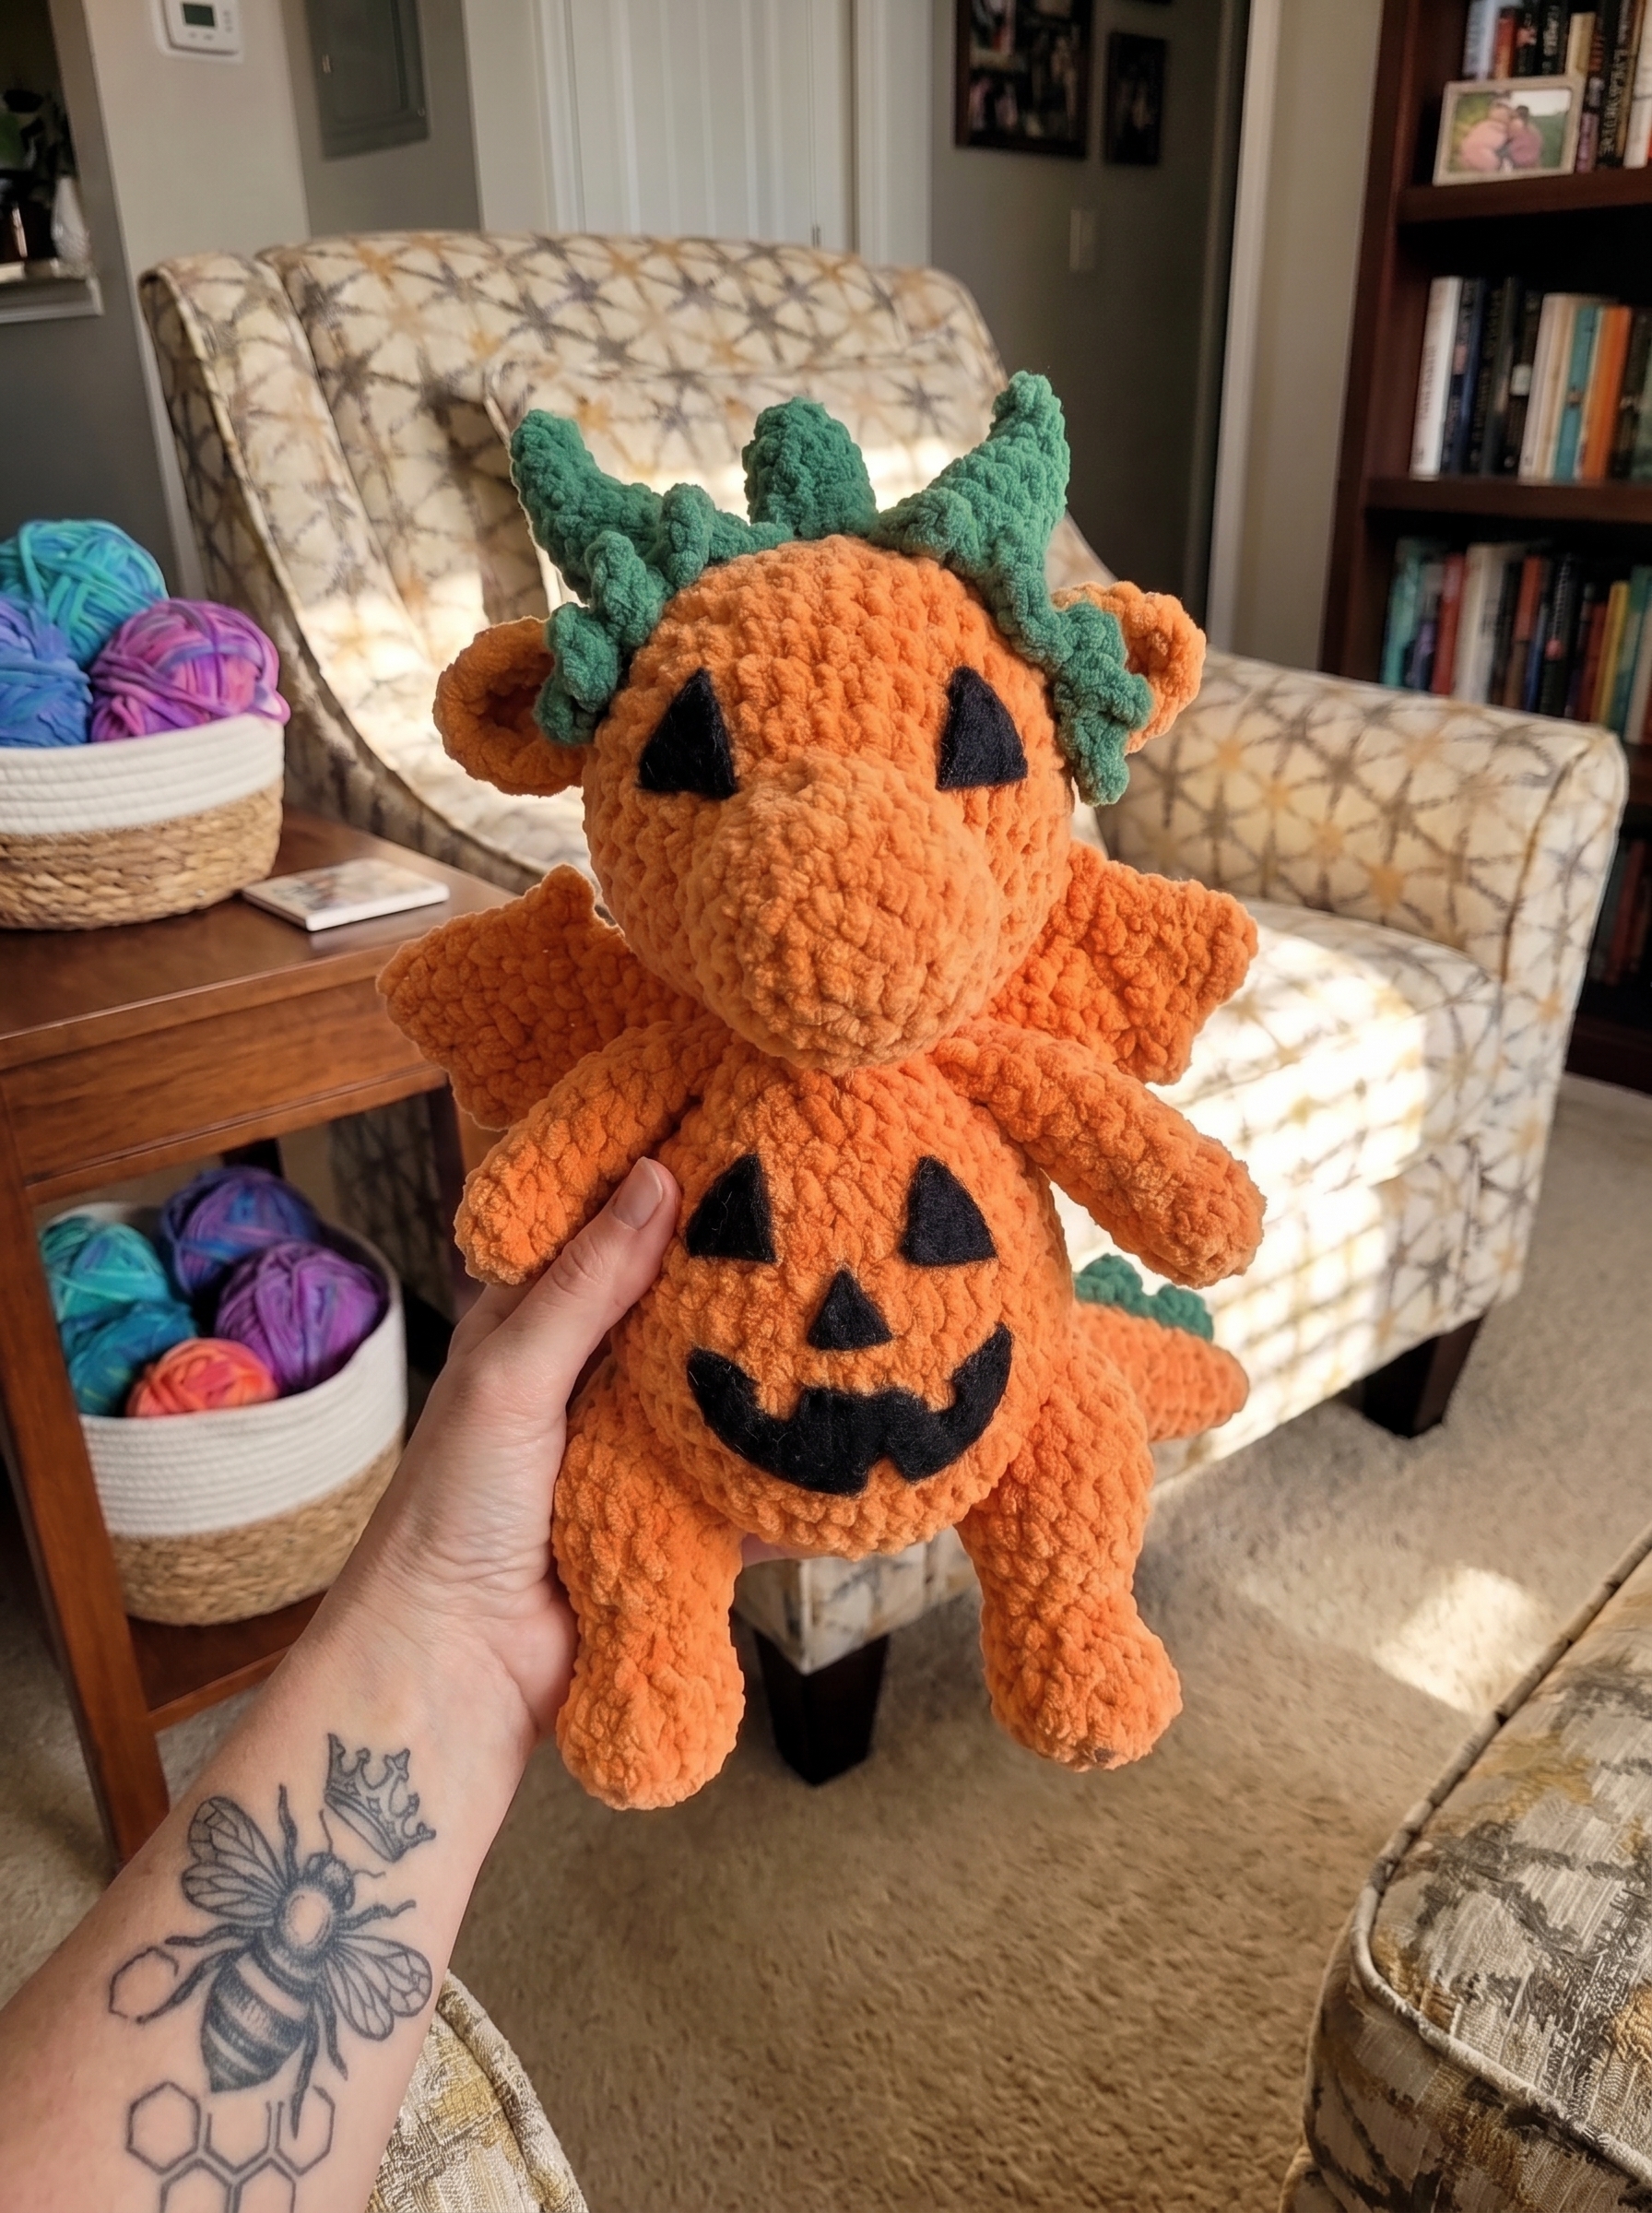
I didn’t set out to make a dragon. I set out to make a pumpkin, honestly — I had a pile of orange chenille left over from another project and no plan for it. But halfway through shaping that round little body, I looked at it sitting on my table and thought: this wants wings. So it got wings. And horns. And a jack-o-lantern face, because at that point I was already committed to the bit.
That’s how this pumpkin dragon happened — not from a sketch, not from a plan, just from yarn that refused to stay a plain pumpkin. If you’ve ever had a project talk you into becoming something else halfway through, you’ll understand exactly how I ended up here.
I get asked a lot whether dragons are a good starting project, so I want to be honest with you before you pick up your hook: this isn’t the easiest thing I’ve ever designed. Dragons in general have a reputation for being one of the harder animals to crochet, and mine isn’t an exception — there are a lot of small pieces. But none of the individual steps are hard. If you’ve made an amigurumi animal before and know your way around a magic ring, an increase, and a decrease, you can make this dragon. I promise the payoff is worth the extra pieces.
Why I Built Him This Way
I wanted him chubby and round rather than sleek and serpentine — that’s just the shape I reach for when I’m designing something meant to be hugged rather than displayed. The bobble spine running down his back was actually the last thing I added, almost as an afterthought, and now it’s my favorite detail on him. It’s such a simple technique — just a bobble, a skip, a slip stitch, repeat — but it’s the thing everyone comments on first.
What You’ll Need
I used bulky chenille for this one on purpose. It’s soft, it’s forgiving if your tension wanders a little (mine always does by round 30), and it gives that plush, no-visible-stitch look I wanted for him. A worsted weight will absolutely work too — you’ll just get a smaller, firmer dragon with more visible stitch definition, which honestly looks great in its own way.
| Detail | Info |
|---|---|
| Skill level | Intermediate (a little amigurumi experience helps) |
| Time to make | 4–6 hours, usually two sittings for me |
| Finished size | Hand-length |
| Yarn | #5 bulky chenille, orange + green |
| Hook | US G / 4.0 mm |
| Stuffing | Polyester fiberfill |
| Extras | Black felt, black thread |
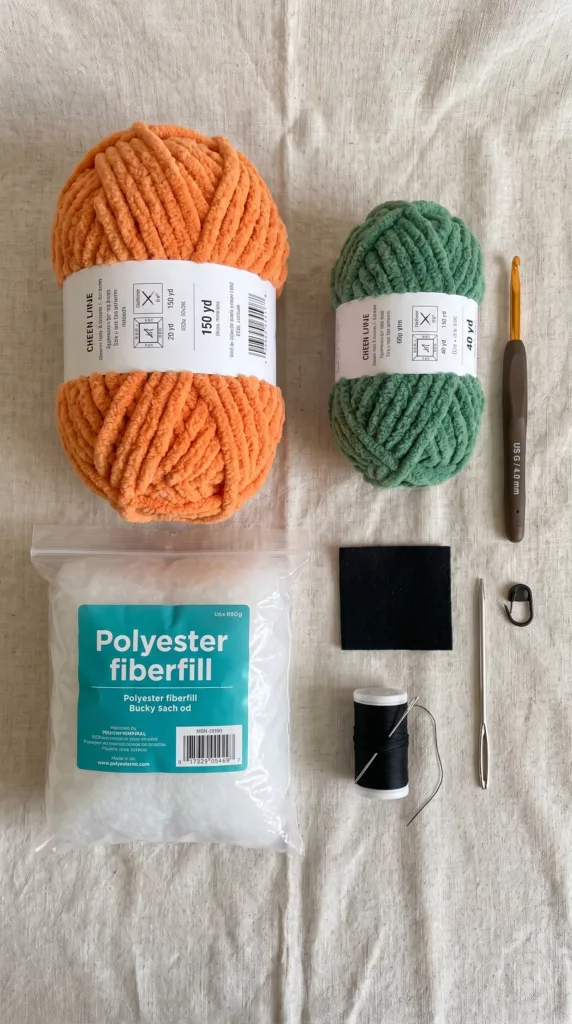
Materials:
- Bulky chenille yarn, orange (main) — approx. 150 yd
- Bulky chenille yarn, green (accent) — approx. 40 yd
- US G / 4.0 mm hook
- Polyester fiberfill
- Black felt scrap
- Black thread + needle
- Yarn needle
- Stitch marker
A Quick Word on Hook and Yarn Choice
I get more questions about this than almost anything else, so let me settle it here: match your hook to your yarn weight first — G/4.0mm is the standard partner for bulky chenille. Then check your own tension with a quick swatch. Hold it up to a window. If you can see light through it, go down a hook size. That gap is exactly where stuffing peeks through later, and I’ve made that mistake enough times to save you from it.
For the horns specifically, I like to go a size smaller than the body — an F/3.75mm if you’ve got one. A firm horn holds its curl. A loose one just flops, and no amount of steaming fixes a floppy horn.
Please Read Before You Start: A Safety Note
This pattern uses felt appliqué for the face, small horn pieces, and safety-eye-sized components — none of which are appropriate for young children or babies to handle unsupervised. This dragon, as written, is not intended as a toy for children under 3, and adult supervision is recommended for any child who does play with it.
If you’re making this as a gift for a baby or toddler, I’d suggest a few changes: skip the felt face entirely and embroider the eyes and nose instead using satin stitch, use securely fastened doll joints or safety eyes rated for the child’s age group (installed before final stuffing, never glued on), stuff firmly enough that small fingers can’t work anything loose, and check every seam is sewn shut with no gaps. Always follow current toy safety guidelines for the age group you’re making this for, and re-check the piece periodically for wear if it becomes a well-loved toy.
Abbreviations
| Abbreviation | Meaning |
|---|---|
| MR | Magic Ring |
| SC | Single crochet |
| HDC | Half double crochet |
| DC | Double crochet |
| Inc | Increase (2 sc in same st) |
| Dec | Decrease (sc2tog) |
| BLO/FLO | Back/Front loop only |
| St(s) | Stitch(es) |
| [ ] | Stitch count at end of round |
The Pieces
Head, Ears (×2), Body, Front Arms (×2), Rear Legs (×2), Tail, Wings (×2), Horns (1 long, 3 small spikes, 1 curly), Spine ridge, Felt face.
Let’s Make Him
Head
I always start with the head on this one — something about seeing his face come together first keeps me motivated through the rest.
Round 1: 8 sc in MR [8]
Round 2: 8 inc [16]
Round 3: (sc, inc) x8 [24]
Round 4: sc around [24]
Round 5: (sc, inc, sc) x8 [32]
Rounds 6–8: sc around, 3 rounds [32]
Round 9: 14 sc, (flo hdc, 2 dc-inc, hdc), 14 sc [34]
Round 10: 14 sc, 6 hdc, 14 sc [34]
Round 11: 15 sc, blo 2 dec, 15 sc [32]
Round 12: (2 sc, dec) x8 [24]
Round 13: sc around, stuff firmly [24]
Round 14: (sc, dec) x8 [16]
Round 15: 8 dec [8]
Round 16: 4 dec [4]
FO, cinch closed. That little snout arch in rounds 9–11 is doing the real work here — it’s what keeps his face from looking flat. Don’t skip it even though it looks fussy on paper.
Ears (make 2)
Row 1: 7 sc in MR, do not tighten [7]
Row 2: sc, 5 inc, sc [12]
FO. Fold in half, sew tips only. I leave that magic ring loose on purpose — it lets the ear sit against his head naturally instead of puckering. Attach beside the snout arch you just made.
Body
Round 1: 8 sc in MR [8]
Round 2: 8 inc [16]
Round 3: (sc, inc) x8 [24]
Round 4: (2 sc, inc) x8 [32]
Round 5: (3 sc, inc) x8 [40]
Round 6: (4 sc, inc) x8 [48]
Rounds 7–14: sc around, 8 rounds, stuff as you go [48]
Round 15: (4 sc, dec) x8 [40]
Round 16: (3 sc, dec) x8 [32]
Round 17: (2 sc, dec) x8 [24]
Round 18: (sc, dec) x8 [16]
Round 19: 8 dec [8]
Finish stuffing, FO, cinch closed. I always stuff this part a little firmer than feels necessary — a soft, saggy dragon belly never looks right to me once he’s standing.
Front Arms (make 2)
Row 1: (hdc, sc, hdc) x2 in MR [6]
Rows 2–4: sc around, 3 rows [6]
Row 5: dec, inc x2, dec [6]
Row 6: dec, inc x2, dec [6]
Row 7: 2 sc, inc x2, 2 sc [8]
Row 8: dec, sc, inc x2, sc, dec [8]
FO, stuff lightly or leave unstuffed.
Rear Legs (make 2)
Work Rows 1–8 exactly as the Front Arm above [8], then continue:
Rows 9–14: sc around, 6 rounds [8]
FO, stuff firmly. He needs these sturdier than the front arms — they’re what actually holds him up.
Tail
Round 1: 12 sc in MR [12]
Rounds 2–4: sc around, 3 rounds [12]
Round 5: (2 sc, dec) x3 [9]
Rounds 6–7: sc around, 2 rounds [9]
Round 8: (sc, dec) x3 [6]
Rounds 9–10: sc around, 2 rounds [6]
Round 11: 3 dec [3]
Round 12: sc around [3]
Stuff lightly, FO, cinch the point closed.
Wings (make 2)
Wings are the part I hear about most from other crocheters — they’re genuinely one of the fiddlier pieces on any dragon. I kept these deliberately simple: one flat layer instead of two, which still gives that pointed silhouette without the extra construction headache.
Row 1: ch 9, from 2nd ch: sc 8, ch 1, turn [8]
Row 2: 2 sc in first st, sc 6, 2 sc in last st, ch 1, turn [10]
Row 3: 2 sc in first st, sc 8, 2 sc in last st, ch 1, turn [12]
Row 4: sc around, ch 1, turn [12]
Row 5: sc around, do not turn [12]
Point row: at sts 2, 6, and 10, work ch 5, sl st in 2nd ch, hdc, dc, dc, sl st back into base st; sl st plain between points
FO.
Horns
Curly horn (make 1):
Round 1: 4 sc in MR [4]
Rounds 2–3: sc around, 2 rounds [4]
Round 4: inc x2, sc 2 [6]
Round 5: sc 4, dec [5]
Round 6: inc x2, sc 3 [7]
Round 7: sc 5, dec [6]
Round 8: inc x2, sc 4 [8]
Round 9: sc 5, dec, sc [7]
Round 10: inc x2, sc 5 [9]
Round 11: sc 6, dec, sc [8]
Round 12: inc x2, sc 6 [10]
Round 13: sc 7, dec, sc [9]
Round 14: inc x2, sc 7 [11]
Round 15: sc 8, dec, sc [10]
Round 16: inc x2, sc 8 [12]
Sl st, FO. Twist it at the halfway point before you fasten off — that twist is the whole trick to the curl. I forgot this the first time I made one and ended up with a very sad, straight horn.
Small spike horns (make 3):
Round 1: 4 sc in MR [4]
Round 2: inc, sc 3 [5]
Round 3: inc, sc 4 [6]
Round 4: inc, sc 5 [7]
Round 5: inc, sc 6 [8]
Round 6: inc, sc 7 [9]
Round 7: inc, sc 8 [10]
Round 8: inc, sc 9 [11]
Round 9: sc 11, sl st [11]
FO.
Long horn (make 1):
Work Rounds 1–8 exactly as the Small Spike Horn above [11], then continue:
Round 9: inc, sc 10 [12]
Round 10: inc, sc 11 [13]
Round 11: inc, sc 12 [14]
Round 12: sc 14, sl st [14]
FO.
Spine Ridge
This is the detail I mentioned loving most. Anchor green yarn at the top of his head, between the horns and ears. Repeat: ch 2, work a 3-loop bobble into the surface, skip 1 row, sl st into the next row at the centerline. Keep going down his head, across the seam onto his body, across the seam onto his tail, all the way to the tip.
Felt Face
Cut and pin 2 black triangle eyes, 1 triangle nose, and a zigzag mouth. Whip-stitch them all in place. I always pin everything first and check him from the front and both sides before I sew a single stitch — a crooked pumpkin face is the kind of mistake you can’t unsee once it’s sewn down.
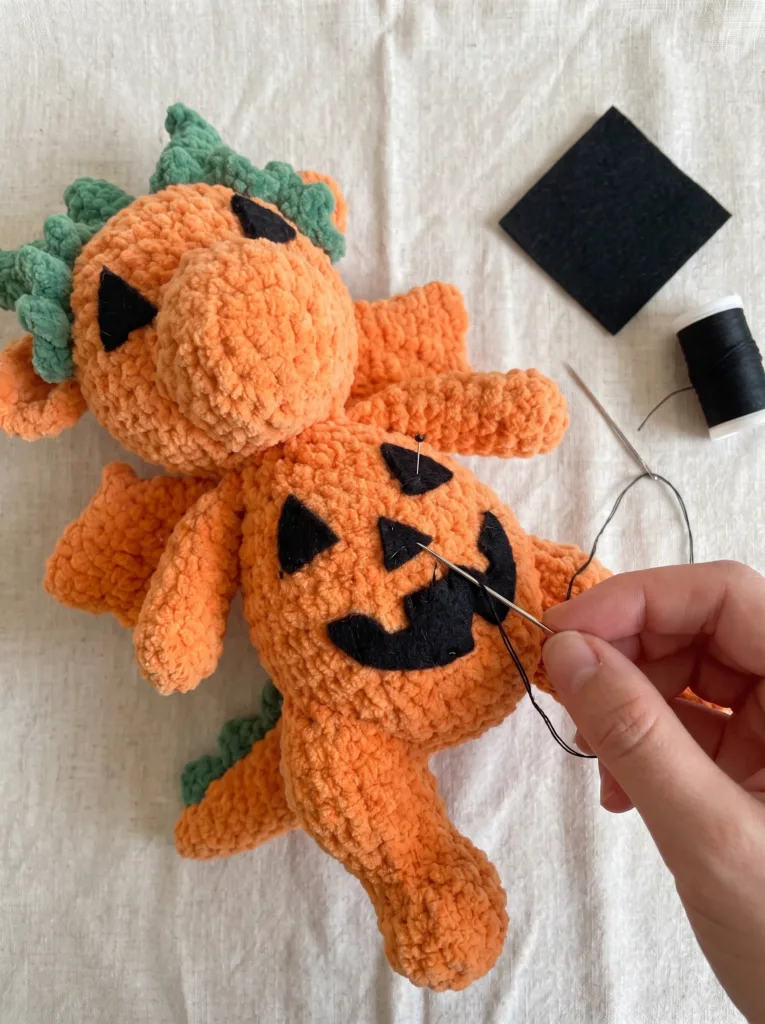
Reminder: felt pieces are glued-appearance but sewn (not glued) here — even sewn felt is still a small, detachable piece over time, so this face treatment is for display pieces and older children/adults, not babies or toddlers. See the safety note above for the baby-safe alternative.
Putting Him Together
Sew the head to the body. Attach the rear legs to the underside for a stable stance, and the front arms up higher on the sides. Sew the tail to the back base of the body. The wings go on the back, flanking the spine, right at the shoulder line. Work the spine ridge last, over all the seams, so it reads as one continuous line. Horns go on last of all, then the felt face.
Finishing Touches
If the wings curl inward from handling all the stuffing pressure elsewhere, a light steam sets them flat again. Trim and hide all your yarn tails inside the body cavity before you close up the last seams.
A Few Ways to Make Him Your Own
I already have a few variations rattling around in my head:
- Swap the orange and green for red/gold or green/brown if you want a dragon that isn’t tied to Halloween
- Skip the felt face and embroider simple sleepy eyes instead for a year-round version
- Tuck a small rattle in before you finish stuffing for a baby-safe toy — just use safety eyes instead of felt in that case, per the safety note above
FAQs About This Pattern
How long does this crochet dragon take to make?
Most of us finish this in 4–6 hours of active work, usually split across two sessions — one for the head, body, and legs, and a second for the smaller detail pieces (horns, wings, spine, face) and assembly.
Is this pattern good for a beginner?
It’s better suited to someone with a little amigurumi experience already — comfortable with magic ring, increases, and decreases. Dragons are widely considered one of the more difficult animals to crochet because of the sheer number of pieces, so if this is your very first project, I’d try a simpler round animal first and come back to him.
What yarn works best for this pattern?
Bulky chenille (like Bernat Blanket or similar) gives the soft, plush look shown here. A basic acrylic worsted weight will also work but will show more stitch definition and produce a slightly smaller, firmer finished dragon.
How do I choose the right hook size for a dragon project?
Match your hook to your yarn weight first — G/4.0mm for bulky chenille — then check your own tension: hold a swatch up to the light, and if you can see through it, size down one hook so stuffing won’t show later.
Can I use a smaller or larger hook?
Yes — sizing up or down will scale the whole dragon. Just make sure your fabric stays dense enough that stuffing doesn’t peek through.
How much yarn do I need in total?
Roughly 150 yards of orange and 40 yards of green for the size shown, plus a small scrap of black felt for the face.
Can I sell finished dragons made from this pattern?
Yes — finished, handmade items from this pattern may be sold. The written pattern itself may not be republished, resold, or redistributed in any form.
My horns keep flopping instead of curving. What went wrong?
Make sure you’re twisting the curly horn at the halfway point before fastening off — that twist is what locks the curve in. I forgot this myself the first time I made one and ended up with a very sad, straight horn. If it still relaxes after twisting, stuff it lightly before sewing to give it internal support.
Can I make this without felt, for a baby-safe version?
Yes — and I’d recommend it. Swap the felt face for embroidered eyes and nose using satin stitch, or use safety eyes rated for the intended age group instead of felt appliqué. As written, with the felt face and small horn pieces, this dragon isn’t appropriate for babies or toddlers — see the safety note earlier in this post for the full list of adjustments I’d make.
The wings look floppy once stuffed — how do I fix that?
These wings aren’t stuffed; they’re a single flat layer, so a little droop is normal. If it bothers you, work them in a slightly smaller hook than the body for a firmer fabric, or add a light wire along the base before sewing on.
Can I resize this into a smaller keychain or larger lovey version?
Yes — to scale down, use a smaller hook and thinner yarn throughout; to scale up, size up the hook and use a bulkier yarn, keeping all pieces in the same weight for consistent proportions.
You’re welcome to sell finished dragons made from this pattern. Please don’t republish or redistribute the written pattern itself.
© Maria Lynn — Crochet Corner, Savorgastronomy. All rights reserved.