
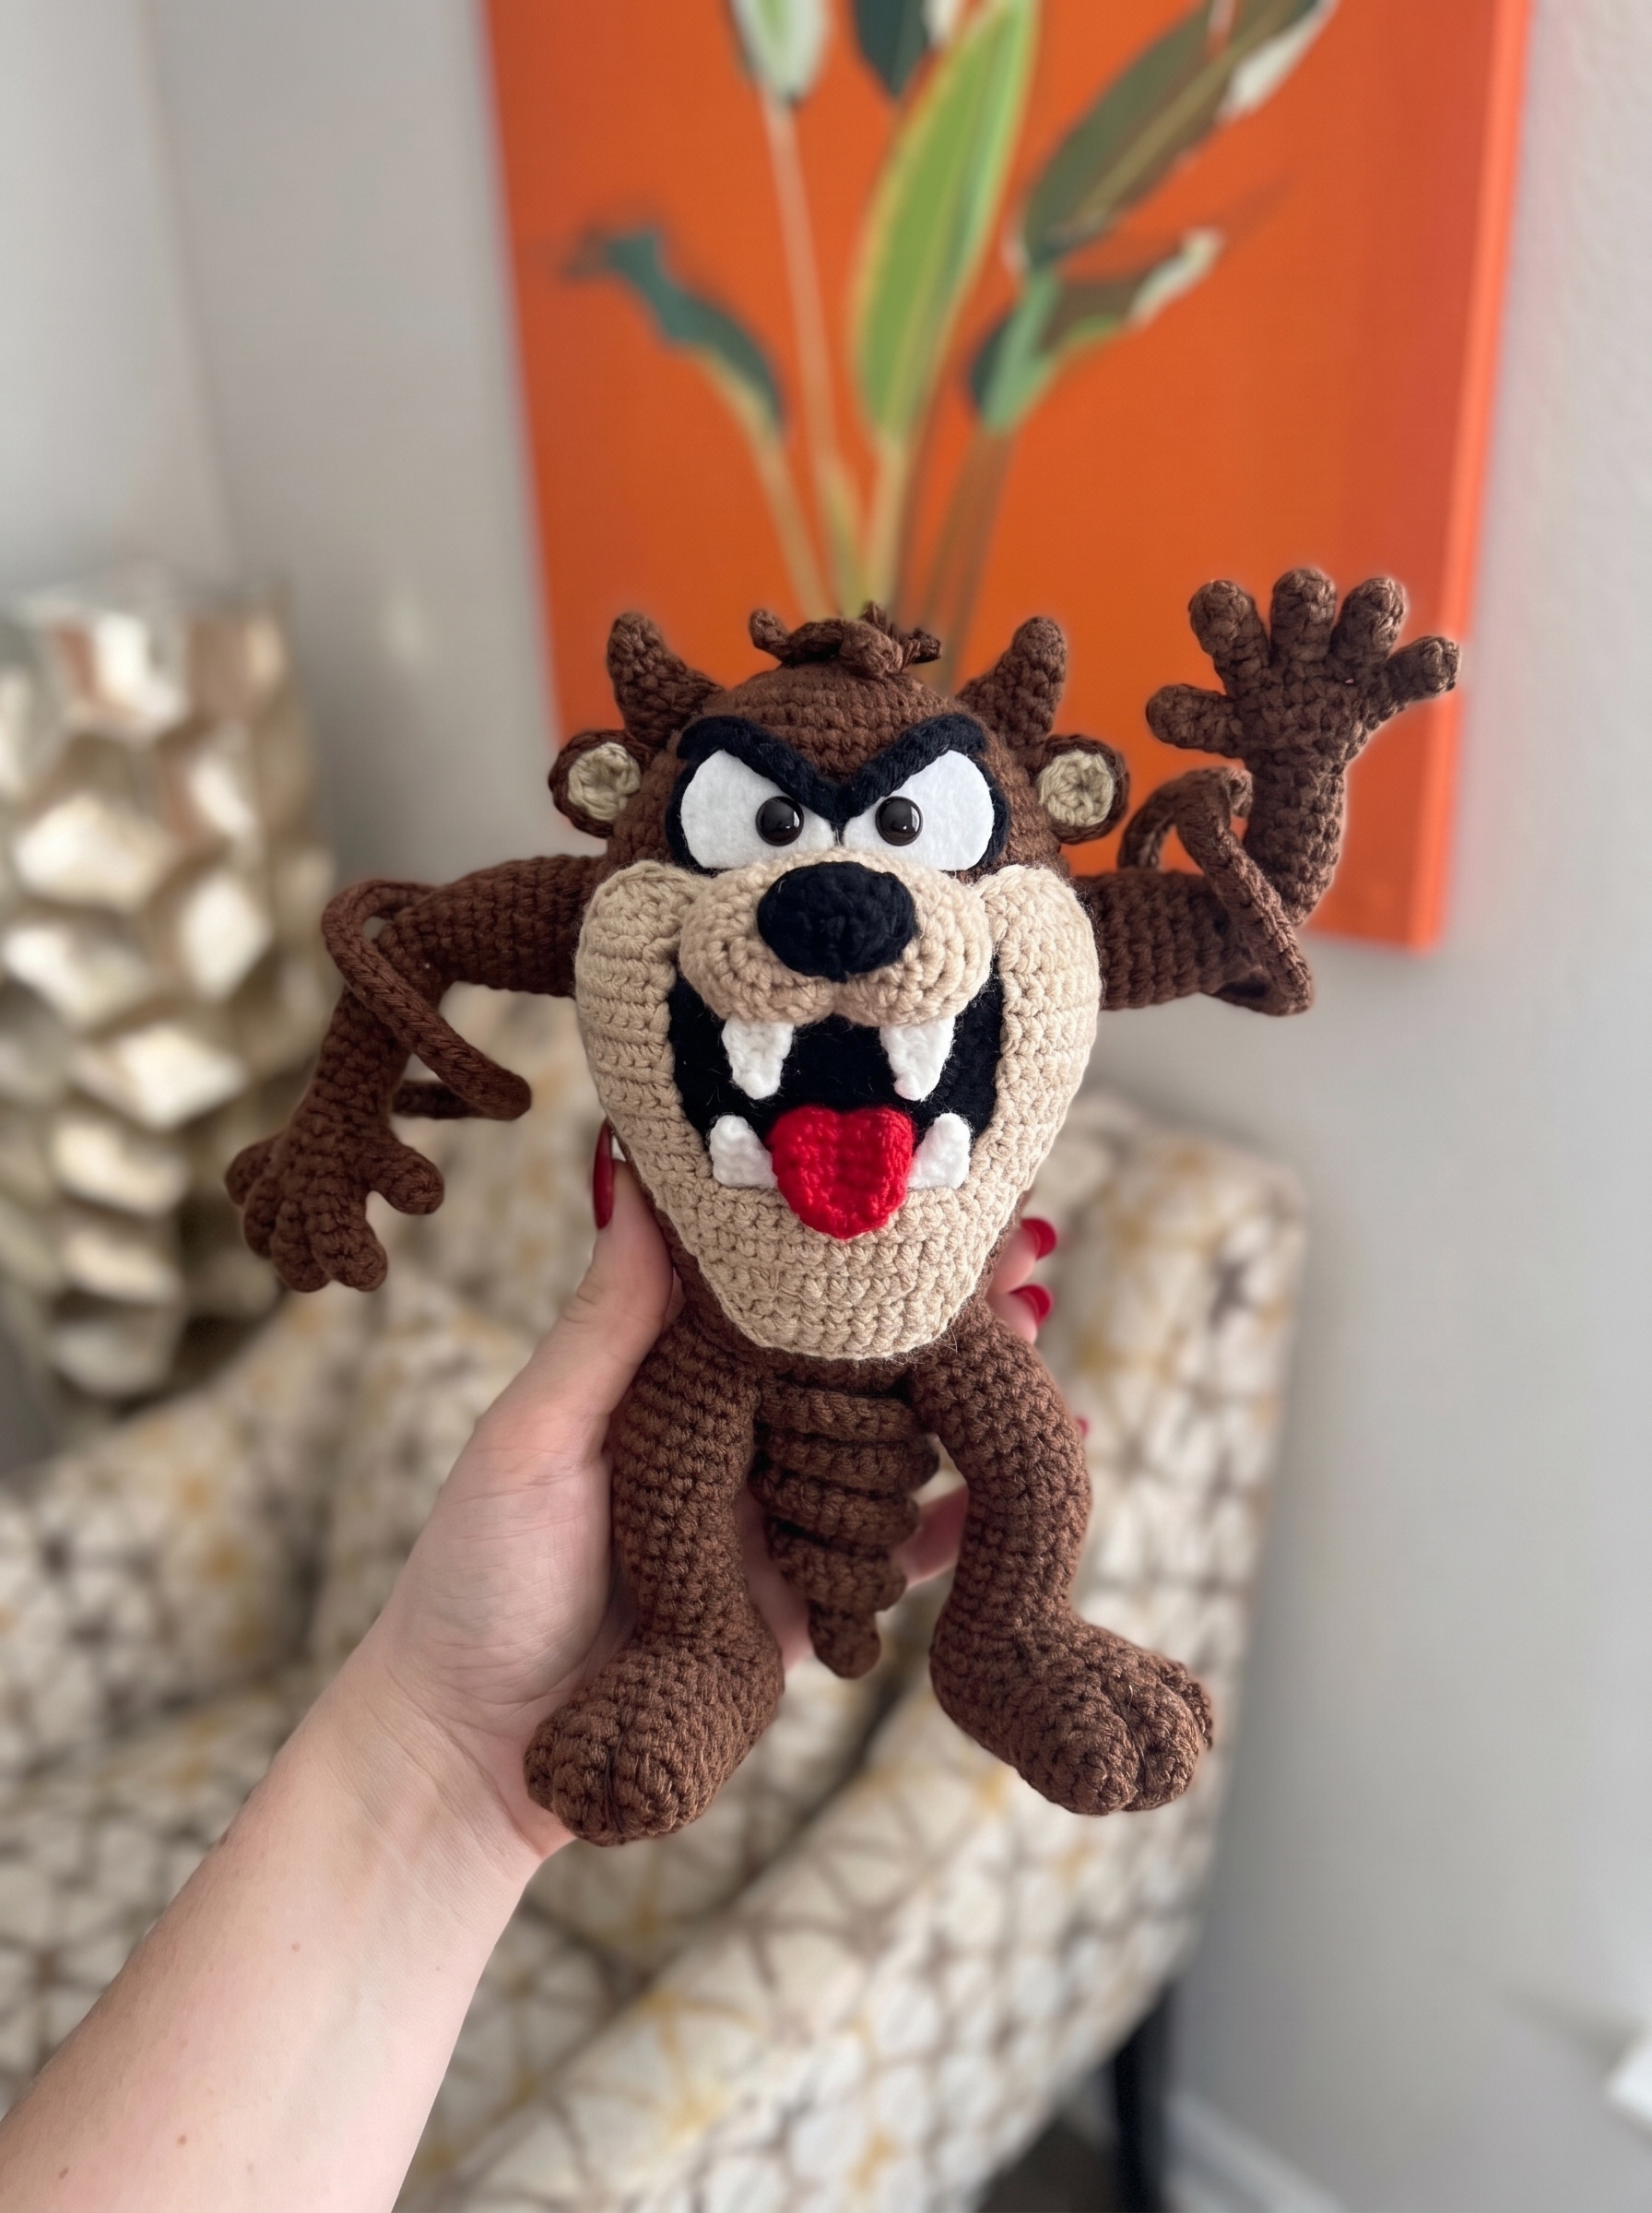
Some crochet projects just hit differently…
I remember watching characters like this one as a kid: wild, funny, always causing trouble. Now seeing him recreated with nothing but yarn and a crochet hook feels like bringing a little piece of those childhood memories back to life.
Every stitch takes time, but that’s what makes handmade crochet so special. It isn’t just yarn… it’s a memory you can hold in your hands. ❤️
That’s the spirit behind the Saturday Morning Scamp, a tiny, wild-haired, wide-grinning keychain amigurumi with the chaotic, lovable energy so many of us grew up with on Saturday mornings. He is small enough to finish in a weekend, and he makes a great bag charm, backpack buddy, or gift for a friend who shares your nostalgia.
Quick Project Details
- Skill level: Confident beginner to intermediate (you’ll need magic ring, decreases, and changing color in the round)
- Finished size: About 12 cm (4.7 in) tall
- Time: Roughly 4–6 hours, depending on how much embroidery you add
- Pattern terms: US crochet terms
Materials
- Bernat Softee Baby yarn (100% acrylic, sport weight #2) in brown and beige. One skein of the main color is plenty. Alternative: WeCrochet Brava Sport, also 100% acrylic sport weight.
- Small amounts of black and white yarn or embroidery floss for facial details
- 2.5 mm crochet hook
- Polyester fiberfill
- 2 small black beads (pupils)
- Scraps of white and black felt or fabric (eye triangles)
- Pipe cleaners (to pose the arms and legs)
- Yarn/tapestry needle, scissors, fabric glue
- Keychain clasp and jump ring
Color Note: This pattern is shown in classic brown and beige, but feel free to use any colors you love. This little guy looks great in almost any palette.
Abbreviations
| Abbreviation | Meaning |
|---|---|
| MR | Magic Ring |
| sc | Single Crochet |
| inc | Increase (2 sc in the same stitch) |
| dec | Decrease (see invisible decrease below) |
| ch | Chain |
Crochet Techniques Used in This Pattern
You don’t need advanced skills for this keychain, but a few techniques make the finished piece look much neater. Here is what to know before you start.
Magic Ring (MR)
Almost every piece here starts with a magic ring. It gives you a closed center with no hole, which matters on a small toy where stuffing could show through. After working your first round of sc, pull the tail firmly to close the ring completely, then weave the tail in.
Invisible Decrease
For every “dec” in this pattern, insert your hook into the front loop only of the next two stitches, yarn over, pull through both loops, yarn over, and pull through the remaining two loops. This pulls the shaping inward instead of leaving a visible gap, and it keeps the fabric smooth around the body, head, and hands.
Working in a Continuous Spiral
The body, head, ears, and limbs are worked in continuous rounds. Don’t join and don’t turn. Use a stitch marker in the first stitch of each round so you never lose your place.
Changing Color in the Round
The ears are worked in two colors. Switch to the new color on the last yarn-over of the final stitch in the old color, and carry the unused yarn loosely on the inside of the piece. Keep your tension even so the color split stays crisp.
Working Flat in Rows
The snout and belly are worked back and forth. Chain 1 and turn at the end of each row (the turning chain does not count as a stitch). Tidy the edges with a final round of sc.
Stuffing and Posing
Stuff firmly but evenly, using small pieces of fiberfill and pushing them into the corners with the end of your hook. For the arms and legs, flatten the piece, stuff only the hand or foot, and insert a trimmed pipe cleaner folded over at the tip so no sharp end touches the yarn. This is what lets him hold a “mid-chaos” pose.
Surface Embroidery
The nose, fangs, and finger and toe divisions are all added by stitching. Use short straight stitches and satin stitch, and anchor your thread inside the piece so it won’t pull loose.
The Pattern
Body (brown)
- Rnd 1: MR, 6 sc. (6)
- Rnd 2: Inc in each st around. (12)
- Rnd 3: (1 sc, inc) x6. (18)
- Rnd 4: 18 sc.
- Rnd 5: (2 sc, inc) x6. (24)
- Rnd 6: 24 sc.
- Rnd 7: (3 sc, inc) x6. (30)
- Rnd 8: 30 sc.
- Rnd 9: (4 sc, inc) x6. (36)
- Rnd 10: 36 sc.
- Rnd 11: (5 sc, inc) x6. (42)
- Rnd 12: 42 sc.
- Rnd 13: (6 sc, inc) x6. (48)
- Rnds 14–17: 48 sc, 4 rounds even. (48)
- Rnd 18: (6 sc, dec) x6. (42)
- Rnd 19: (5 sc, dec) x6. (36)
- Rnd 20: (dec) x18. (18)
- Rnd 21: (dec) x9. (9). The head attaches here.
Head (brown)
- Rnd 1: MR, 6 sc. (6)
- Rnd 2: Inc around. (12)
- Rnd 3: (1 sc, inc) x6. (18)
- Rnd 4: (2 sc, inc) x6. (24)
- Rnds 5–9: 24 sc, 5 rounds even. (24)
Snout (beige)
- Row 1: Ch 4.
- Row 2: 2 sc, inc, 2 sc, inc. (8)
- Row 3: 3 sc, inc, 3 sc, inc. (10)
- Row 4: 5 sc, 2 inc, 5 sc, 2 inc. (18)
- Row 5: 18 sc. Stuff lightly before sewing on, and embroider the small black nose here.
Ears (make 2: brown + beige, beige facing forward)
- Rnd 1: MR, 6 sc in brown. (6)
- Rnd 2: 3 inc brown, 3 inc beige. (12)
- Rnd 3: (1 sc, inc) x3 brown, (1 sc, inc) x3 beige. (18)
- Rnds 4–6: 9 sc brown, 9 sc beige, 3 rounds even. (18)
Legs (make 2, brown)
- Row 1: Ch 5.
- Row 2: (4 sc, inc) x2. (12)
- Row 3: (4 sc, 2 inc) x2. (16)
- Row 4: (6 sc, 2 inc) x2. (20)
- Row 5: (8 sc, 2 inc) x2. (24)
- Row 6: 24 sc.
- Row 7: 7 sc, 3 dec, 11 sc. (21)
- Row 8: 5 sc, 3 dec, 10 sc. (18)
- Row 9: 3 sc, 3 dec, 9 sc. (15)
- Row 10: 3 sc, 2 dec, 7 sc. (12)
- Row 11: 12 sc.
- Row 12: 4 sc, 2 dec, 4 sc. (10)
- Row 13: work even at 10 sc for 10 rounds total. Flatten the foot, stuff lightly, and stitch toe divisions with needle and thread. Insert a trimmed pipe cleaner, then sew to the body.
Arms (make 2, brown)
- Rnd 1: MR, 6 sc. (6)
- Rnd 2: Inc around. (12)
- Rnd 3: (1 sc, inc) x6. (18)
- Rnds 4–6: 18 sc, 3 rounds even. (18)
- Rnd 7: 1 sc (in that same st, ch 8, turn and sc back across 7; fold this little strip and tack it to the half-stitch to form the thumb, which you’ll shape later with a needle and matching thread), then continue with the remaining 17 sc. (18)
- Rnds 8–9: 18 sc, 2 rounds even. (18)
- Rnd 10: (1 sc, dec) around. (12)
- Rnd 11: 4 sc, 2 dec, 4 sc. (10)
- Rnd 12: work even at 10 sc for 13 rounds total. Flatten the hand, stuff lightly, and stitch finger divisions, reinforcing the thumb. Insert a trimmed pipe cleaner.
Belly (beige, worked flat)
- Row 1: Ch 2.
- Row 2: 4 sc.
- Row 3: inc, 2 sc, inc. (6)
- Row 4: inc, 4 sc, inc. (8)
- Row 5: inc, 6 sc, inc. (10)
- Row 6: inc, 8 sc, inc. (12)
- Row 7: inc, 10 sc, inc. (14)
- Row 8: inc, 12 sc, inc. (16)
- Row 9: work even at 16 sc for 6 rows. Finish with one round of sc around the piece to soften the points and tidy the edge.
Hair Tufts
Ch 9, turn, sc back across 8. At the end of that strand, ch 9 again and sc back across 8. Repeat this “burst” 6–7 times, or as many as you like for extra volume.
Tail
Made from leftover scrap yarn with a crochet hook and tacked on at assembly.
Assembly
Attach all pieces to the body and head as shown in the photos. Embroider the small nose in beige with a few satin-stitch passes, and stitch the two little fangs in white. For the eyes, layer a white felt triangle over a black felt triangle on each side, and glue a small black bead to each one for the pupil. Add a jump ring and keychain clasp to the top of the head before the final stuffing.
Tips for a Neater Finish
- Use pipe cleaners generously in the arms and legs for a fun, mid-motion pose.
- Keep your tension even through the two-color ear rounds.
- Stuff the head and snout firmly so the face keeps its shape over time.
- Save all embroidery (nose, fangs, eyes) for after assembly. It’s much easier to get the expression right once you can see the whole face.
- A sport-weight acrylic keeps stitches small and neat, which matters at this scale.
- Test the clasp placement before final stuffing.
- If your stitches look loose or gappy, go down one hook size (2.25 mm) rather than pulling harder on the yarn.
Safety Note
This keychain contains small parts (beads, felt, pipe cleaners) and is a decorative accessory, not a toy for babies or children under 3. For a child-friendly version, skip the beads and pipe cleaners and embroider the eyes and fangs with yarn instead. Check that all seams and attachments are secure before gifting.
Frequently Asked Questions
Is this crochet keychain good for beginners?
It’s best for confident beginners. The pieces are small and the stitches are all basic single crochet, but you’ll need to be comfortable with a magic ring, decreases, and a simple color change. Work the body first. It’s the easiest piece and a good warm-up.
What yarn is best for amigurumi keychains?
A smooth, tightly plied yarn works best because the stitches stay defined at small sizes. Sport-weight acrylic such as Bernat Softee Baby or WeCrochet Brava Sport is a good choice. Avoid fuzzy or splitty yarns, which hide the stitch detail.
What hook size should I use for amigurumi?
Use a hook one or two sizes smaller than the yarn label suggests. Here that means a 2.5 mm hook with sport-weight yarn. A tighter fabric stops the stuffing from showing through.
How do I stop gaps from showing in my amigurumi?
Use a smaller hook, keep your tension firm, and use invisible decreases. Stuff in small pieces as you go rather than all at the end.
How do I make the arms and legs hold their pose?
Fold a pipe cleaner over at the tip so no sharp end touches the yarn, trim it to fit, and slide it into the flattened limb before sewing it on. Gently bend it into position once it’s attached.
How do I attach the keychain hardware?
Sew a jump ring to the top of the head with strong thread, running several passes through the yarn and the ring. Then clip on the keychain clasp. Check the stitching is secure before using it daily.
Can I sell items made from this pattern?
This pattern is a nostalgic fan tribute, so I share it for personal use and gifts. If you want to sell, I’d suggest changing the colors and details to make your own original character first.
Can I change the colors?
Absolutely. Any two or three colors work. Keep a strong contrast between the belly, ears, and body so the details stay readable.
Loved this pattern? Save it to Pinterest and tag Crochet Corner at savorgastronomy.com with your version. I’d love to see your own Saturday Morning Scamp!
Disclaimer
The Saturday Morning Scamp is an independent, fan-made crochet pattern created for personal, non-commercial enjoyment and nostalgia. It is not an official product, and it is not affiliated with, sponsored by, authorized by, or endorsed by any studio, brand, or rights holder.
All characters, names, and designs that may have inspired this pattern remain the property of their respective owners. No ownership of any character, trademark, or copyrighted work is claimed. The only thing I own is the written crochet instructions on this page, which I wrote myself and share out of love for the memories they bring back.
If you are a rights holder and have a concern about this post, please contact Crochet Corner through the contact page at savorgastronomy.com and we will respond promptly.
© 2026 Maria Lynn, Crochet Corner at savorgastronomy.com. All Rights Reserved.
The written pattern may not be copied, shared, translated, or resold, in part or in full, in print or digital form. My product photos may not be used to advertise or sell your own finished items. Please photograph your own work.