
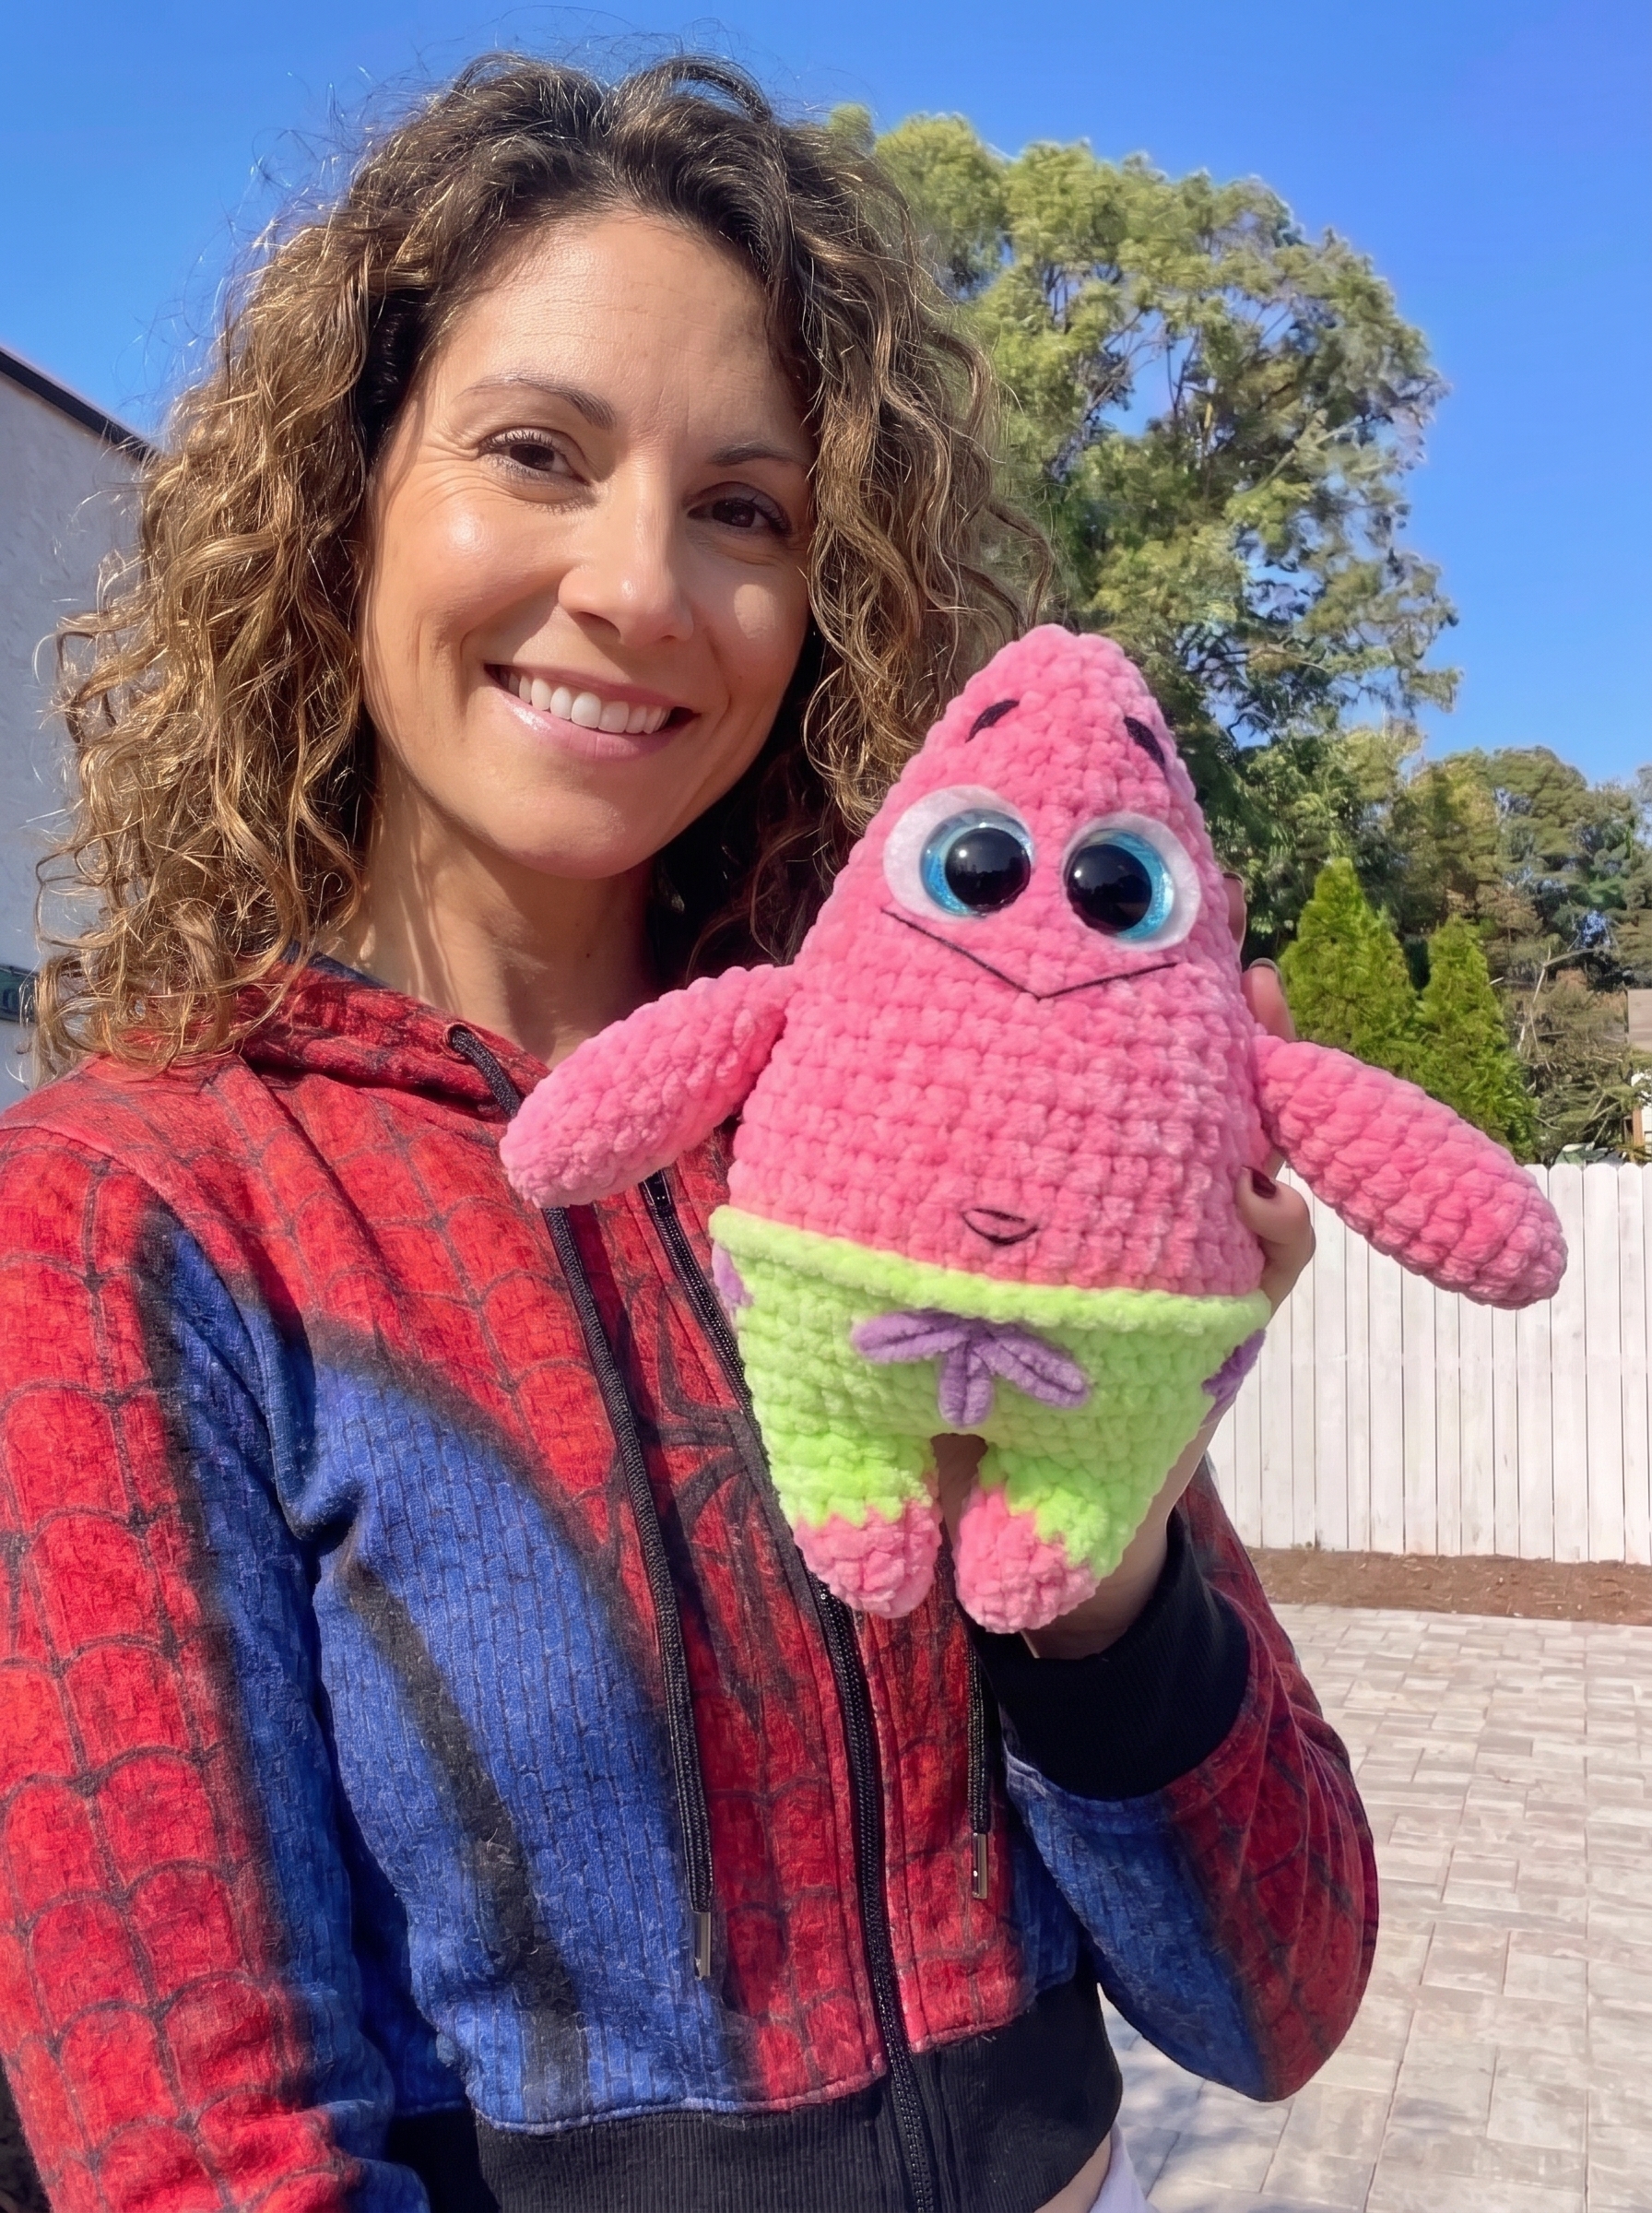
There’s a special kind of joy in finishing a project that makes you smile every time you look at it — and Starry the Sea Star is exactly that. This little plush has big sparkly eyes, a soft rounded body, and just enough personality to become someone’s new favorite cuddle buddy. It’s worked entirely in single crochet with simple increases and decreases, which makes it a genuinely great project if you’re newer to amigurumi and want to build confidence with shaping.
I designed Starry to be quick enough to finish in a weekend but detailed enough to feel like a real keepsake — the layered arms, legs, and simple embroidered face come together fast, and the final result punches well above its stitch count. Whether you’re making this for a nursery shelf, a birthday gift, or just because you love a good crochet weekend project, this pattern walks you through every single step.
A quick note on inspiration: this design is inspired by the classic look of a smiling pink sea star character that many of us grew up loving. It’s my own original interpretation, written from scratch with my own stitch counts and construction — I don’t claim any rights to, affiliation with, or ownership of any existing copyrighted or trademarked character. Think of Starry as a fun, personal nod rather than a recreation.
Size
The finished Starry comes out to approximately 22 cm (8.7 in) tall when made with the materials listed below. Want a bigger or smaller version? Simply size up or down your hook and yarn weight — the stitch counts will scale proportionally with a thicker or thinner yarn.
Safety Note: This amigurumi contains small parts, including safety eyes and stuffing, which can pose a choking hazard for children under 3 years old. It is intended as a decorative plush/collectible toy rather than a children’s toy. If making this for a young child, consider embroidering the eyes instead of using safety eyes, and ensure all pieces are sewn on extremely securely.
Materials
- Plush/velvet yarn:
- Main color — pink
- Light green
- Lilac or purple (small amount, for embroidery accent)
- (I use Himalaya Dolphin Baby textured yarn)
- 3.75mm crochet hook
- Polyester fiberfill stuffing
- 25mm safety eyes, flat style preferred
- Felt circles, 3 cm (30mm) diameter, for backing the safety eyes
- Yarn/tapestry needle, stitch marker, scissors
- Black thread for detailing (embroidery floss or thin yarn works well)
Skill level: Beginner-friendly (just single crochet, increases, and decreases)
Estimated time: 4–6 hours
Color Note
Feel free to swap in any colors you love! This pattern is shown in pink and green, but pastels, brights, or even a fully one-color version would all look adorable.
Abbreviations
This pattern is written in US terminology.
| Abbreviation | Definition |
|---|---|
| MR | Magic Ring |
| Sc | Single Crochet |
| Inc | Increase (2 sc in one stitch) |
| Dec | Decrease (sc2tog / 2 sc together) |
| Ch | Chain |
| Sl st | Slip Stitch |
The Pattern
Arms (make 2, stuff the lower part lightly)
Crochet in pink:
- Rnd 1: 6 sc in MR. (6)
- Rnd 2: (2 sc, inc) x2. (8)
- Rnd 3: (3 sc, inc) x2. (10)
- Rnd 4: (4 sc, inc) x2. (12)
- Rnds 5–9: 12 sc. (12) — 5 rounds
- Rnd 10: (4 sc, dec) x2. (10)
- Rnd 11: (3 sc, dec) x2. (8)
Fasten off and cut the yarn.
Legs (make 2, do not cut the yarn on the second piece)
Begin crocheting in pink:
- Rnd 1: 6 sc in MR. (6)
- Rnd 2: (2 sc, inc) x2. (8)
- Rnd 3: (3 sc, inc) x2. (10)
- Rnd 4: (4 sc, inc) x2. (12)
In light green:
- Rnds 5–6: 12 sc. (12) — 2 rounds
Joining the Legs & Body
Join to the first leg. Chain 3.
- Rnd 7: Work 12 sc across the first leg, 3 sc along the chain, 12 sc across the second leg, 3 sc along the chain. (30)
Place a stitch marker at the center back to keep track of your rounds.
- Rnd 8: (4 sc, inc) x6. (36)
- Rnd 9: (5 sc, inc) x6. (42)
- Rnds 10–13: 42 sc. (42) — 4 rounds
- Rnd 14: In pink, working in back loops only: 42 sc. (42)
- Rnds 15–19: 42 sc. (42) — 5 rounds
- Rnd 20: (5 sc, dec) x6. (36)
Attaching the arms: make sure the arms are placed evenly on both sides before you continue — shift stitches as needed to line them up.
- Rnd 21: 7 sc, 4 sc with arm attached, 13 sc, 4 sc with arm attached, 8 sc. (36)
Shaping the Body (stuff as you go)
- Rnd 22: 36 sc. (36)
- Rnd 23: (4 sc, dec) x6. (30)
- Rnds 24–25: 30 sc. (30) — 2 rounds
- Rnd 26: (3 sc, dec) x6. (24)
- Rnds 27–28: 24 sc. (24) — 2 rounds
Insert the safety eyes between rounds 25 and 26, spaced 4 sc apart from each other. If you’re using felt circle backings, poke a small hole through each circle with your scissors and thread the eye post through before securing.
- Rnd 29: (2 sc, dec) x6. (18)
- Rnd 30: 18 sc. (18)
- Rnd 31: (4 sc, dec) x3. (15)
- Rnd 32: (3 sc, dec) x3. (12)
- Rnd 33: (Dec) x6. (6)
Pull the opening closed and fasten off, weaving in the yarn end.
Finishing the Collar
Working into the remaining front loops of round 14, work 42 sl st all the way around. This creates a clean, defined line between the pink body and the green “shorts” section.
Face & Embroidery Details
- Embroider with purple thread — add a small flower or star accent to the front of the green section, just below the collar.
- With black thread, embroider the mouth and the belly button.
- With black thread, embroider the eyebrows using 2 stitches each, angled slightly for a friendly, expressive look.
Tips for Making Starry
- Stuff firmly but evenly — amigurumi holds its shape best when the fiberfill is packed consistently, without lumps or soft spots.
- Use a stitch marker religiously through the increase rounds; it’s easy to lose track of where a round starts once you’re past round 20.
- When attaching the arms in Round 21, lay the piece flat first and eyeball the placement before committing — small asymmetries are much easier to fix before you crochet over them.
- Safety eyes look best placed slightly closer together than you might expect — try holding them in place with stitch markers first and stepping back to check the expression before snapping them in.
- A plush/velvet yarn (like the Himalaya Dolphin Baby used here) gives this piece its soft, huggable texture — a smooth cotton yarn will still work, but the finished look will read more “classic amigurumi” than “plush toy.”
- Keep your embroidery stitches loose rather than pulled tight — it keeps the face looking soft rather than pinched.
- This is a wonderful stash-buster project if you have small amounts of leftover pink, green, and purple yarn sitting around.
Notes & Variations
Color variation: try an ocean-inspired palette (blues and teals) for a true sea star look, or go bold with a color you love — this pattern is forgiving and works in nearly any combination.
Size variation: switching to a bulkier yarn and larger hook will give you a bigger, cuddlier version — great for a nursery centerpiece.
Inspiration note: to repeat from the introduction — Starry is my own original design and construction, inspired by a beloved pink sea star character’s general silhouette and cheerful expression. This is a fan-inspired personal project, not an official or licensed product, and I don’t claim any ownership over any existing copyrighted character.
About This Pattern
This pattern was designed and written by me, Maria Lynn, for Crochet Corner in our Family Blog Savorgastronomy. All text, photos, and instructions in this document are protected by copyright.
Loved this pattern? Find more like it in the Crochet Corner, and save this post to Pinterest so you can find it again. Happy crocheting!