
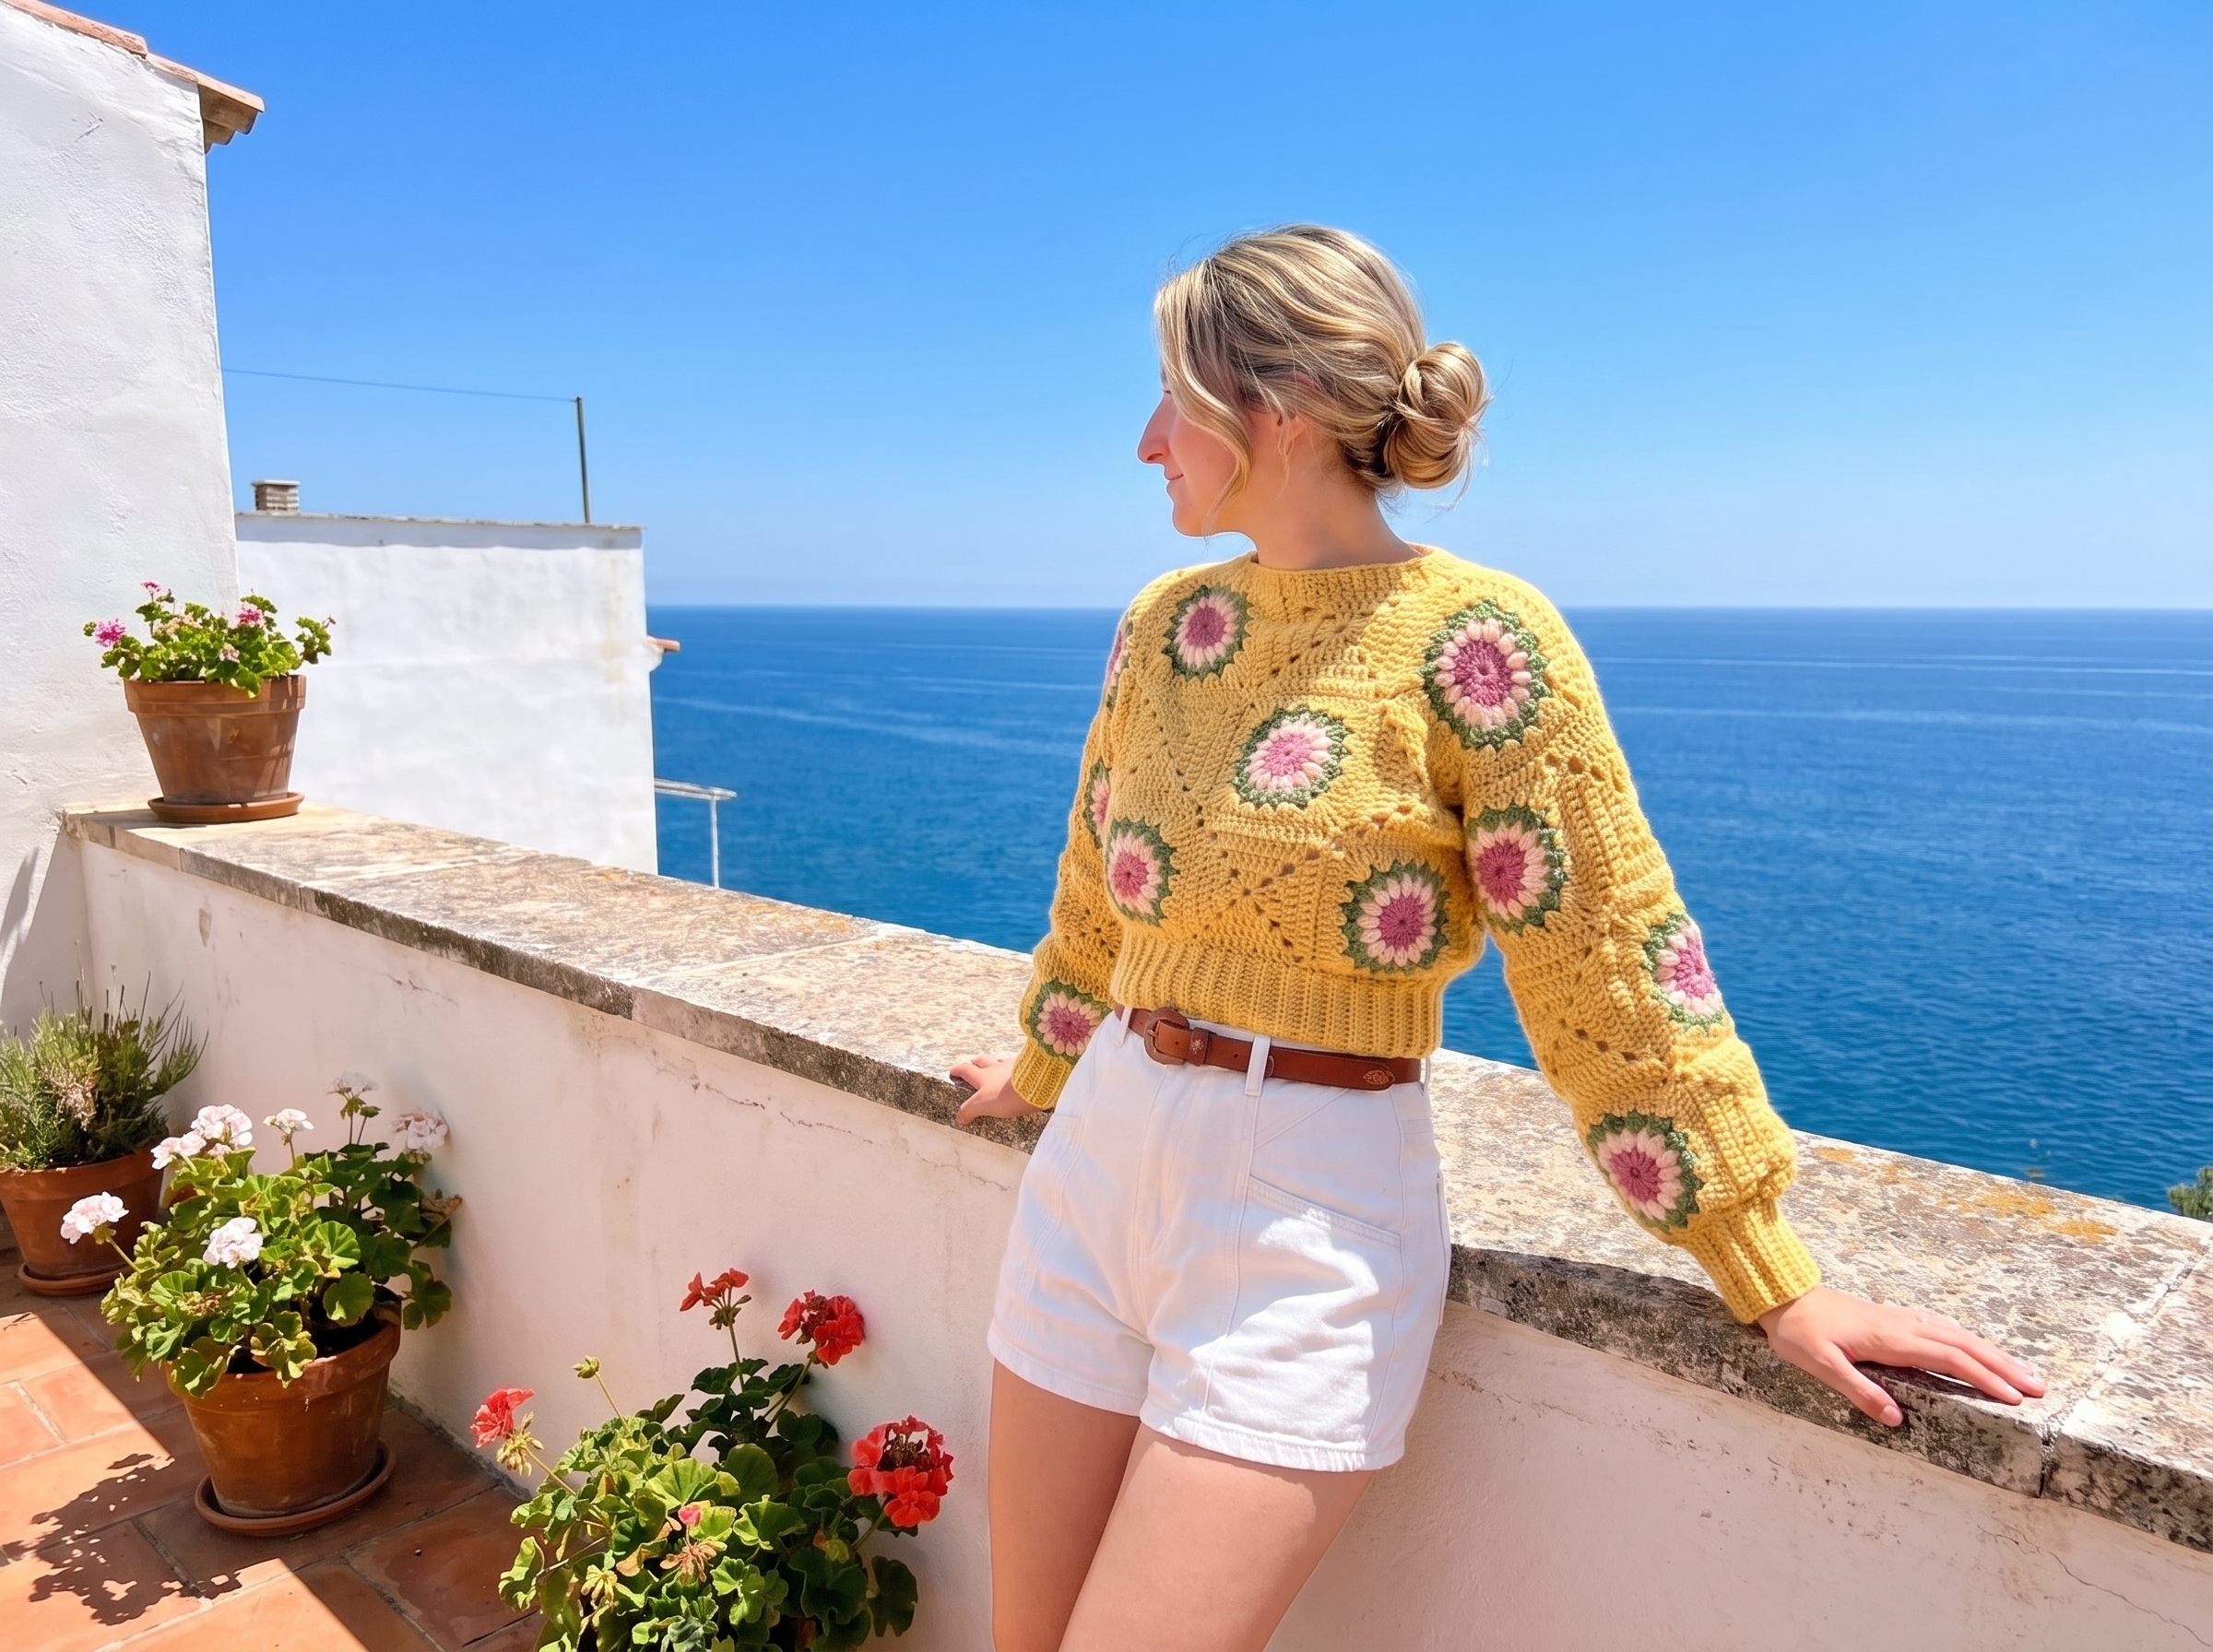
What better way to fulfill your patchwork dreams than by making a sweater with two different kinds of squares? The Blooming Meadow Sweater is cropped, colorful, and calming in its construction. I designed this sweater with the intent of making it hard to mess up; beginners can practice their crocheting while making squares, then learn a little about garment construction while becoming their own assembly line to finish the sweater. All crocheters, regardless of skill level, will find joy in exploring this pattern’s infinite color combo possibilities while also being flattered by the cinched waist and cuffs.
Here’s a secret: this cropped sweater pairs fabulously with high-waisted shorts for sneaking through a flower patch into a forest, or with your favorite pair of jeans for laid-back lounging.
If you’re new to reading patterns, choosing yarn, or need a refresher on stitches and seaming, check out these guides first:
- How to Read a Crochet Pattern: A Beginner’s Guide to Abbreviations, Sizing & Stitch Counts
- Crochet Garment Materials 101: Yarn, Hooks, Gauge & Sizing Explained
- Essential Crochet Techniques for Garment-Making: Seaming, Stitches & Assembly Tips
Part 1: Materials
Yarn
Worsted weight/size 4 yarn in 4 colors, 940–2175 total yds (862–1991 m). See specific yardage amounts for each size in the pattern’s size chart below.
Shown In
Hobbii Amigo XL in the following colors:
- Color 1: Light Lilac
- Color 2: Ecru
- Color 3: Dusty Green
- Color 4: Hunter Green
📝 Note on Color: The colors listed above are simply what I used for my sample — you are absolutely not limited to them! As you can see from the photos, this pattern looks beautiful in countless color combinations, from soft pastels to deep jewel tones. Feel free to swap in whatever colors you love or already have in your stash. Just keep in mind:
- Color 1, 2, and 3 are used for the Starburst and Filled Granny Squares (the flower motifs), so pick colors that contrast nicely with each other to make the “flower” pop.
- Color 4 is your main background/ribbing color and typically the color you’ll see the most of, so choose one you’d be happy wearing as the dominant shade.
There’s no wrong choice here — make it yours! 🌸
Want me to insert this directly into the file, or do you want to place it yourself?
Hook
US H/8 (5 mm) or size needed to obtain gauge
Notions
- Tapestry needle
- Scissors
Gauge
4 x 4″ (10 x 10 cm) = 15 sts and 7.5 rows in double crochet
For swatch: Ch 21.
Row 1: Dc in 3rd st from hook (skipped sts count as dc) and in each st across, turn. [20 dc]
Rows 2–10: Ch 2 (counts as first dc), dc in each st across, turn.
Block your swatch if you plan on blocking your garment. Measure the inner 4 inches (10 cm) of your blocked swatch to get the most accurate measurement.
Part 2: Sizing Chart
This chart shows the finished garment measurements. This sweater is designed to be worn with up to 8 inches (20 cm) of positive ease, depending on the size you are making. For reference, the model is 5 feet, 4 inches (165 cm) tall with a 36″ (91 cm) chest and 11″ (28 cm) upper arm measurements, and is wearing a size 2 with 4″ (10 cm) of positive ease. If between sizes, size up, or refer to Customized Sizing to get the perfect fit.
Pattern sizes are written as 1 (2, 3, 4, 5). These sizes align with XS (M, XL, 3X, 5X) in the United States.
| Measurement | Size 1 | Size 2 | Size 3 | Size 4 | Size 5 |
|---|---|---|---|---|---|
| Finished chest circumference | 30″ / 76 cm | 40″ / 102 cm | 50″ / 127 cm | 60″ / 152 cm | 70″ / 178 cm |
| Total length measured from tops of shoulders | 18″ / 46 cm | 18″ / 46 cm | 23″ / 58 cm | 28″ / 74 cm | 28″ / 74 cm |
| Sleeve length measured from underarm | 18″ / 46 cm | 18″ / 46 cm | 18″ / 46 cm | 13″ / 33 cm | 13″ / 33 cm |
| Upper arm circumference | 15″ / 38 cm | 15″ / 38 cm | 15″ / 38 cm | 20″ / 51 cm | 20″ / 51 cm |
| Wrist circumference | 8″ / 20 cm | 8″ / 20 cm | 8″ / 20 cm | 10″ / 25 cm | 10″ / 25 cm |
| Yardage required (Color 1, Color 2, Color 3, Color 4, Ribbing) | 50, 90, 150, 510, 140 | 65, 115, 175, 610, 160 | 80, 140, 220, 845, 205 | 95, 170, 260, 1125, 255 | 120, 195, 305, 1260, 295 |
| Total yardage required | 940 | 1125 | 1490 | 1905 | 2175 |
| Meters required (Color 1, Color 2, Color 3, Color 4, Ribbing) | 46, 83, 138, 467, 128 | 60, 106, 160, 558, 147 | 74, 128, 202, 773, 188 | 87, 156, 238, 1029, 234 | 110, 179, 279, 1153, 270 |
| Total meters required | 862 | 1031 | 1365 | 1744 | 1991 |
| Number of Starburst Squares you’ll make | 20 | 22 | 30 | 38 | 44 |
| Number of Filled Granny Squares you’ll make | 16 | 20 | 28 | 38 | 42 |
Abbreviations in US Crochet Terms
- blo: back loops only
- ch: chain
- dc: double crochet
- sc: single crochet
- st/sts: stitch/stitches
Part 3: Customized Sizing
The Blooming Meadow Sweater consists of four panels: two for the body and two for the sleeves. Since it is a patchwork design, it is a bit more complicated to change the sizing without changing the look, but here are a few suggestions!
For example, for size 2, there are two body panels that are 20 inches (51 cm) wide each for a total chest circumference of 40 inches (102 cm). Since each square is 5 x 5 inches (13 x 13 cm), adding 2 squares to each panel’s width to change the chest circumference gets you to the next size up.
So, to change the panel width, once you’ve assembled the panels together, you can add rows of your preferred stitch — sc, hdc (half double crochet), dc and so on — to the sides of the panels to add width before sewing them together. For example, you can add 1 inch (2.5 cm) to each side of both body panels, which would add 2 inches (5 cm) per body panel and thus 4 inches (10 cm) total. (Learn how to add length to squares that are already stitched together in the Essential Crochet Techniques guide, under Adding Length to Rows of Squares.) You can do the same for the upper arm circumference!
To change the panel length, apply the same principles, but add the rows to the top or bottom of your panel instead of to the sides. You can also make the ribbing longer or shorter; across all sizes, the ribbing is 3 inches (8 cm) long.
Part 4: Base Squares
The recommended squares are the Starburst Granny Square and the Filled Granny Square (both covered in detail in Essential Crochet Techniques for Garment-Making). You can use any square you like that measures 5 x 5 inches (13 x 13 cm).
Refer to the sizing chart above to see how many squares you’re making in total of each kind, and complete that many. This is the longest step, but you can do it!
Part 5: Ribbing
Body Ribbing
With color 4, ch 15.
Row 1: Sc in 2nd ch from hook (skipped ch does not count as a stitch) and in each ch to end of row. You should now have 14 sts.
Row 2: Ch 1, turn, sc in blo in each st across.
Repeat row 2 until your ribbing is 25 (30, 40, 50, 60)” / [63.5 (76, 102, 127, 152) cm] long unstretched. This will give your waistband a cinched-in effect. You can lengthen the band by 5–10″ (13–25 cm) to get a looser, more relaxed effect at the hem if you like.
Cuff Ribbing
Repeat instructions as for body ribbing until your ribbing is 8 (8, 8, 10, 10)” / [20 (20, 20, 25, 25) cm] long unstretched. This will give your sleeve cuffs a cinched-in effect. Lengthen the ribbing by 5–10″ (13–25 cm) if you don’t want a cinched-in effect. Repeat for a second cuff.
Part 6: Beginning Assembly
In each panel, your squares are stitched into vertical columns, then each column is stitched one by one into a panel. If your column is one Starburst square, then one Filled Granny Square, then one Starburst, it will be written as: “Column 1: Star, granny, star.”
I recommend the Whip Stitch Method for all seaming (covered in Essential Crochet Techniques for Garment-Making). I used color 4 for all seaming. Make sure you always seam with the wrong sides facing out. Let’s look at how we put it all together!
Body Panels (make two)
For all sizes, the front and back panels are the same, so you’ll be doing this twice!
Size 1
- Column 1: Star, granny, star.
- Column 2: Granny, star, granny.
- Column 3: Star, granny, star.
Size 2
- Column 1: Star, granny, star.
- Column 2: Granny, star, granny.
- Column 3: Star, granny, star.
- Column 4: Granny, star, granny.
Size 3
- Column 1: Star, granny, star, granny.
- Column 2: Granny, star, granny, star.
- Column 3: Star, granny, star, granny.
- Column 4: Granny, star, granny, star.
- Column 5: Star, granny, star, granny.
Size 4
- Column 1: Star, granny, star, granny, star.
- Column 2: Granny, star, granny, star, granny.
- Column 3: Star, granny, star, granny, star.
- Column 4: Granny, star, granny, star, granny.
- Column 5: Star, granny, star, granny, star.
- Column 6: Granny, star, granny, star, granny.
Size 5
- Column 1: Star, granny, star, granny, star.
- Column 2: Granny, star, granny, star, granny.
- Column 3: Star, granny, star, granny, star.
- Column 4: Granny, star, granny, star, granny.
- Column 5: Star, granny, star, granny, star.
- Column 6: Granny, star, granny, star, granny.
- Column 7: Star, granny, star, granny, star.
Now, lay your columns out in order and seam them together one by one into a panel. Repeat for a second panel. Congrats, you’ve completed most of the assembly!
Sleeve Panels (make two)
The same column, layout, and stitching rules for the body panels apply to the sleeve panels!
Sizes 1, 2 and 3
- Column 1: Star, granny, star.
- Column 2: Granny, star, granny.
- Column 3: Star, granny, star.
Sizes 4 and 5
- Column 1: Star, granny, star, granny.
- Column 2: Granny, star, granny, star.
Now, lay your columns out in order and whip stitch them together one by one into a panel. Repeat for a second panel!
Part 7: Assembly
Neck Shaping
Place a stitch marker in the exact middle of the top of one of your body panels. Measure 4 inches (10 cm) out from either side and place two stitch markers in those spots so they’re 8 inches (20 cm) apart.
Align the top of your other body panel to the top of this one.
Using color 4, attach your yarn to the outer edge of the top row of one of your body panels. Seam the two panels together until you hit a stitch marker and fasten off. Repeat on the other side of the panel. These are your shoulder seams.
To finish off the neckline, you have two options:
Option 1 — Classic neckline: Attach your yarn to any point on the neck opening. Sc around the opening for one round, then slip stitch into your first sc, and fasten off.
Option 2 — Folded turtleneck: Work the ribbing instructions as you did for the body ribbing with an initial chain of 25, until your ribbing is 16 inches (41 cm) long. Seam the ribbing onto your neckline. Once fully attached, sew up the ribbing to close it, then double knot the yarn to fasten off. Fold it over to create the folded turtleneck look! You can sew the ribbing down to the neck opening to make the fold secure if you like.
Attaching the Sleeves
Place a stitch marker in the exact middle of the top of one of your sleeve panels. For sizes 1, 2 and 3, the middle can go on any side of the panel, so the stitch marker will have 1.5 squares on each side. For sizes 4 and 5, this will go on the side of the panel that’s 4 squares long, so the stitch marker will have 2 squares on each side.
Align this stitch marker with the outer edge of one of your shoulder seams.
Seam the sleeve onto the body starting from the outer edge of the top of the sleeve panel. Make sure to do this loosely, since you don’t want to make the arm seam too tight. The stitch marker should align with the body’s shoulder seam as you’re going along the length. Fasten off once you’re finished. Repeat on the other side.
Finishing the Body
Fold the sweater in half. Starting on the outer edge of the sleeve and using a matching yarn color, sew the sleeve closed going toward the body using whip stitch, then sew down the body going toward the bottom hem. Repeat on the other side.
Attaching the Ribbing
Sleeve cuffs: Attach a 30-inch (76-cm) length of yarn in color 4 to the outer edge of your cuff ribbing and seam it on. (To learn how to attach ribbing to a garment, see Sewing on Ribbing in Essential Crochet Techniques for Garment-Making.)
Body ribbing: Your body ribbing is shorter than your garment’s total circumference. To sew it on, attach a 40–80-inch (102–203-cm) length of yarn in color 4 to your ribbing, then seam the ribbing onto the bottom body hem starting at any point. Repeat the pattern of 1 body stitch into one ribbing stitch, 2 body stitches into one ribbing stitch from * to * all the way around. This method may need some fussing, but it’s worth the trial and error!
Weave in all ends, and congratulations! You’re finished! 🌸