
This guide covers every seaming method, stitch, and assembly technique used across my garment patterns — including the Starburst and Filled Granny Squares that show up in many of my patchwork designs. Bookmark this one; you’ll come back to it often!
If you’re just getting started, check out How to Read a Crochet Pattern and Crochet Garment Materials 101 first.
Seaming
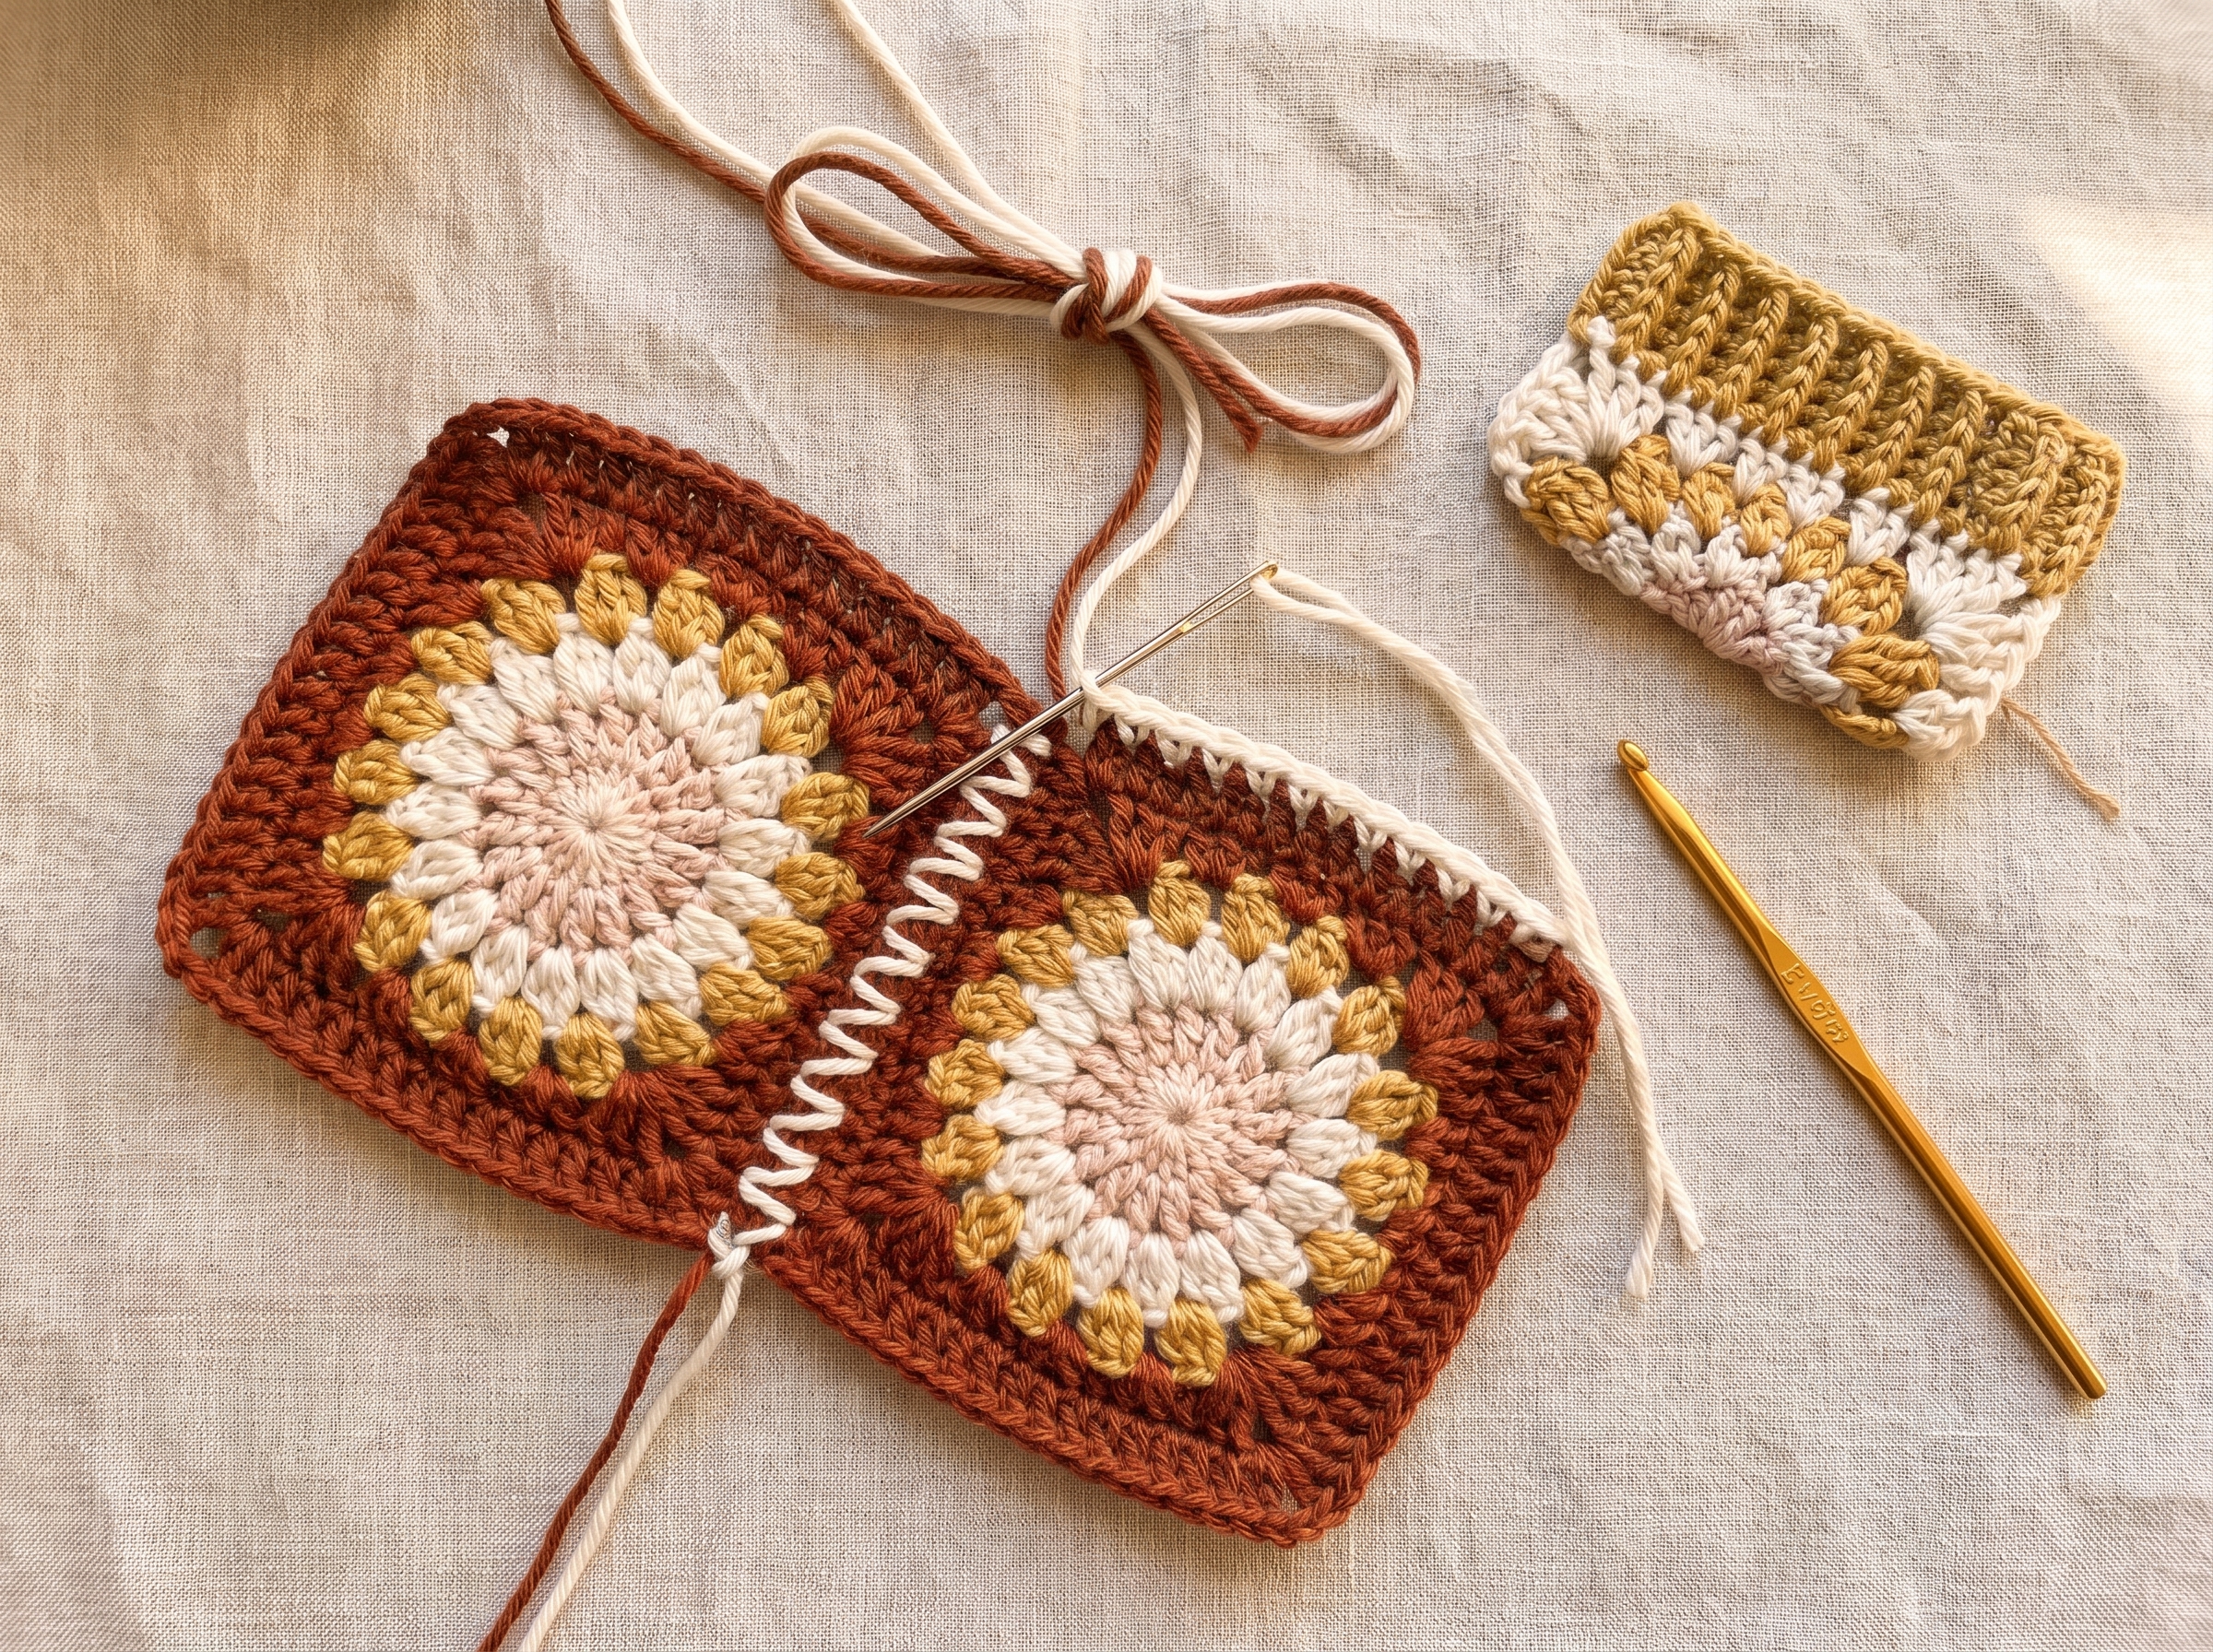
Almost all of my patterns involve seaming pieces together. You can use any seaming method you like, but I recommend a whip stitch — it’s usually the least noticeable, and once you get the hang of it, it’s easy and quick! Make sure to do all your seaming with the wrong side facing out.
Step 1: If the yarn isn’t already attached to one of the pieces you’re sewing together, attach it to the outer edge or corner. I recommend using a length of yarn around two times the length of what you’re sewing; for example, if you’re sewing together two squares that are 5 x 5″ (13 x 13 cm), use a 10-inch (26-cm) length of yarn.
Step 2: Thread your tapestry needle with a color that matches the section you’re seaming together. You can also use a crochet hook.
Step 3: Insert the needle or hook through corresponding stitches on both panels. If you’re going through the tops of stitches, make sure you’re going through both loops on both stitches. If you’re going through the sides of stitches, make sure your stitches are even and going through the right stitches — it’s easy to mess this up!
Step 4: Insert the needle or hook into the next set of corresponding stitches in the same direction as Step 3.
Repeat Step 4 until you’re finished! I usually double knot my yarn after I’ve whip stitched all my stitches together.
For the Starburst and Filled Granny Square, I attach my yarn in the second chain of a chain-2 space, whip stitch down the side, then finish after I’ve whip stitched into the first chain of the next chain-2 space.
Adding Length to Rows of Squares
For a few patterns, you’ll need to add length to rows of squares, or you can do so to customize your sizing. There are two methods:
For convenience: After you’ve stitched together the squares for a row, attach your yarn to one corner of an outer square (I do this on the second chain of a chain-2 space). Chain 2, then double crochet in every stitch until you hit the other corner of the square. Chain 2 and turn, then double crochet down the row. Repeat these rows until you’ve added the length you need.
For a more subtle look: Add the length to individual squares before joining them in a row. For example, if you need to add 4″ (10 cm) to a row, add 1 inch (2.5 cm) of length to 4 squares using whatever stitch you like, then sew all squares together. Make sure the extra length is horizontal (pointing left or right) when you join them!
After using either method, measure the entire row again, including the squares, to make sure it’s the right size.
Whip Stitch Method for Panels of Different Lengths
The Whip Stitch Method (not to be confused with the whip stitch itself) is used to stitch together two rows of squares that are different lengths — for example, a row of 5 squares and a row of 4 squares — to result in one panel with smooth ends. Essentially, you’re squishing the longer row to fit the same length as the shorter row.
Align the two rows you’ll be sewing together. Match the beginning and end of both rows and secure them with stitch markers. Match the center of each strip and secure. Now you can see how much material needs to get squished to fit in each section.
When stitching together, every couple of stitches, whip stitch 2 of the longer row’s stitches into 1 of the shorter row’s stitches. The exact number of stitches you work normally before doing this is the number of squares in your longer row. For example, if there are 7 squares in your longer row, you’d whip stitch together 6 stitches normally, then stitch two of the longer row’s stitches into one of the shorter row’s.
Explained another way: if you have a row of 3 and a row of 4, every 3 stitches there should be two of row 4 that go into row 3. For a row of 5 and 4, every 4 stitches there should be two of row 5 that go into row 4, and so on. For rows with a greater difference than one square, you’ll need to do this more often.
You don’t always have to do it mathematically — if you can match up the rows with stitch markers and just eyeball what you need, that works too! It’s a guess-and-check method, and you’ll get more of a feel for it with practice.
Sewing on Ribbing
Similar to the Whip Stitch Method, you’ll often need to sew on ribbing that’s smaller than the garment itself to achieve a cinched-in effect. Instead of whip stitching one ribbing stitch (about one row of sc) to one garment stitch, whip stitch two or three garment stitches into every one ribbing stitch. This depends on the width of your garment and ribbing, so it may take some experimenting.
In practice: insert your tapestry needle into one ribbing stitch and its corresponding garment stitch, sew them together. Insert your hook again into the same ribbing stitch, then the next garment stitch, and sew together. Repeat once more into the same ribbing stitch and the next garment stitch — now you’ve sewn three garment stitches into one ribbing stitch! Repeat all the way around. Once fully attached, whip stitch up the ribbing to sew it closed, then double knot the yarn to fasten off. Weave in the ends.
If your ribbing and garment widths are the same, simply whip stitch one garment stitch to one ribbing stitch all the way around, then close and fasten off the same way.
Changing Colors
When working the last stitch of your original color, work the stitch as usual, but stop before the final yarn over and pull-through — you’ll have 2 loops on your hook. Cut your original color, leaving around a 5-inch (13-cm) tail for weaving in later. With your new color, yarn over and pull through the two loops on your hook, then continue as usual. I like to double knot the ends of the original and new color together before continuing, so they don’t slip out.
When working in rounds to create a square, finish the round, then slip stitch with your new color into the first stitch of the round to begin the next round. I double knot the ends here too.
Color changes in my patterns only happen at the beginning of a new round or row, but you can change at any point using this method — it’s a great way to use up scrap yarn.
Sewing Appliques On
Cut a length of matching-color yarn, around 15 inches (38 cm) or longer to be safe. Place the applique where you’d like it. Thread your tapestry needle and pull it — with the yarn still attached — through a stitch on your applique, going from front to back of the fabric you’re sewing it onto. This is your first sewing stitch. Work your way around the edges of the applique with small stitches, front to back, then back to front. Once done, make sure your working yarn and tail are both on the back of the panel, double knot them, and weave in the ends.
Weaving in Ends
Before weaving, make sure your ends are secure — I double knot mine first. Always seam on the wrong side too.
Separate the end of the yarn into individual strands (I usually separate mine into four sections), then weave each section in a different direction: up, down, left, and right. Cut off any excess, then gently stretch the fabric to hide the ends.
For a riskier but faster method, you can crochet over the ends as you go — for example, while making squares, hold the yarn ends together with the piece and complete stitches over them. This isn’t as secure, but it’s handy for patchwork patterns. You can also do this with whip stitching as you sew two pieces together.
Stitches to Add Texture and Decoration
Griddle Stitch
The basic idea is alternating sc and dc, working one stitch in each stitch of the previous row. Starting with row 2, you’ll always work an sc into a dc and a dc into an sc.
Row 1: Sc in first st, dc in next st, [sc in next st, dc in next st] across row. If you end on a dc, ch 1 and turn. If you end on an sc, ch 2 and turn.
Row 2 Option A (if you have a ch 2): This counts as your first dc, sc in the 2nd st, [dc in next sc, sc in next dc] to end of row.
Row 2 Option B (if you have a ch 1): This doesn’t count as your first sc, so sc in the first st, [dc in next sc, sc in next dc] to end of row.
For either option, if you end on a dc, ch 1 and turn. If you end on an sc, ch 2 and turn. Repeat row 2 until you have the number of rows you need. Remember: always dc on top of an sc and vice versa.
Alpine Stitch
The basic idea is creating texture with alternating front post double crochet (fpdc). To work an fpdc: yarn over and insert hook around the indicated stitch from front to back to front, yarn over, draw up a loop (pulled up to the height of the dc on the same row), yarn over and draw through 2 loops, yarn over and draw through the remaining 2 loops.
You’ll alternate rows of dc/fpdc with a return row of only sc, creating a 4-row repeat that staggers the beginning stitches to maintain the pattern.
Row 1: Dc in each st to end of row, turn.
Row 2: Ch 1 (does not count as a stitch here and throughout), sc in each st to end of row, turn.
Row 3: Ch 2 (counts as your first dc here and throughout), [fpdc around the dc below the next sc, skip the sc behind your fpdc, dc in next sc] across row, turn.
Row 4: Ch 1, sc in each st to end of row, turn.
Row 5: Ch 2, dc in next sc, [fpdc into the dc below the next sc — this should be the dc between two fpdc from the previous fp row — dc in next sc] across row, turn.
Repeat rows 2–5 until you have the number of rows you need.
Puff Stitch
A puff stitch is made by drawing several loops up in the same stitch and securing them together at the end. Draw up your loops to the height of the stitches on your row — if too tight, you won’t be able to secure it at the end.
[Yarn over, insert hook into stitch, yarn over and draw up a loop] — repeat this 3 times total in the same stitch (7 loops on hook). Yarn over and draw through all loops on hook, ch 1. Your puff stitch is complete!
Repeat until you have the number of puff stitches you need. If beginning a round or row with a puff stitch, ch 2 before you start.
Scallop Stitch
Step 1: Attach your yarn and sc in the same st.
Step 2: Skip the next st, then dc 5 into the next st.
Step 3: Skip the next st and sc.
Repeat steps 2 and 3 until you have the length you need. If working in the round, once complete, slip stitch into your first sc, then fasten off.
Written another way: Join yarn, ch 1, sc in first st, [sk 1 st, dc 5 in next st, sk 1 st, sc in next st] to end of row or desired number of times.
Stitch Techniques
Increases
Increases work the same way for every stitch: crochet 2 stitches into 1 stitch. For example, “Dc 18, then inc” means you’ll complete 18 dc as normal, then put two dc into the last stitch. This applies to all other stitch increases as well.
Decreases
Decreases are a little more complicated. A dc2tog means to double crochet 2 stitches together, worked as: yarn over, insert hook into first st, yarn over and draw up a loop (3 loops on hook), yarn over and draw through 2 loops (2 loops on hook), yarn over and insert hook into next stitch, yarn over and draw up a loop (4 loops on hook), yarn over and draw through 2 loops (3 loops on hook), yarn over and draw through all 3 loops on hook. Stitch complete — you’ve decreased 2 stitches down to 1.
The number in a decrease always indicates how many partial stitches are created before drawing them all together. You work stitches up until the final yarn over, and instead of completing the stitch, you begin the next one.
These stitches can also all be worked in the same stitch or space, creating a cluster. For example, a dc4tog worked into one space (as in the Starburst Granny Square) is worked as: placing all stitches in the same ch-sp, [yarn over, insert hook into space, yarn over and draw up a loop, yarn over and draw through two loops] four times in the same ch-sp. With 5 loops on hook, yarn over and draw through all 5 loops.
Back Loops Only (BLO)
Back loops only (blo) stitches are typically used to create a ribbing effect. The top of each stitch has a front and back loop — the front loop is closest to you when working the stitch, and the back loop is farthest from you. If instructions say “sc blo in each st,” insert your hook only under the back loop to draw up the stitch and complete the sc.
Granny Squares
Many patchwork designs on this blog use these two squares. Make sure each square measures 5 x 5 inches (13 x 13 cm) — refer to the gauge section in [Crochet Garment Materials 101] if your measurement is different.
Starburst Granny Square
My personal favorite! It’s eye-catching whether made in monochrome or with four different colors. Some granny squares require a lot of color changes, counting, or complicated stitches, but the starburst is effortless once you’ve made your first two.
It’s typically worked in 4 rounds, with one color per round.
Abbreviations: ch = chain, dc = double crochet, hdc = half-double crochet, slst = slip stitch, sp/sps = space/spaces, st/sts = stitch/stitches, tc = triple crochet
With color 1, ch 4, slst into first ch to form a ring.
Step 1: Ch 2 (counts as first dc), dc 15 into ring. (16 dc)
Step 2: With color 2, slst into first dc (the initial ch 2) and ch 2.
Step 3: Complete a puff st in each dc around. (16 puff sts)
Step 4: After your final ch 1, with color 3, slst into the top of your first puff st and ch 2.
Step 5: (Dc4tog, ch 2) into each ch-1 sp around. (16 dc4tog and 16 ch-2 sp)
Step 6: After your final ch 2, with color 4, slst into first dc4tog and ch 2 (does not count as dc).
Step 7: Working into the ch-2 sps around, dc 3 in next sp, hdc 3 in next sp, dc 3 in next sp, (tc 3, ch 2, tc 3) in next sp. Repeat from * to * around, then slst into your first dc and fasten off. (60 sts and 4 ch-2 sp)
Filled Granny Square
One of the most common squares any crocheter will make in their lifetime. It provides more coverage than a traditional granny square — perfect for garments — while still being just as easy: all you need to know is ch and dc!
Ch 4, slst into first ch to form a ring.
Round 1: Ch 4 (counts as first dc plus ch 2), dc, ch 2; repeat from * to * two more times, then dc 2, slst into 2nd ch of initial ch 4.
Round 2: Ch 4 (counts as first dc plus ch 2). Into first ch-2 sp work (dc 2, ch 2, dc 2), dc into next 3 sts, (dc 2, ch 2, dc 2) into next ch-2 sp; repeat from * to * two more times, then dc into final 2 sts, slst into 2nd ch of initial ch 4.
Round 3: Ch 2 (counts as dc in joining st), dc in each st to ch-2 sp, (dc 2, ch 2, dc 2) in ch-2 sp; repeat from * around, dc in each st to end, slst in top of beginning ch-2.
Repeat round 3 for as many rounds as your pattern calls for, then fasten off.
Blocking (After You Finish)
Blocking uses water to relax your stitches, even out the fabric, fix curling edges, and achieve proper garment measurements — the crochet equivalent of ironing. It’s never required, but many crocheters like the more polished, professional look it gives.
- Steaming: Pin your garment to a blocking board to the correct dimensions, then use a hand steamer to relax the stitches. Let it dry fully before removing.
- Wet Blocking: Soak your garment in lukewarm water with a small amount of mild, gentle detergent or wool wash. Use a towel to gently squeeze out excess water, then lay flat to dry (or pin to a blocking board to hold the shape).
- Spraying: Pin your garment to a blocking board to the correct dimensions, then spray with water. Let it dry fully before removing.
With all methods, keep garments away from direct sunlight while drying, as it can fade the color of certain yarns. A fan can help speed up drying if desired.
That covers every seaming method, stitch, and technique you’ll need for the garment patterns on this blog! If you missed the earlier guides, go back to How to Read a Crochet Pattern and Crochet Garment Materials 101: Yarn, Hooks, Gauge & Sizing Explained for the full picture.
Now that you’ve got the basics down, you’re ready to make your first garment! Check out the full pattern for the Blooming Meadow Sweater — a granny square patchwork sweater made with the Starburst and Filled Granny Squares covered above.