
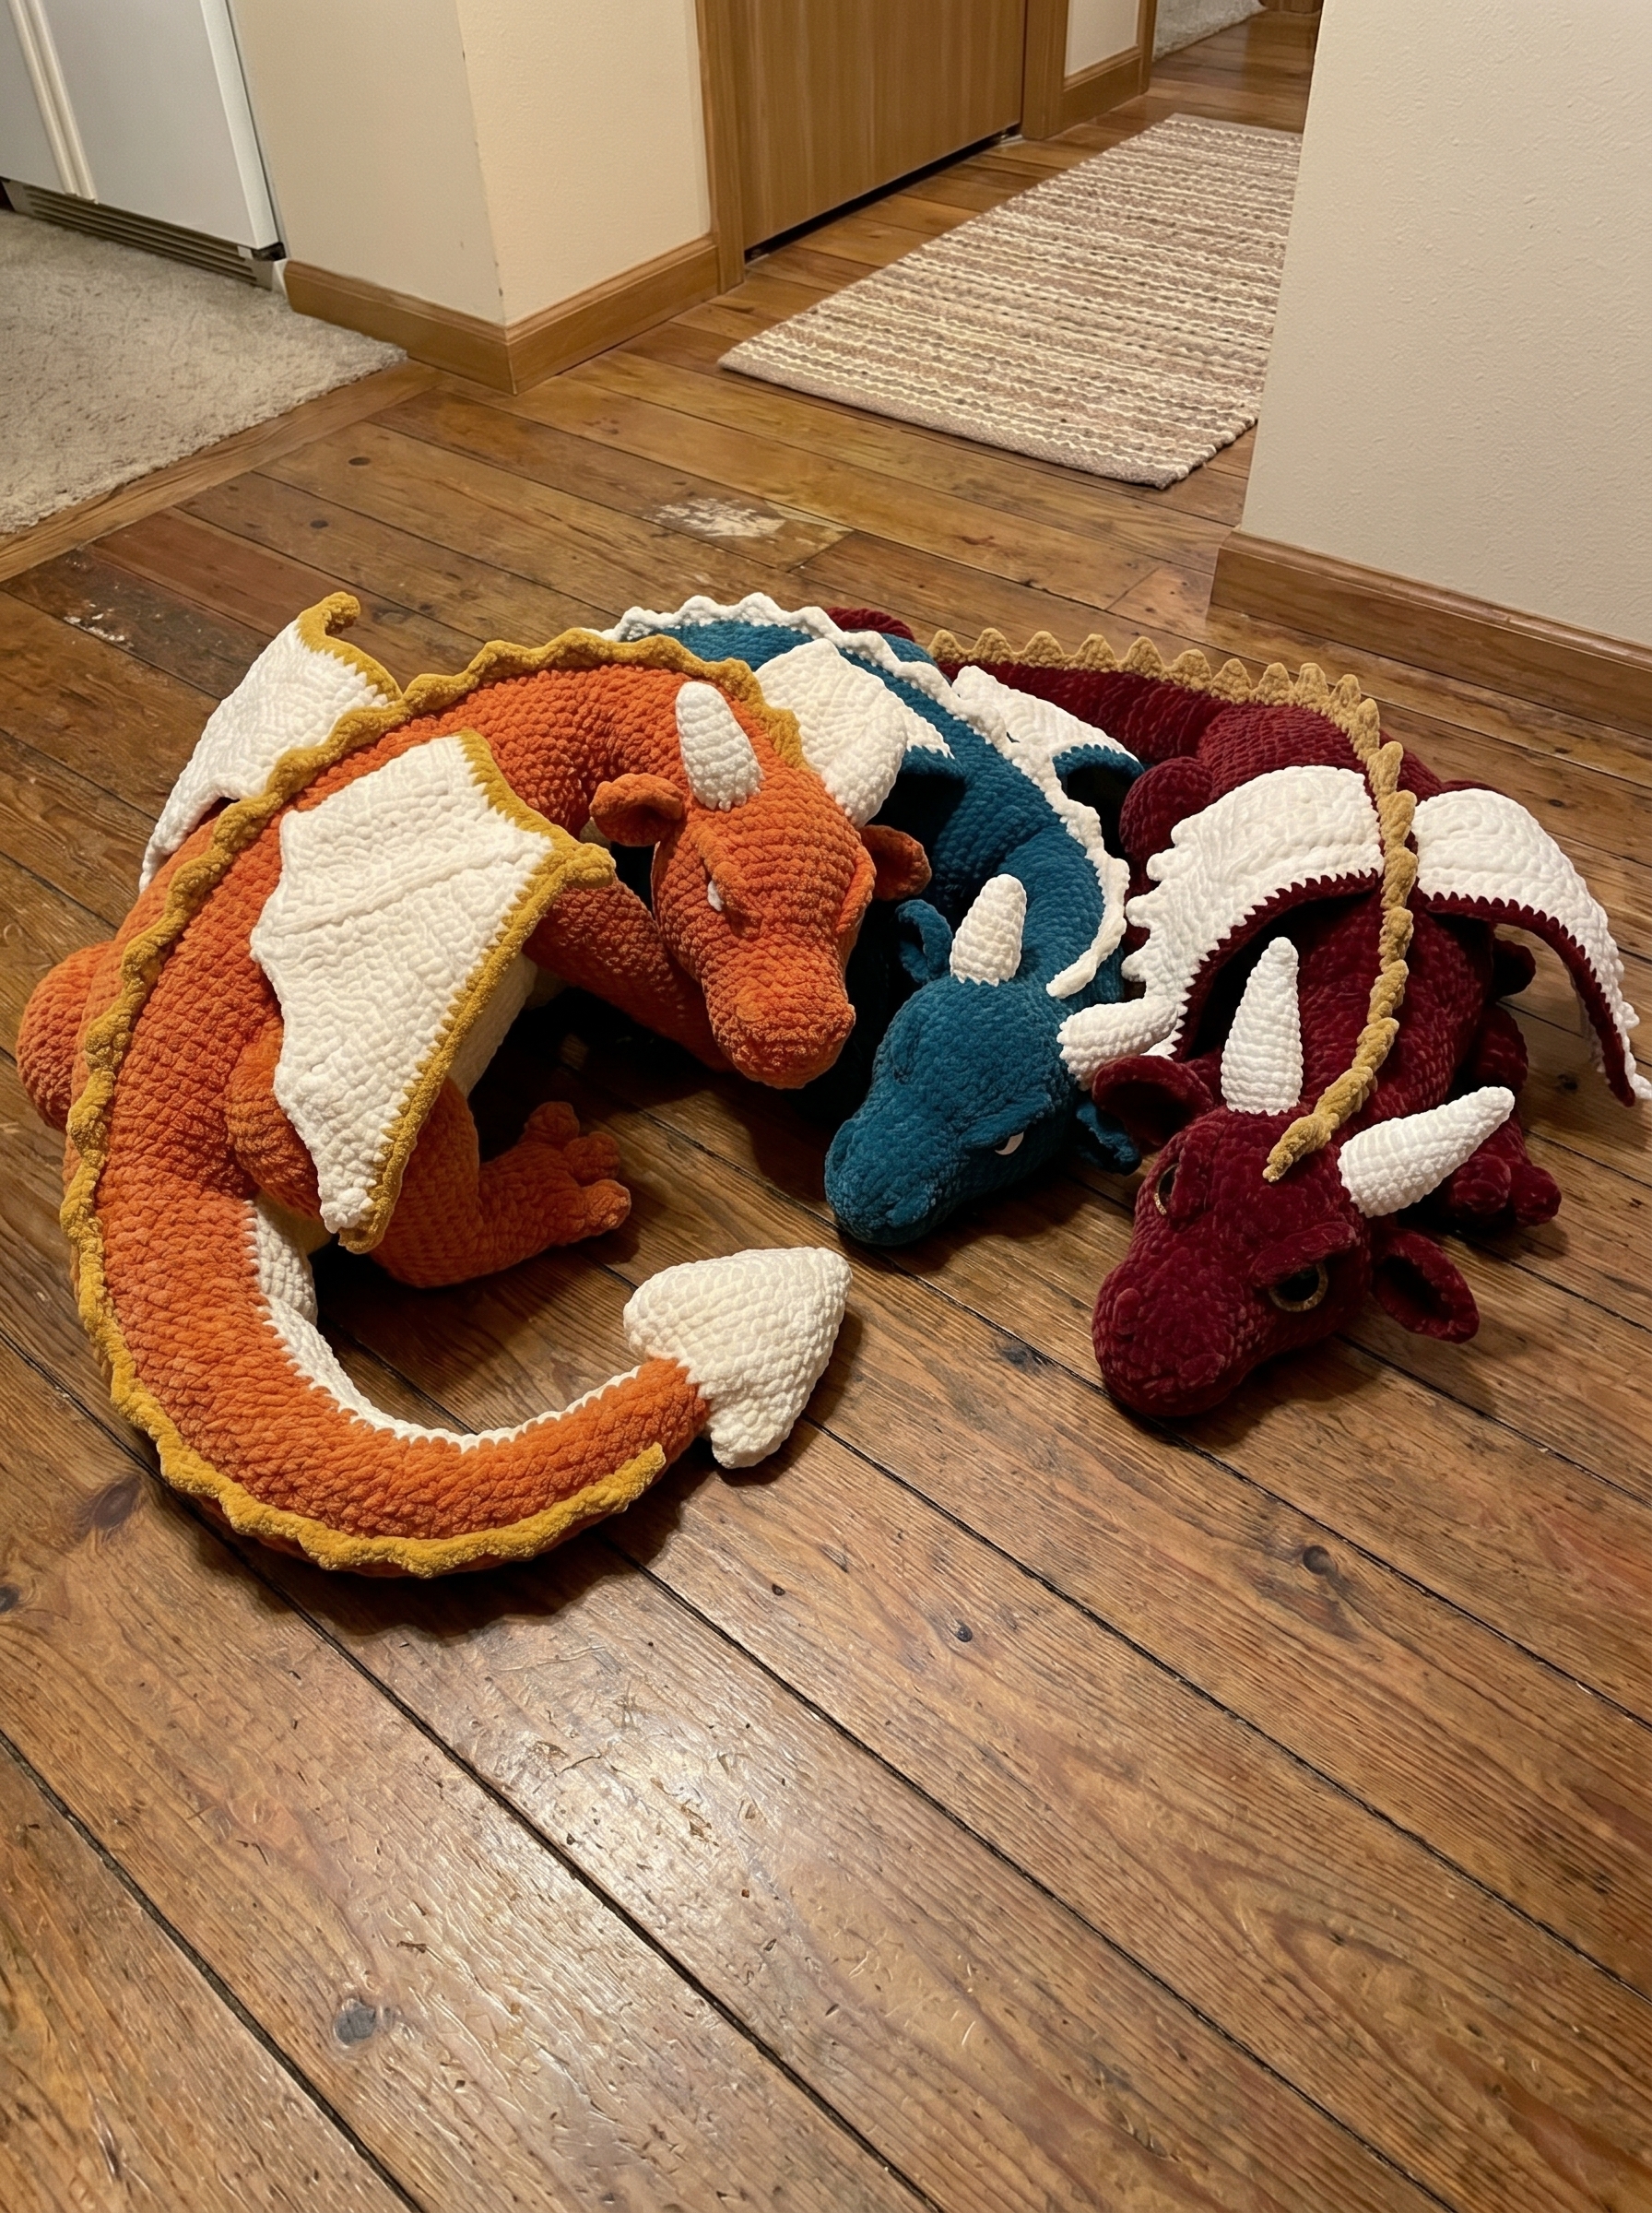
In Chinese mythology, the Lóng (龍) is no mere beast — it is a divine creature of supreme power and benevolence, lord of rivers, rain, and the celestial sea. This pattern brings the great dragon to life in deep crimson chenille with imperial gold spines, pearl-white wings, and gleaming golden eyes. At 47 inches long, it curls magnificently across any floor, exactly as a legendary creature should.
This tutorial is written in US crochet terminology. All rounds are worked in a continuous spiral — no joining slip stitches between rounds — unless specifically noted otherwise. A stitch marker at the beginning of each round is essential throughout.
Skill level: Intermediate to Advanced. You should be comfortable with magic rings, continuous spiral rounds, SC/HDC/DC/TR, BLO/FLO techniques, and sewing amigurumi pieces together.
Your Color Palette
Looking at the finished dragon, the three colors you need are:
| Role | Color | Amount |
|---|---|---|
| Body, head, legs, ears | Deep crimson / burgundy red | 250–320g chenille |
| Spines | Warm imperial gold / mustard yellow | 40g chenille |
| Wings | Pearl white | 30g chenille |
| Horns | Pearl white | 30g cotton (not chenille) |
| Optional | Small piece black chenille | Eyebrow embroidery |
Materials
Yarn: Chenille, size 4.5–5 (120m/100g). Recommended: Himalaya Dolphin Baby or Yarnart Dolce. For an even larger dragon, use Alize Velluto (68m/100g) at a 7mm hook — you’ll need 450–520g red, 60g gold, 50g white.
Tools:
- 5mm crochet hook (body, wings, legs, ears, eyebrows)
- 3mm crochet hook (horns only — cotton yarn)
- 30mm gold glitter safety eyes × 2
- Several removable stitch markers
- Polyester fiberfill stuffing
- Tapestry/yarn needle and scissors
Always buy extra yarn. Chenille brands vary in meters per gram. Running out mid-project creates a visible color difference.
Abbreviations
| Code | Meaning |
|---|---|
| mr | Magic Ring |
| ch | Chain |
| slst | Slip Stitch |
| sc | Single Crochet |
| hdc | Half Double Crochet |
| dc | Double Crochet |
| tr | Triple/Treble Crochet |
| inc | Increase — 2 stitches into 1 |
| dec | Decrease — 2 stitches together |
| BLO | Back Loops Only |
| FLO | Front Loops Only |
| (…)×6 | Repeat 6 times |
| rnd | Round(s) |
| FO | Fasten Off |
| st(s) | Stitch(es) |
Crochet Terms — Complete Dictionary
Understanding why each stitch works makes every round faster and more confident. Here is every technique used in this pattern, explained fully.
Foundation Stitches
MR — Magic Ring The standard start for any piece worked in the round. It creates a center that can be pulled completely closed — no visible hole, no stuffing showing through.
How to work it: Wrap yarn twice around your finger forming a loop. Insert hook into the loop. Pull working yarn through. Chain 1 to secure. Work your required number of stitches into the ring. Pull the tail end to close the center completely. Join with a slip stitch or continue in spiral.
Why it matters: A chain ring leaves a small visible hole in the center. For a plush dragon, any gap will show the white stuffing underneath — especially in dark crimson yarn. Always use a magic ring for amigurumi.
CH — Chain Stitch The most basic crochet stitch — used to start pieces, create turning chains, build spine structures, and form decorative elements.
How to work it: Yarn over. Pull yarn through the loop on your hook. One chain stitch made. Repeat for required count.
In this pattern: Chains appear in the oval head foundation (ch 6), the spine chains (ch 4 and ch 5), the wing foundation (ch 23), and horn construction.
SLST — Slip Stitch The shortest crochet stitch — it adds no height. Used for joining rounds, anchoring spines to the body, and creating flat surface areas in ear construction.
How to work it: Insert hook into stitch. Yarn over. Pull yarn through both the stitch AND the loop on your hook in one motion. The loop has closed — nothing remains on hook.
Critical detail: When instructions say “do not crochet the last stitches of the round, 1slst” — this creates a partial round that shapes the neck opening. Stop exactly where stated and fasten off.
SC — Single Crochet The primary stitch of this entire pattern. Compact, dense, and ideal for amigurumi because it creates fabric that holds stuffing without gaps.
How to work it: Insert hook into stitch. Yarn over, pull up a loop (2 loops on hook). Yarn over, pull through both loops. One single crochet complete.
In chenille yarn: The velvety fibers make it harder to see where to insert the hook. Look for the two visible loops on top of each stitch — always insert under both unless BLO or FLO is specified.
HDC — Half Double Crochet Slightly taller than a single crochet. Creates a smoother, softer fabric. Used in ear shaping (hdcinc) and spine construction.
How to work it: Yarn over first (before inserting hook). Insert hook into stitch. Yarn over, pull up a loop (3 loops on hook). Yarn over, pull through all 3 loops at once.
Height comparison: SC = 1 loop height. HDC = 1.5. DC = 2. TR = 3. Mixing heights creates the organic, graduated shapes used in ear and spine construction.
DC — Double Crochet Twice the height of a single crochet. Used in the spine chains and ear increases.
How to work it: Yarn over. Insert hook into stitch. Yarn over, pull up a loop (3 loops on hook). Yarn over, pull through 2 loops (2 remain). Yarn over, pull through remaining 2 loops.
TR — Triple / Treble Crochet The tallest stitch in this pattern. Used only in the large body spines to create the dramatic pointed fins along the upper body and neck.
How to work it: Yarn over twice. Insert hook. Yarn over, pull up a loop (4 loops on hook). [Yarn over, pull through 2 loops] × 3 times. One treble complete.
In the large spines: The sequence slst → hdc → dc → tr creates a graduated slope — flat at the base and sharply pointed at the tip. This is why the body spines look so much more dramatic than the tail spines.
Shaping Stitches
INC — Increase Two stitches worked into the same stitch space. This adds one stitch to your total count and makes the fabric expand outward.
How to work it: Work a complete SC into the current stitch. Without moving the hook to the next stitch, work another complete SC into that same stitch. Two stitches where there was one.
In this pattern: The body uses single increases spread across each round to maintain a smooth curve. In the head, clusters of increases create the eye socket expansion. The toe construction uses increases to widen from 4 stitches to 6.
DEC — Decrease Two stitches combined into one. Removes one stitch from your count and pulls the fabric inward. The invisible decrease method is strongly recommended for amigurumi.
Standard decrease: Insert hook into next stitch, yarn over, pull up loop. Insert into following stitch, yarn over, pull up loop. (3 loops on hook.) Yarn over, pull through all 3 loops.
Invisible decrease (recommended): Insert hook into the FRONT LOOP ONLY of the next stitch. Without yarning over, also insert hook into the FRONT LOOP ONLY of the stitch after that. Yarn over and pull through both front loops. Yarn over, pull through remaining 2 loops. The back loops remain visible and hide the decrease line on the right side of the fabric.
Why invisible: Standard decreases create a visible diagonal ridge on the outside of the piece. Since amigurumi is worked right-side-out, this ridge shows on the dragon’s skin. The invisible decrease is nearly undetectable.
HDCINC — Half Double Crochet Increase Two half double crochet stitches worked into the same stitch. Used in ear construction to create the rounded upper edge.
How to work it: Work a complete HDC into the current stitch. Work another complete HDC into that exact same stitch.
Loop Techniques
BLO — Back Loops Only Instead of inserting the hook under both loops of a stitch, you insert it only under the back loop — the one furthest from you.
Visual result: Working BLO leaves the front loop unused and sticking up as a visible ridge. Multiple rounds of BLO create stacked ridges — a ribbed, textured surface. This is what creates the twisted, ridged texture on the horns.
Why the horns use BLO: From Round 3 onward, each BLO stitch leaves a front loop as a visible horizontal ridge. As the horn grows, these stacked ridges create the distinctive segmented texture. The optional FLO spiral then highlights these ridges with a contrasting thread.
FLO — Front Loops Only Insert hook only under the front loop — the loop closest to you. The mirror of BLO.
Visual result: Working FLO leaves the back loop available for a later round to work into. In the horn’s optional spiral: after all the BLO horn rounds are complete, you go back and slip stitch into each front loop from Row 3 to Row 17 in spiral order — this creates a continuous spiral line that wraps around the horn, making it look naturally twisted.
Also in wings: The wing rows work in BLO throughout, leaving FLO ridges visible along the top — creating the rib lines visible in the photo.
Working Methods
SPIRAL — Continuous Spiral Rounds The standard working method for amigurumi. You work continuously from one round into the next without joining or creating a visible seam.
How it works: After completing the last stitch of any round, simply continue into the first stitch of that same round to begin the next. The work spirals upward. Use a stitch marker in the first stitch of each round — without a marker, it becomes impossible to count correctly after a few rounds.
Why no joining: If you join each round with a slip stitch, a visible vertical seam appears on the outside. For a smooth dragon body, the continuous spiral is essential.
OVAL START — Foundation Chain Oval A technique for starting a piece that needs to be oval rather than round — the dragon’s head and ears. Instead of a magic ring (which creates a circle), you start with a chain and work along both sides.
How it works: Chain the required number. Work SC along the chain to the last stitch. Work multiple SC into that last stitch (tip increase). Flip the work without turning — you are now crocheting back along the other side of the same chain. Work SC back along the other side. Multiple SC into the starting stitch (other tip). Continue in spiral rounds. The two clusters of increases at each end create the oval’s pointed tips.
For this dragon: The head’s muzzle shape — wide behind the eyes, narrowing toward the nose — comes entirely from this oval foundation. A round magic ring would create a spherical head with no snout definition.
BLO STAIRCASE — Wing Construction Method A unique technique used to build the multi-stepped wing shape. Each “half-row” uses 6 slip stitches to create the flat wing base, then single crochets for the active section, followed by a chain extension that starts the next step outward.
How the staircase forms: Row 2: work 6 slst (flat base) + 12 sc (active wing) + chain 3 extension. The chain 3 creates a new starting point further into the wing. Row 3: 6 slst + 10 sc (2 fewer) + chain 3. Each row is 2 sc shorter, creating a stepped edge. After 6 rows, the wing has 5 distinct steps — the same stepped silhouette visible in the photo.
SURFACE SLST — Surface Slip Stitch Working slip stitches on the surface of a finished piece to add decorative lines or texture. Used for the optional horn spiral and for anchoring spines to the body.
How it works: Insert hook from the top surface going through to the back. Pull a loop of new yarn through to the front. Pull this loop through the existing loop on your hook. One surface slip stitch complete.
In the horn spiral: You attach cotton yarn at the front loop of Round 3 and slip stitch through each successive front loop, spiraling up to Round 17. The result looks like a thread has been twisted into the horn’s surface — no additional structure, just a beautiful visual line.
Part 1 — Body & Tail
Crimson Red chenille · 5mm hook · Make 1
The body is worked in one unbroken piece from the tail tip to the neck opening — 112 rounds. The tail grows by just one stitch every 4–9 rounds. Do not rush this section. The slow build is what creates the long, serpentine tail visible in the photo.
Mark every round from the very start. From Round 68 onward, increases and decreases must land in specific positions within each round. If your round marker drifts, the shaping will be wrong.
Tail Section — Rounds 1–67
Leave the first 17 rounds unstuffed — the tail tip stays flat and flexible by design. Begin stuffing at Round 18 and continue stuffing as you work for the rest of the body.
| Round(s) | Instructions | Count |
|---|---|---|
| 1 | 4sc in magic ring | 4 |
| 2 | 4sc | 4 |
| 3 | 2sc, 1inc, 1sc | 5 |
| 4–7 | 5sc (4 rounds) | 5 |
| 8 | 4sc, 1inc | 6 |
| 9–12 | 6sc (4 rounds) | 6 |
| 13 | 1sc, 1inc, 4sc | 7 |
| 14–17 | 7sc (4 rounds) | 7 |
| ▶ BEGIN STUFFING at Round 18. Continue stuffing throughout. | ||
| 18 | 5sc, 1inc, 1sc | 8 |
| 19–22 | 8sc (4 rounds) | 8 |
| 23 | 2sc, 1inc, 5sc | 9 |
| 24–27 | 9sc (4 rounds) | 9 |
| 28 | 1inc, 8sc | 10 |
| 29–32 | 10sc (4 rounds) | 10 |
| 33 | 6sc, 1inc, 3sc | 11 |
| 34–37 | 11sc (4 rounds) | 11 |
| 38 | 2sc, 1inc, 8sc | 12 |
| 39–42 | 12sc (4 rounds) | 12 |
| 43 | 4sc, 1inc, 7sc | 13 |
| 44–47 | 13sc (4 rounds) | 13 |
| 48 | 1inc, 12sc | 14 |
| 49–52 | 14sc (4 rounds) | 14 |
| 53 | 9sc, 1inc, 4sc | 15 |
| 54–57 | 15sc (4 rounds) | 15 |
| 58 | 3sc, 1inc, 11sc | 16 |
| 59–62 | 16sc (4 rounds) | 16 |
| 63 | 12sc, 1inc, 3sc | 17 |
| 64–65 | 17sc (2 rounds only — not 4!) | 17 |
| 66 | 8sc, 1inc, 8sc | 18 |
| 67 | 18sc | 18 |
Body Expansion — Rounds 68–90
Mark the beginning of every round from here onward. Note the leg and wing attachment zones.
| Round(s) | Instructions | Count |
|---|---|---|
| 68 | 6sc, 1inc, 4sc, 1inc, 6sc | 20 |
| 69 | 20sc | 20 |
| 70 | 1sc, (4sc, 1inc)×3, 4sc | 23 |
| 71 | 23sc | 23 |
| 72 | 3sc, (3sc, 1inc)×4, 4sc | 27 |
| 73 | 27sc | 27 |
| 74 | 5sc, (4sc, 1inc)×3, 7sc | 30 |
| 75 | 30sc | 30 |
| 76 | 5sc, 1inc, (6sc, 1inc)×3, 3sc | 34 |
| 77 | 4sc, (4sc, 1inc)×5, 5sc | 39 |
| 78–81 | 39sc (4 rounds) | 39 |
| 82 | 9sc, (5sc, 1inc)×3, 12sc | 42 |
| 83–86 | 42sc (4 rounds) — wing attachment zone | 42 |
| 87 | 7sc, (7sc, 1inc)×3, 11sc | 45 |
| 88–90 | 45sc (3 rounds) | 45 |
Neck Transition — Rounds 91–112
Mark the first stitch of Round 72 and Round 92 with a locking marker now — these are where you’ll attach the hind and fore legs later.
| Round(s) | Instructions | Count |
|---|---|---|
| 91 | 5sc, (8sc, 1dec)×3, 10sc | 42 |
| 92–94 | 42sc (3 rounds) — fore leg attachment zone | 42 |
| 95 | 8sc, (6sc, 1dec)×3, 10sc | 39 |
| 96 | 39sc | 39 |
| 97 | 5sc, (5sc, 1dec)×4, 6sc | 35 |
| 98 | 35sc | 35 |
| 99 | 4sc, (5sc, 1dec)×4, 3sc | 31 |
| 100 | 5sc, (5sc, 1dec)×3, 5sc | 28 |
| 101 | 28sc | 28 |
| 102 | 4sc, (7sc, 1dec)×2, 6sc | 26 |
| 103 | 3sc, (5sc, 1dec)×3, 2sc | 23 |
| 104 | 5sc, (3sc, 1dec)×3, 3sc | 20 |
| 105–111 | 20sc (7 rounds — neck tube) | 20 |
| 112 | 8sc, 1slst — leave remaining stitches unworked | — |
Fasten off with a long tail for sewing.
Part 2 — Head
Crimson Red chenille · 5mm hook · Make 1
The head begins from a foundation chain oval rather than a magic ring. This creates a naturally elongated shape — wide at the face, narrowing into the muzzle.
Oval Chain Start: Chain 6. Begin in the 2nd chain from your hook. Work 4sc along the chain. Then 3sc into the very last chain (muzzle tip). Flip the work and crochet back along the other side of the same chain: 4sc, then 3sc into the starting chain stitch (the other tip). You now have a flat oval of 14 stitches. Continue in spiral rounds.
| Round(s) | Instructions | Count |
|---|---|---|
| 1 | Ch 6 oval start: 4sc, 3sc in last ch, 4sc other side, 3sc in first ch | 14 |
| 2 | (4sc, 3inc)×2 | 20 |
| 3 | 4sc, (1sc, 1inc)×3, 4sc, (1sc, 1inc)×3 | 26 |
| 4 | 6sc, 1inc, 4sc, 1inc, 7sc, 1inc, 4sc, 1inc, 1sc | 30 |
| 5–9 | 30sc (5 rounds) | 30 |
| 10 | 10sc, (1sc, 1inc)×8, 4sc | 38 |
| 11 | 14sc, (1sc, 1inc)×8, 8sc | 46 |
| ▶ Insert gold glitter safety eyes between Rounds 11 and 12. Leave 16–17 stitches between them. Lock washers before continuing. | ||
| 12–19 | 46sc (8 rounds) | 46 |
| 20 | 3sc, 1dec, 5sc, (2sc, 1dec)×8, 4sc | 37 |
| 21 | 8sc, (1sc, 1dec)×9, 2sc — stuff firmly | 28 |
| 22 | 5sc, (1sc, 1dec)×7, 1dec | 20 |
| 23–25 | 20sc (3 rounds) | 20 |
| 26 | 9sc, 1slst — leave remaining stitches unworked. Stuff. Fasten off with long tail. | — |
Sew the head onto the neck opening (Rounds 105–111) of the body with small, tight stitches. Make this seam very strong — the head is the heaviest part.
Eye placement tip: The eyes should sit on the upper-side of the head, above the muzzle level. Test positioning before snapping the washers — once locked, they cannot be removed without cutting.
Part 3 — Feet & Legs
Crimson Red chenille · 5mm hook · Make 4 feet and 4 legs
Each foot is built from three individual toes joined together in a single clever round.
Toes — Make 3 per foot (12 total)
| Round | Instructions | Count |
|---|---|---|
| 1 | 4sc in magic ring | 4 |
| 2 | 1sc, 1inc, 2sc | 5 |
| 3 | 4sc, 1inc | 6 |
| 4 | 5sc, 1slst | 6 |
Fasten off toes 1 and 2. Do not cut yarn on toe 3.
Joining the Toes — Round 5
With yarn still attached to toe 3, travel around all three toes:
- 3sc along toe 3 — work around the outside of toe 3
- 3sc along toe 2 — travel across and work along toe 2
- 6sc around toe 1 — toe 1 is farthest; work all the way around it (3 out + 3 back = 6)
- 3sc back along toe 2 — return along the other side
- 3sc back along toe 3 — mark this stitch as your new round start — you now have 18 stitches total
Complete the Foot — Rounds 6–10
| Round | Instructions | Count |
|---|---|---|
| 6 | 8sc, 1dec, 7sc, 1dec (round start shifts by 1) | 16 |
| 7 | (2sc, 1dec)×4 | 12 |
| 8 | 5sc, 1dec, 4sc, 1dec (round start shifts by 1) | 10 |
| 9 | 10sc — stuff the foot now | 10 |
| 10 | 5dec, skip 1 stitch, 1slst | 5 |
Legs — Make 4
| Round(s) | Instructions | Count |
|---|---|---|
| 1 | 6sc in magic ring | 6 |
| 2 | 6inc | 12 |
| 3 | (1sc, 1inc)×6 | 18 |
| 4 | (2sc, 1inc)×6 | 24 |
| 5–7 | 24sc (3 rounds) | 24 |
| 8 | (2sc, 1dec)×6 | 18 |
| 9 | 4sc, 5dec, 4sc | 13 |
| 10 | 4sc, 1dec, 1sc, 1dec, 4sc | 11 |
| 11–15 | 11sc (5 rounds) | 11 |
Fasten off with a long tail. Sew each leg onto its foot at Rounds 6–9. The curved part of the leg must face the same direction as the toes.
Body placement: Fore legs → body Rounds 92–100. Hind legs → body Rounds 72–80. Pin all four before sewing any. All four feet must sit level on a flat surface.
Part 4 — Imperial Gold Spines
Imperial Gold / Mustard Yellow chenille · 5mm hook · Worked directly onto body
Attach gold yarn at Round 1 of the tail. The spines are crocheted directly onto the body surface — no separate sewing. Always insert the anchor slip stitch at the center of the round.
Small Spines × 22 — Tail Section
Repeat 22 times. Each spine skips 2 rounds (inserts into every 3rd round):
ch 4 → from 2nd ch: 1slst, 1hdc, 1dc → skip 2 rounds on body → slst into body at center of round
Large Spines × 14 — Body Section
Repeat 14 times. Each spine skips 3 rounds (inserts into every 4th round):
ch 5 → from 2nd ch: 1slst, 1hdc, 1dc, 1tr → skip 3 rounds on body → slst into body at center of round
Fasten off when all 36 spines are complete.
Part 5 — White Twisted Horns
White cotton yarn · 3mm hook · Make 2
Cotton yarn and a smaller 3mm hook create a stiffer structure that holds the twisted shape upright. BLO is used from Round 3 onward.
| Round(s) | Instructions | Count |
|---|---|---|
| 1 | 4sc in magic ring | 4 |
| 2 | (1sc, 1inc)×2 | 6 |
| From Round 3 — all stitches in BLO | ||
| 3 | BLO: 3sc, 1inc, 2sc | 7 |
| 4 | BLO: 3sc, 2inc, 2sc | 9 |
| 5 | BLO: 1dec, 3sc, 1inc, 3sc | 9 |
| 6 | BLO: 5sc, 1inc, 3sc | 10 |
| 7 | BLO: 1dec, 3sc, 2inc, 3sc | 11 |
| 8 | BLO: 5sc, 2inc, 4sc | 13 |
| 9 | BLO: (3sc, 1inc)×3, 1sc | 16 |
| 10 | BLO: 16sc | 16 |
| 11 | BLO: 1inc, 1sc, 1inc, 13sc | 18 |
| 12 | BLO: (1sc, 1inc)×3, 5sc, 1dec, 5sc | 20 |
| 13 | BLO: 1sc, (1inc, 2sc)×3, 3sc, 1dec, 5sc | 22 |
| 14 | BLO: 3sc, 1inc, 4sc, 1inc, 7sc, 1dec, 4sc | 23 |
| 15 | BLO: 7sc, 1inc, 15sc | 24 |
| 16 | BLO: 5sc, 1inc, 4sc, 1inc, 7sc, 1dec, 4sc | 25 |
| 17 | BLO: 1sc, (3sc, 1inc)×3, 7sc, 1dec, 3sc | 27 |
| 18 | 27sc | 27 |
Optional spiral ridge: Attach white cotton yarn to the front loop of Round 3. Slip stitch in each front loop, spiraling upward to Round 17. This creates the beautiful visible twist stripe running up each horn.
Sew horns to Rounds 16–20 of the head. Leave 1–2 stitches between each horn and the nearest gold spine.
Part 6 — Ears & Eyebrows
Crimson Red chenille · 5mm hook · Make 2 of each
Ears
| Round(s) | Instructions | Count |
|---|---|---|
| 1 | Ch 6 → from 2nd ch: 4sc, 3sc in one st (tip), other side: 4sc, 1slst | 12 |
| 2 | 2slst, 2sc, 3inc, 2sc, 2slst, 1inc | 16 |
| 3 | 2slst, 3sc, 1inc, 2sc, 1inc, 3sc, 3slst, ch 1, 1slst | 19 |
| 4 | 3slst, 3sc, 1hdcinc, 2sc, 1hdcinc, 3sc, 5slst (leave last stitch) | 21 |
Fasten off with long tail. Sew between Rounds 16–17 of the head, 1–2 stitches from each horn.
Eyebrows
Chain 8. From 2nd chain from hook: 7sc. Fasten off with long tail. Sew directly beside the eyes at Rounds 9–15, angled inward toward the nose. Optional: embroider a line of black chenille for extra intensity.
Part 7 — Pearl White Wings
White chenille · 5mm hook · Make 2
Make one left and one right wing — the staircase creates naturally asymmetric pieces. Never make two of the same side.
| Row | Instructions |
|---|---|
| 1 | Ch 23, from 2nd ch: 22sc, ch 1, turn work |
| From Row 2 — BLO throughout, except for the chain stitches | |
| 2 | BLO: 6slst, 12sc → ch 3, turn → from 2nd ch: 20sc, ch 1, turn |
| 3 | BLO: 6slst, 10sc → ch 3, turn → from 2nd ch: 18sc, ch 1, turn |
| 4 | BLO: 6slst, 8sc → ch 3, turn → from 2nd ch: 16sc, ch 1, turn |
| 5 | BLO: 6slst, 6sc → ch 3, turn → from 2nd ch: 14sc, ch 1, turn |
| 6 | BLO: 6slst, 5sc → ch 3, turn → from 2nd ch: 13sc |
| Final | Work 4 decreases along the side edge to shape the wingtip. Fasten off with long tail. |
Optional crimson wing border: Attach crimson red chenille to the back loops of the foundation chain from Row 1 and crochet 22sc. This creates a red edge along the wing’s leading edge — matching the dragon’s body color.
Sew wings to Rounds 86–92 of the body. Pin carefully before sewing.
Part 8 — Final Assembly
Follow this order. Each step positions the pieces for the next.
- Sew head to body. The neck tube (Rounds 105–111) nestles into the head’s base. Use very small, tight stitches. This seam must be extremely strong — the head is the heaviest piece.
- Attach gold spines. Starting at Round 1 of tail with gold yarn. 22 small spines (every 3rd round) then 14 large spines (every 4th round). Always anchor at center of round.
- Sew white horns. Position at Rounds 16–20 of the head. Keep 1–2 stitches between each horn and the nearest spine.
- Sew crimson ears. Between Rounds 16–17, keeping 1–2 stitches from each horn.
- Sew eyebrows. At Rounds 9–15, angled inward toward the muzzle.
- Assemble feet and legs. Sew each leg onto its foot at Rounds 6–9. The leg’s curve must face the same direction as the toes.
- Attach hind legs to body Rounds 72–80. Pin both before sewing either. Check the dragon lies flat and balanced.
- Attach fore legs to body Rounds 92–100. Pin before sewing. Verify the curled resting pose looks natural from all angles.
- Attach wings to Rounds 86–92 last. Pin symmetrically on both sides. Use the long yarn tails from the wing pieces to sew firmly in place.
Advanced Techniques Explained
Technique 1 — The Three-Toe Join
Instead of sewing three toe tubes onto a foot separately (which creates visible seam lines), the three toes are literally joined into one foot by crocheting around all three simultaneously.
Why 6sc on toe 1? Toe 1 is physically the farthest from where you start on toe 3. To travel all the way around it, you need 3 stitches on the outward journey and 3 on the return — 6 total. Toes 2 and 3 only need 3 each because you work them once in each direction.
Why does the round start shift in Rounds 6 and 8? The decreases pull the fabric asymmetrically. The pattern accounts for this by noting the shift — the marker must move with the actual fabric behavior. This is not a mistake; it is precise engineering that creates a naturally shaped foot rather than a perfectly symmetric but anatomically wrong one.
The result: The three toes appear to grow naturally from a single foot, with no visible join lines and no sewing required at the toe junction.
Technique 2 — Inline Spine Construction
Traditional amigurumi back spines are made as separate flat pieces and sewn on — slow, with visible seam lines. This pattern uses a superior method: the spines are crocheted directly onto the body surface in one continuous pass.
The chain formula: Each spine is a tiny individual piece: chain out (4 or 5 chains), work graduated stitches back down the chain (slst → hdc → dc, or slst → hdc → dc → tr), then anchor with a slip stitch into the body fabric. The chain going out creates the height; the graduated stitches create the slope; the anchor slip stitch locks it in place.
Why two sizes? The tail is narrow (4–18 stitches across). Small spines are proportional to a narrow tube. The body is wide (up to 45 stitches). Large spines are proportional to a wide barrel. One size would look enormous at the tail tip or tiny along the back.
Centering the anchor: The slip stitch must go into the center of the round — not the edge where your round marker sits. Off-center anchors cause spines to lean sideways.
Technique 3 — The BLO Twisted Horn
Horns that simply expand round by round look like ice cream cones. This pattern creates horns that curve, twist, and taper in multiple directions. The alternating increases and decreases in the BLO rows are what creates this effect.
Why alternate increase + decrease in the same round? When you both increase and decrease in the same round, the stitch count changes slowly but the fabric distorts. The increase and decrease are placed on opposite sides of the horn — this asymmetry forces the horn to curve. One side grows faster than the other, creating the natural spiral twist.
Why cotton yarn + 3mm hook instead of chenille + 5mm? Chenille is soft and flexible — a chenille horn would droop immediately. Cotton is stiffer, has less stretch, and holds its shape when worked tightly on a small hook. The 3mm hook creates a very dense fabric that is almost self-supporting. The horn can stand upright without any wire inside.
The optional spiral explained: Because Rounds 3–17 are all worked BLO, every round leaves an unused front loop visible on the horn’s surface. These front loops sit in a natural spiral pattern as the horn grows. When you slip stitch through each front loop from Round 3 to Round 17, you are tracing the spiral that was already built into the horn’s geometry — just making it visible with a contrasting thread.
Technique 4 — Gradient Body Growth
Most amigurumi bodies jump from one size to the next in large increments. This dragon’s tail gains exactly one stitch every 4–9 rounds, over 67 rounds of patient work. This restraint is what creates the long, serpentine, believably organic tail.
The growth rate: Rounds 1–67 bring the tail from 4 stitches to 18 — an increase of just 14 stitches over 67 rounds. That is approximately 1 new stitch every 4.8 rounds. A typical amigurumi body reaches 30+ stitches in 6 rounds. The slow rate is what creates a gradual taper rather than a sudden bulge.
Why the holding rounds matter: After each increase round, you work 4 (sometimes 2 or 9) plain rounds. These holding rounds allow the fabric to form a cylinder at that diameter before expanding again. Without them, consecutive increases would create a cone shape rather than a gently tapering tube.
The stuffing discipline: Leaving the first 17 rounds unstuffed is not laziness — it is structural design. A stuffed tail tip would be rigid. An unstuffed tail tip is pliable and curls naturally under its own weight, exactly as a dragon’s tail should rest when curled on a floor.
Skills This Project Will Teach You
This is a masterclass in amigurumi. Every major technique appears somewhere in Lóng Shén, and by the time you finish, you will have hands-on practice with all of them.
| Skill | Where you practice it |
|---|---|
| Magic Ring Mastery | Every toe (×12), every leg (×4), horns (×2) |
| Oval Foundation Chain | Head and both ears |
| Continuous Spiral Rounds | 112 rounds of body, 26 of head, 15 per leg |
| Invisible Decrease | All closing seams throughout |
| BLO Texturing | Horns (Rounds 3–18) and wings (Rows 2–6) |
| Surface Crocheting | All 36 spines + horn spiral |
| Multi-Piece Joining | The three-toe foot construction |
| Staircase Row Construction | Wing BLO staircase method |
| Position-Critical Shaping | Body Rounds 68–112 |
Time Planning
Knowing what to expect prevents frustration and helps you plan sessions strategically.
| Section | Rounds / Steps | Estimated Time | Difficulty |
|---|---|---|---|
| Body & Tail | 112 rounds | 14–20 hours | Intermediate |
| Head | 26 rounds | 2–3 hours | Beginner |
| 4× Feet (toes + join) | 10 rounds each | 3–4 hours | Advanced |
| 4× Legs | 15 rounds each | 3–4 hours | Beginner |
| Gold Spines (36 total) | Continuous | 2–3 hours | Intermediate |
| 2× Horns + spiral | 18 rounds each | 2–3 hours | Advanced |
| 2× Ears | 4 rounds each | 30–45 min | Beginner |
| Eyebrows | Chain only | 5 min | Beginner |
| 2× Wings | 6 rows each | 1–2 hours | Intermediate |
| Final Assembly | 9 steps | 2–3 hours | Advanced |
| Total | — | 30–43 hours | Advanced |
Recommended Session Strategy
Session 1 (2–3 hrs): Body through Round 67 — the slow-growth tail section. Perfect for evenings.
Sessions 2–4 (3–4 hrs each): Body expansion and neck (Rounds 68–112). Mark your round starts obsessively. End each session at the end of a complete even round.
Session 5 (2–3 hrs): All four toes + four legs. Make all pieces in sequence — toes first, then legs, then the joined feet. This is the most technically demanding session.
Session 6 (2–3 hrs): Head + horns. The cotton yarn and small hook will feel strange after the chenille — give yourself a few rows to adjust tension.
Session 7 (2–3 hrs): Wings, ears, eyebrows, spines. The spines take longer than expected — set aside a full hour for all 36.
Session 8 (2–3 hrs): Final assembly. Do this in daylight, pinning everything before sewing anything.
How to Never Lose Your Place
- Keep a paper tally — mark every completed round. For 112 rounds, do not trust your memory.
- Use different colored markers — one color for the round start, a different color every 10th round as a checkpoint.
- Count before you continue — every time you pick up the project, count the current round’s stitches before starting the next.
- Leave contrast yarn markers — at Rounds 72 and 92, weave a small piece of contrast yarn through one stitch as a permanent reference point for leg attachment.
- Photograph your work in progress — a quick photo at the end of each session captures your position, the current shape, and stitch marker location.
Troubleshooting & FAQ
My stitch count keeps going wrong in chenille yarn.
Chenille hides stitches inside its fibers. Always count stitches before you start the next round, not after. Use a bright-colored stitch marker every 10 stitches if needed. In dark crimson yarn, a small flashlight angled across the fabric helps make individual stitches visible.
My tail tip looks flat and floppy. Did I make a mistake?
Not at all — this is exactly correct. The first 17 rounds are intentionally left unstuffed to keep the tip naturally flat and flexible. The floppy, sinuous tail is part of what makes this dragon look so lifelike when curled on a floor.
The dragon is smaller/larger than 47 inches. Is that normal?
Completely normal. Finished size depends on your tension, the exact yarn brand, and your hook. Different chenille brands can produce noticeably different results even at the same hook size.
Where exactly do I place the gold spine anchors?
Before starting the spines, place removable markers at every 3rd round through the tail section and every 4th round through the body section. These give you pre-marked targets. Always insert the anchor slip stitch at the middle of the round — not the edge — so the spines sit centered on the back.
Can I use different colors?
Absolutely. The pattern works in any color combination. Deep forest green with bronze spines, midnight blue with silver, or jet black with flame orange are equally dramatic. Keep the horn cotton separate from the body chenille regardless of color.
Is the spiral horn ridge (FLO slip stitch) difficult?
It looks technical but it is just slip stitches worked into front loops — one stitch at a time in a spiral. Attach the cotton yarn cleanly to the front loop of Round 3 and work consistently into each front loop without missing one. Go slowly and the spiral ridge emerges naturally.
Care & Display
Washing: Hand wash only in cool water with a gentle detergent. Never wring or twist. Gently press out water and reshape while wet.
Drying: Air dry flat only. Never tumble dry — heat damages chenille. Keep away from direct sunlight which can fade the crimson.
Fluffing: If the pile flattens from handling, hold the piece 20–30cm from a steamer (not touching) and gently brush the pile back up while the steam opens the fibers.
Storage: Store loosely in a breathable cotton bag or on an open shelf. Avoid plastic bags which trap moisture.
Display: Curl the tail around the body to form a coil and let the head rest on the tail tip — the classic Chinese dragon resting pose. On a large circular rug, this creates a dramatic focal point. The crimson and gold combination makes Lóng Shén an especially meaningful gift for Lunar New Year celebrations.