
Crochet plants have been growing quietly in popularity for years — and it is easy to understand why. They do not need watering. They do not drop leaves in winter. They do not die when you forget about them for three weeks. And when they are made well, they look genuinely beautiful sitting on a shelf, a desk, or a windowsill alongside real plants.
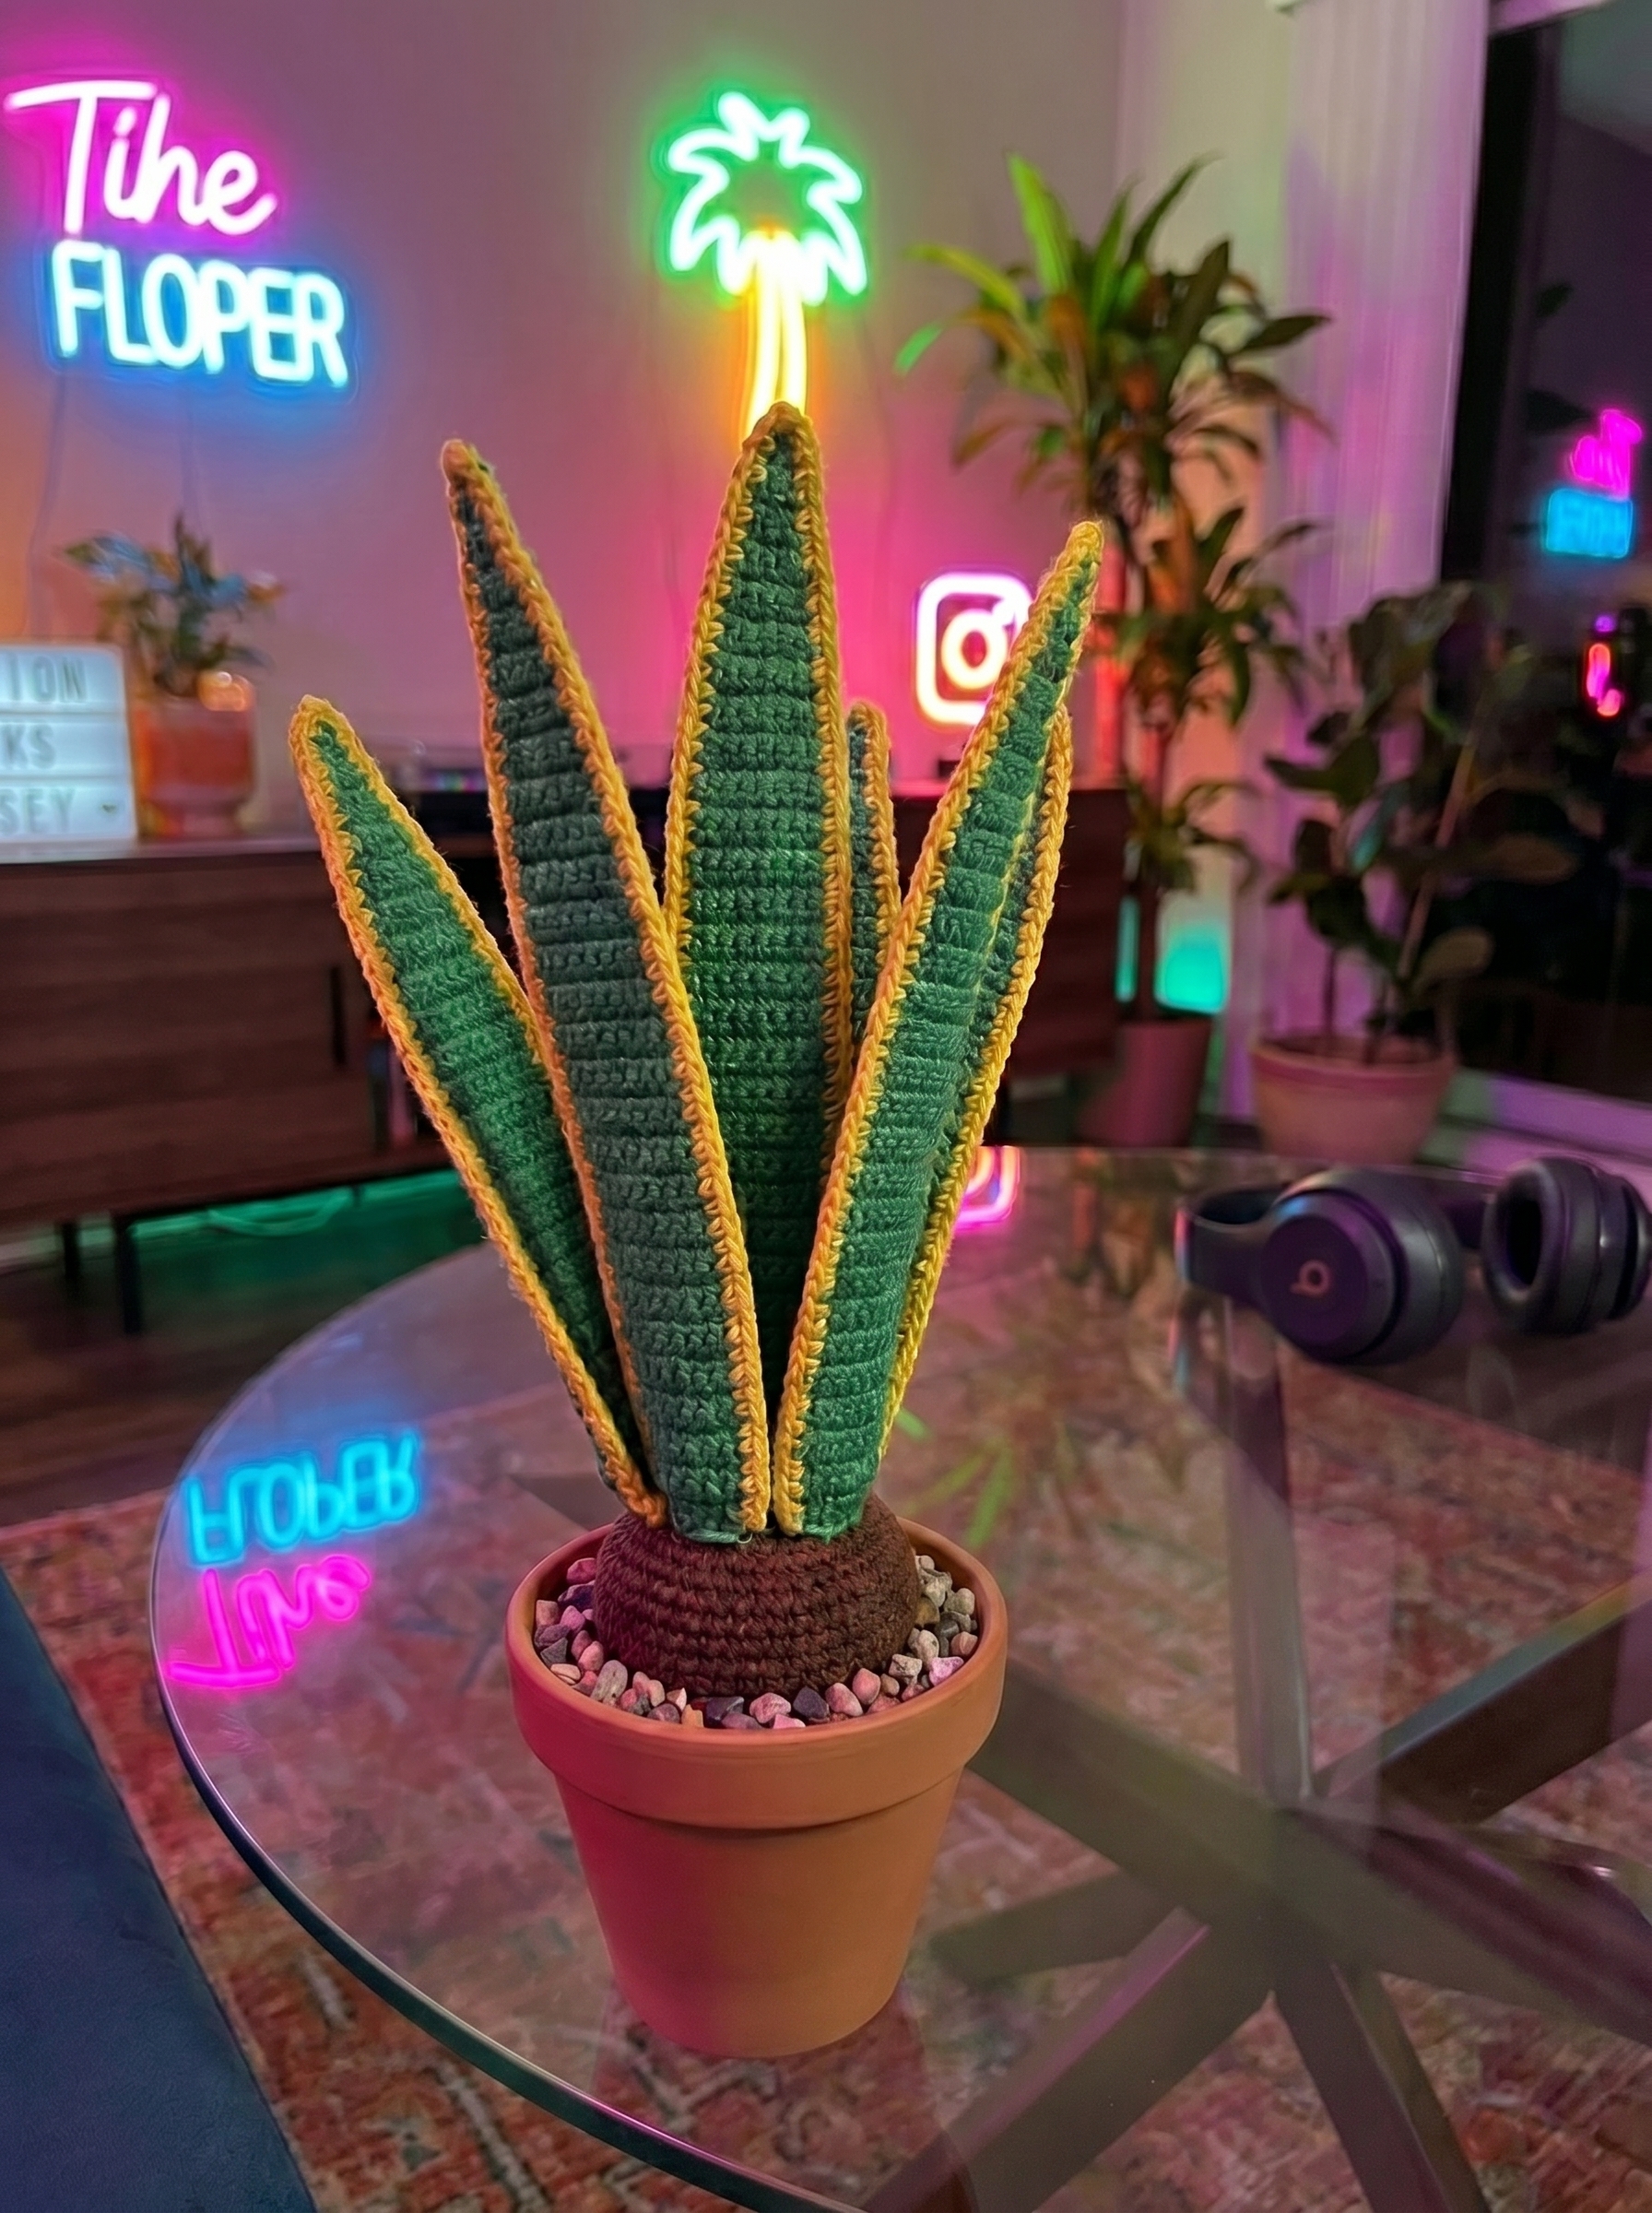
But there is a gap between a crochet plant that looks like a handmade decoration and one that makes a visitor stop and look twice. That gap is structure. Most crochet plants are soft, round, and stuffed — charming, but immediately recognizable as yarn. The snake plant we built and photographed for this article is different. Each leaf stands upright on its own. The tip is pointed and firm. The two-tone color — deep forest green body, warm yellow-gold border — catches the light the way a real Sansevieria trifasciata does.
That structure comes from three things working together: the way the leaves are constructed in rows around a foundation chain, the stitch height variation that naturally shapes each leaf to a point, and a hidden metal wire stem encased inside the yellow border that gives every leaf its rigidity. The result sits in a real clay pot with real decorative gravel and looks, at first glance, like a living plant.
We made every leaf in this plant ourselves — every row, every wire, every piece of gravel in the pot. What you see in the photograph above is exactly what this article builds.
This guide is written for three levels. If you are a beginner, we walk through every stitch and every decision in plain language with no assumptions. If you are intermediate, the row construction and wire embedding technique will give you genuinely new skills. If you are advanced, the tips section and variation options will push the project further. Everyone starts at Section 2.
What You Will Need — Full Materials List
Have everything ready before starting. This project uses materials from two different categories — crochet supplies and craft/florist supplies — and having both ready from the beginning makes the process smooth.
Yarn
The leaves use two colors: a deep forest green for the body of each leaf, and a warm yellow-gold for the border that runs around the entire perimeter. Both colors must be the same yarn weight so they work up evenly when you change color in Row 3.
Weight: 4-ply / Fingering weight, 100% cotton. Cotton is non-negotiable for this project — acrylic yarn has stretch that will cause the leaves to sag away from the wire over time. Cotton holds its shape firmly against the wire and keeps the leaf upright permanently.
Quantity needed:
- Green: approximately 0.7oz / 20g total for all six leaves
- Yellow-gold: approximately 0.35oz / 10g total for all six leaves
Yarn brand options — choose one:
| Brand | Notes |
|---|---|
| Scheepjes Catona | 4-ply cotton, excellent stitch definition, wide color range |
| Rico Essentials Cotton | 4-ply cotton, affordable, widely available |
| Drops Safran | 4-ply cotton, very smooth, good for beginners |
| Hobbii Rainbow Cotton 8/4 | 4-ply cotton, consistent dye lots, good value |
| Anchor Creativa Fino | 4-ply cotton, good stitch definition for fine detail |
For the green, look for a deep forest green shade — not lime, not olive, not sage. The tone should read as a real plant leaf under both natural daylight and warm indoor lighting.
For the yellow-gold, look for a warm mustard or sunflower yellow — not bright lemon yellow. The border on a real Sansevieria is a warm amber-gold, and the yarn shade should match that warmth.
Hook
2.5mm (US C/2)
This produces a firm, tight fabric that holds its shape around the wire. If you naturally crochet loosely, go down to a 2mm hook. If your hands feel strained, go up to 2.75mm. The fabric should feel slightly stiff — not soft like a scarf — and individual stitches should be clearly visible.
Wire Stems
6 metal flower stems, 18 inches / 45cm long, covered with green cloth, gauge 20 / 0.8mm
This is the element that makes the plant look genuinely real rather than decorative. The green cloth covering means the wire does not show through the crochet stitches even where they sit loosely at color change points.
Look for them in craft stores under: “fabric-covered floral stems,” “stem wire,” or “flower-making wire.” Online craft and florist supply shops are the most reliable source.
If cloth-covered wire is not available locally: plain green florist wire works as a substitute. Wrap it in green embroidery thread before using to prevent any metal showing through the stitches.
Do not use wire thicker than gauge 18 — it will be too stiff to bend smoothly into leaf shape. Do not use wire thinner than gauge 22 — it will not hold the leaf upright.
Pot, Foam and Gravel
Clay pot: 1 terracotta clay pot with an interior diameter of approximately 2.5 inches / 6.5cm. A real clay pot gives the finished plant authentic weight. Too large and the leaves lean outward; too small and there is not enough foam to hold six wire stems securely.
Floral foam for dried flowers: This must be the dry / grey floral foam — not the dense dark green wet foam used for fresh flower arrangements. Dry floral foam is lighter, firmer, and holds wire stems without compressing or crumbling. It is sometimes sold as “Styrofoam floral foam” or “dried flower foam.” Available in craft stores and online.
Decorative gravel: approximately 1oz / 30g. Small pebbles, aquarium gravel, or decorative stones. The gravel covers the foam and completes the potted plant appearance.
Other Tools Needed
- Wire cutters (not fabric scissors — wire will damage scissors blades)
- Paring knife or box cutter for shaping the foam
- Yarn needle / tapestry needle
- At least 2 stitch markers
- Pins (optional, for holding leaf position during assembly)
Before You Start — Understanding How This Pattern Works
Reading through this section before picking up your hook will make every step in Sections 5 and 6 feel logical. The construction method used for these leaves is different from standard amigurumi crochet, and understanding it in advance saves confusion mid-row.
How Each Leaf Is Built
Each leaf is crocheted in rows — not in the round. There are three rows per leaf. Row 1 and Row 2 are worked in green. Row 3 is worked in yellow-gold and encases the wire stem inside its stitches.
The key difference from regular row crochet is what happens at the tip of each leaf. Instead of turning at the end of a row and coming straight back, you chain a small number of stitches, work into those chains to form the pointed tip, and then continue crocheting back along the other side of the original foundation chain.
Your pattern describes this exactly: “continue crocheting the other side of the large starting chain, opposite the stitch you made previously.”
In plain terms: the foundation chain runs down the center of the leaf like a spine. You crochet down one side of it, create the tip, then crochet back up the other side — all in one continuous pass. Both sides of the leaf are made in a single row without seaming.
Why the Stitch Heights Change
Look at the stitch sequence in Row 1 of the large leaf: dc, tr, dc, hdc, sc at the tip — then sc, hdc, dc, tr, dc coming back. The stitches are tall in the middle section and short at the tip and base.
This matters because taller stitches make a wider, taller fabric. Shorter stitches make a narrower, shorter fabric. By mixing stitch heights across the row, the leaf naturally tapers to a point at the tip and widens through the main body — without any separate shaping rows or decreases.
Two Terms That Appear Repeatedly
“Keeping 4in of yarn before the slip knot” — This means leaving a 4-inch yarn tail before you make your slip knot and start the foundation chain. This tail is woven in after the row is complete and is not decorative. Do not trim it at the start.
“Marking the lower loop of the stitch” — When the pattern says to mark a stitch at the tip, place a stitch marker or a small piece of contrasting yarn through the back loop of that stitch. You will work into this marked stitch on the following row. Without the marker, finding the correct stitch again is genuinely difficult — especially at the tip where stitches are small and close together.
What Is Different from Amigurumi
| Standard Amigurumi | These Leaves |
|---|---|
| Worked in the round | Worked in rows |
| Stuffed with fiberfill | Shaped by internal wire |
| Same stitch throughout | Mixed stitches for shaping |
| Self-closing at top | Open at base for wire stems |
| Freestanding through tension | Held upright by wire in foam |
Yarn & Color Guide — Getting the Colors Right
The color combination is the first thing anyone notices about this plant. The deep green and warm gold work because they mirror the real Sansevieria trifasciata almost exactly. Getting both colors right matters more than the specific brand you choose.
Choosing Your Green
The green used in the body of each leaf is a deep, slightly muted forest green. When you hold potential yarns against the photograph of the finished plant, the correct shade will look like it belongs there — not too bright, not too grey, not too yellow.
Avoid: lime green (too bright), olive (too brown), sage (too pale and grey).
Look for: a green with depth and warmth, readable as a real plant leaf under any lighting condition.
Green shades that work well:
| Brand | Shade |
|---|---|
| Scheepjes Catona | Forest Green (412) |
| Rico Essentials Cotton | Dark Green (31) |
| Drops Safran | Dark Green (16) |
| Hobbii Rainbow Cotton 8/4 | Deep Forest or equivalent dark green |
| Anchor Creativa Fino | Dark Green |
Choosing Your Yellow-Gold
The border is not bright yellow. It is a warm, slightly golden yellow — closer to mustard or sunflower than lemon. On a real snake plant this edge has a slightly amber quality, and the yarn should reflect that warmth.
Yellow-gold shades that work well:
| Brand | Shade |
|---|---|
| Scheepjes Catona | Topaz (179) or Butterscotch (411) |
| Rico Essentials Cotton | Mustard (84) |
| Drops Safran | Curry (68) |
| Hobbii Rainbow Cotton 8/4 | Sunflower or Mustard equivalent |
| Anchor Creativa Fino | Warm yellow / gold equivalent |
Weight Consistency
Both yarns must be the same weight. If you mix a DK-weight green with a fingering-weight yellow, the border will pull differently from the body and distort the leaf edge at the color change in Row 3. Keep both at 4-ply / fingering weight throughout.
Quick Tension Check Before Starting
Chain 20 with your green yarn and 2.5mm hook. Work 4 rows of sc. The swatch should measure approximately 3 inches wide. If it measures wider, go down to a 2mm hook. If it measures narrower, go up to 2.75mm.
How to Crochet the Large Leaves (×3)
Make three large leaves total. Complete each leaf fully — all three rows — before starting the next one. This makes it easier to check the shape and stitch count on a finished piece rather than a half-made one.
Each large leaf is worked across three rows in green (Rows 1 and 2) then yellow-gold (Row 3). The wire stem is added during Row 3.
Materials per large leaf:
- 2.5mm hook
- Green yarn (~0.2oz / 6g)
- Yellow-gold yarn (~0.1oz / 3g)
- 1 metal flower stem, 18 inches long
- 2 stitch markers
Row 1
Before starting: Leave 4 inches of yarn before your slip knot. This tail is woven in after the row — do not trim it.
Foundation chain: Chain 43.
The chain of 43 stitches is the spine of your leaf. The end closest to your hook is where you begin. The slip-knot end with the 4-inch tail is the base.
First side — working from base toward tip:
- Skip the first 4 chains from the hook (these count as ch-3 for height plus ch-1 replacing the first dc)
- Work 1 dc into the 5th chain from the hook
- Work 14 dc continuing along the chain
- Work 10 tr
- Work 7 dc
- Work 5 hdc
- Work 2 sc — you are now at the tip end of the leaf
Tip:
- Chain 3
- Work 1 sc into the 2nd stitch away from the hook
- Place stitch marker in the lower loop of this sc — you need it in Row 2
- Work 1 sc continuing along this chain
Second side — working back toward the base along the underside of the foundation chain:
Starting at the level of the slip knot, work back along the opposite side of the foundation chain:
- Work 2 sc
- Work 5 hdc
- Work 7 dc
- Work 10 tr
- Work 16 dc — make the last dc at the bottom of the 4-ch that started Row 1
Turn.
Total stitch count: 84 stitches
Now bring the starting 4-inch tail under several stitches and cut it flush with the surface of the work — weave it in securely.
Beginner note: Lay the piece flat after Row 1. It should look like a long narrow leaf outline — wider through the middle, narrowing toward the tip. Both sides were made in the same row without seaming. If your stitch count is 84, you are ready for Row 2.
Intermediate note: The stitch height sequence — dc / tr / dc / hdc / sc at the tip, then sc / hdc / dc / tr / dc returning — creates the taper automatically. No shaping rows are needed because the mixed heights do all the work.
Row 2
Row 2 is worked on top of Row 1. It adds a second layer of stitches that gives the leaf its slight three-dimensional thickness.
Starting Row 2:
- Chain 3 — this replaces the first dc
- Skip the first stitch
- Work 1 dc into the next stitch
- Work 26 dc
- Work 8 hdc
- Work 6 sc
Tip:
- Chain 2
- Work 1 sc into the 2nd stitch away from the hook
- Place your second stitch marker in the lower loop of this sc — you need it in Row 3
- Work 1 sc into the stitch marked in Row 1
- Work 1 sc into the next stitch
Continuing back:
- Work 4 sc
- Work 8 hdc
- Work 28 dc — make the last dc in the top of the 4-ch that started Row 1
Turn.
Total stitch count: 86 stitches
Color change at end of Row 2: Switch to yellow-gold yarn. Leave 4 inches of yellow at the start and 4 inches of green at the cut end — both will be woven in after Row 3.
Beginner note: The stitch count goes from 84 to 86 between Row 1 and Row 2 because of the extra stitches worked at the tip. If your count is 86, you are correct.
Advanced note: This is the moment to pre-shape your wire. Before starting Row 3, fold the 18-inch stem in half and bend it to closely follow the leaf outline. A well-shaped wire placed at the start of Row 3 needs almost no adjustment afterward.
Row 3 — Yellow Border with Wire Encased
Row 3 is worked in yellow-gold and encases the metal wire stem inside every stitch. This is what gives the finished leaf its rigidity and shape.
Preparing the wire:
Take one 18-inch metal flower stem. Fold it exactly in half so both cut ends meet. You now have a doubled wire approximately 9 inches long. Bend it gently to follow the shape of the crocheted leaf — the fold sits at the tip, the two cut ends extend downward from the base.
Positioning the wire:
Place the bent wire along the top surface of Row 2, following the leaf edge all the way around. Hold it in position with your non-hook hand. As you work each sc stitch, insert your hook over the wire and into the Row 2 stitch below it — the wire ends up encased inside the completed sc stitch.
Row 3:
- Chain 1
- Work 42 sc, encasing the wire in every stitch
- Work 1 increase (2 sc into the same stitch) in the last stitch before the tip
- Work 1 increase (2 sc) in the stitch marked in Row 2
- Work 42 sc — make the last sc at the top of the 3-ch that started Row 2
Total stitch count: 88 stitches
The wire now runs all the way around the leaf invisibly, giving it the shape desired.
After Row 3:
There should be approximately 2.5 inches of wire stem extending from the base at each end. Do not cut this yet — these extensions go into the floral foam during assembly.
Fasten off the yellow yarn leaving a 4-inch tail. Thread all remaining yarn tails (green and yellow) onto your needle and pass each one under several stitches on the wrong side. Cut flush with the surface.
Large leaf complete. Make two more.
Finished large leaf checklist:
- ✅ Leaf outline is smooth with no gaps between rows
- ✅ Tip comes to a clean point
- ✅ Yellow border runs evenly around the full perimeter
- ✅ Wire is completely hidden inside the yellow stitches — no metal visible
- ✅ Approximately 2.5 inches of wire extends from the base at each end
- ✅ All yarn tails woven in and trimmed
How to Crochet the Small Leaves (×3)
The small leaves follow exactly the same three-row construction as the large leaves. The only difference is the foundation chain length and adjusted stitch counts — producing a shorter, slightly narrower leaf that sits outside the large leaves in the final arrangement.
Make three small leaves total. Complete each one fully before starting the next.
Materials per small leaf:
- 2.5mm hook
- Green yarn (~0.15oz / 4g)
- Yellow-gold yarn (~0.08oz / 2g)
- 1 metal flower stem, 18 inches long
- 2 stitch markers
Row 1
Before starting: Leave 4 inches of yarn before your slip knot.
Foundation chain: Chain 35.
First side — working from base toward tip:
- Skip the first 3 chains from the hook (these count as ch-2 for height plus ch-1 replacing the first hdc)
- Work 1 hdc into the 4th stitch away from the hook
- Work 7 hdc continuing along the chain
- Work 17 dc
- Work 5 hdc
- Work 2 sc — you are at the tip
Tip:
- Chain 2
- Work 1 sc into the 2nd stitch away from the hook
- Place stitch marker in the lower loop of this sc
Second side — working back along the underside of the foundation chain:
Starting at the level of the slip knot, opposite the stitch just made:
- Work 2 sc
- Work 5 hdc
- Work 17 dc
- Work 9 hdc — make the last hdc at the bottom of the 3-ch that started Row 1
Turn.
Total stitch count: 68 stitches
Bring the starting 4-inch tail under several stitches and cut it flush with the surface.
Beginner note: The small leaf uses hdc as its tallest stitch rather than tr — this is why it is shorter and slightly narrower than the large leaf. The construction logic is identical.
Row 2
Starting Row 2:
- Chain 3 — replaces the first dc
- Skip the first stitch
- Work 1 dc into the next stitch
- Work 20 dc
- Work 7 hdc
- Work 5 sc
Tip:
- Chain 2
- Work 1 sc into the 2nd stitch away from the hook
- Place your second stitch marker in the lower loop of this sc
- Work 1 sc into the stitch marked in Row 1
- Continue crocheting in the stitches of the preceding row
Continuing back:
- Work 4 sc
- Work 7 hdc
- Work 22 dc — make the last dc at the top of the 3-ch that started Row 1
Turn.
Total stitch count: 70 stitches
Color change: Switch to yellow-gold yarn. Leave 4-inch tails of both green and yellow to weave in after Row 3.
Row 3 — Yellow Border with Wire Encased
Preparing the wire:
Take one 18-inch metal stem. Fold it exactly in half. Bend it gently to follow the small leaf outline — fold at the tip, cut ends at the base.
Positioning the wire:
Lay the bent wire along the top surface of Row 2. Hold it in position and crochet Row 3 over it, trapping the wire inside each sc stitch.
Row 3:
- Chain 1
- Work 34 sc, encasing the wire in every stitch
- Work 1 increase (2 sc) in the last stitch before the tip
- Work 1 increase (2 sc) in the stitch marked in Row 2
- Work 34 sc — make the last sc in the top of the 3-ch that started Row 2
Total stitch count: 72 stitches
The wire now runs around the small leaf invisibly.
There should be approximately 4 inches of wire stem extending from the base at each end. Do not cut yet.
Fasten off yellow yarn leaving a 4-inch tail. Weave in all remaining tails and cut flush.
Small leaf complete. Make two more.
Finished small leaf checklist:
- ✅ Leaf is visibly shorter and narrower than the large leaf
- ✅ Tip is clean and pointed
- ✅ Yellow border runs evenly around the full perimeter
- ✅ Wire completely hidden inside yellow stitches
- ✅ Approximately 4 inches of wire extends from the base at each end
- ✅ All tails woven in and trimmed
The Wire Stem — How, Why & Safety
Why the Wire Goes Inside the Yellow Border
The wire follows the complete outer perimeter of the leaf — both sides and the tip — because this gives structure to the entire edge simultaneously. A wire placed only down the center spine would hold the leaf upright but allow the edges to droop sideways. A perimeter wire keeps the whole leaf flat, firm, and correctly shaped.
This is also why the wire is folded in half before use. A single strand of 0.8mm wire would bend too easily under the weight of the crochet fabric. The doubled wire is stiff enough to hold the leaf upright while still being flexible enough to shape by hand.
Step-by-Step Wire Preparation
Step 1 — Check the length: Hold the 18-inch stem against your completed Row 2 leaf before folding. The stem should be comfortably longer than the full leaf perimeter with several inches to spare at the base.
Step 2 — Fold: Fold the stem exactly at the midpoint so both cut ends meet. The fold point sits at the leaf tip.
Step 3 — Shape: Bend the doubled wire to follow the leaf outline closely. It does not need to be perfect — you will refine shape after the leaf is planted. The wire should lie flat against the Row 2 surface without springing away.
Step 4 — Position: Lay the shaped wire along the top surface of Row 2. Fold at the tip marker. Both cut ends extend downward from the base.
Step 5 — Encase: Work Row 3 sc stitches over the wire. Insert your hook over the wire and into the Row 2 stitch below it each time. The wire should feel enclosed inside the completed stitch — not sliding loose and not forcing the stitch wider than normal.
Safety
Wire ends at the base: The cut wire ends go into floral foam during assembly. Before inserting into the pot, check each end — if any feel sharp, use small pliers to fold the very tip back approximately 2mm to round it off.
Scissors vs wire cutters: Always use wire cutters to trim metal stems. Fabric scissors used on wire will be damaged immediately and leave rough sharp cut ends.
Display: This plant is for decorative display only. The wire inside each leaf is completely hidden but is present throughout the construction. Keep out of reach of children under 5 and pets who might pull the leaves.
Shaping After Assembly
Do all final shaping after all six leaves are planted and before the gravel is added — at that stage you can see the full arrangement and adjust leaves as a group.
Large leaves: Bend slightly inward at the base and slightly outward at the tip — this creates the natural funnel cluster shape of a real snake plant.
Small leaves: Angle these slightly more outward than the large leaves. Younger snake plant leaves grow at the outer edges of the cluster, so this placement looks botanically correct.
General rule: step back and look from all four sides. Slight asymmetry between leaves reads as natural and organic. Perfect symmetry looks artificial.
Assembly — Step by Step
Assembly takes approximately 20–30 minutes. Get the foam fitted correctly before inserting any leaves — adjusting the foam once wire stems are in is much harder.
Step 1 — Cut the Floral Foam to Fit the Pot
Place the pot upside down on top of the foam block. Press gently to leave a circular impression. Cut the foam along this impression with a paring knife or box cutter to make a rough cylinder.
Test-fit the cylinder in the pot. Shave away small amounts where it presses too tightly against the interior walls. Work gradually — test frequently. Removing too much in one cut is irreversible.
The foam is correctly sized when it drops into the pot with light hand pressure, sits level at the bottom, and does not wobble or spin. Once seated, there should be approximately half an inch between the top of the foam and the rim of the pot — this space holds the gravel.
Step 2 — Trim the Wire Stems
Before inserting any leaves, trim all six wire ends to the correct length. The wire extensions at the base of each leaf need to be slightly shorter than the depth of the foam so the leaf base sits on top of the foam surface when fully inserted.
Hold one large leaf beside the pot with its base at foam level. Note where the wire ends reach — they should stop just short of the bottom of the pot. Mark that point and trim with wire cutters. Use this leaf as your length reference for all five remaining leaves.
Trim all six leaves before inserting any of them.
Step 3 — Plant the Three Large Leaves
Place the three large leaves first, forming the inner cluster.
Imagine a circle approximately 1 inch in diameter at the center of the foam surface. Push the first large leaf stem-first into the foam at one point on that imaginary circle — both wire ends entering the foam side by side — pushing until the crochet base touches the foam.
Place the second large leaf directly opposite the first. Place the third equally between the first two. The three large leaves now form a triangle pattern when viewed from above.
Check that all three are standing upright with bases at foam level. Adjust by pulling slightly out and reinserting at a different angle if needed.
Step 4 — Plant the Three Small Leaves
Insert the three small leaves just outside the triangle formed by the large leaves, in staggered positions — each small leaf sits in the gap between two large leaves, not directly beside one.
Angle each small leaf slightly more outward than the large leaves. When viewed from above, the six leaves should form a complete alternating circle — no two leaves pointing in exactly the same direction, no large gaps on one side.
Step 5 — Shape the Leaves
Before adding gravel, make all final adjustments. Push leaves slightly left or right at the base by moving the wire in the foam. Curve tips inward or outward by bending the wire gently with your fingers.
The plant should look as though it grew this way — not perfectly symmetrical, but naturally varied in angle and direction.
Step 6 — Add the Gravel
Pour the decorative gravel slowly from one point rather than scattering. Let it settle between the leaf bases without dislodging the wire stems.
Fill to foam level so the foam is completely covered. The gravel should sit level with or just above the leaf base contact points, concealing all foam and wire.
Tap the pot gently on a flat surface to settle the gravel evenly. Do a final check of leaf positioning and make any last small adjustments.
The crochet snake plant is complete.
Variation — Crocheted Soil Ball Instead of Foam
If you prefer a fully crocheted result — or cannot source the correct dry floral foam — you can use a crocheted soil ball instead. The leaves are sewn into the soil ball rather than wired into foam.
For this variation, leave approximately 12 inches of green yarn at the end of each leaf (instead of trimming close) — you will use this length to sew the leaves to the soil ball.
Crocheting the Soil Ball
Work in the round using dark brown 4-ply cotton and your 2.5mm hook. The darkest earthy brown available works best — Scheepjes Catona Chocolate (507), Rico Essentials Cotton Dark Brown, or Drops Safran in the darkest brown shade.
Round 1: Magic ring, 6 sc into ring. (6 sts) Round 2: 2 sc in each st around. (12 sts) Round 3: [Sc 1, 2 sc in next st] 6 times. (18 sts) Round 4: [Sc 2, 2 sc in next st] 6 times. (24 sts) Round 5: [Sc 3, 2 sc in next st] 6 times. (30 sts) Round 6: [Sc 4, 2 sc in next st] 6 times. (36 sts) Rounds 7–12: Sc 36 around. (36 sts even)
Test inside the pot — the ball should sit snugly without falling through. If too small, work 2 more even rounds.
Round 13: [Sc 4, sc2tog] 6 times. (30 sts) — Begin stuffing firmly with fiberfill now. Round 14: [Sc 3, sc2tog] 6 times. (24 sts) Round 15: [Sc 2, sc2tog] 6 times. (18 sts) Round 16: [Sc 1, sc2tog] 6 times. (12 sts) Round 17: [Sc2tog] 6 times. (6 sts)
Fasten off. Thread tail through remaining 6 front loops, pull tight to close. Weave in end.
Attaching the Leaves
Arrange all six leaves against the top of the soil ball before sewing — three large inner, three small staggered outer. Mark each position with a pin.
Thread the 12-inch green tail from one leaf onto a tapestry needle. Push down through the ball at the marked position and come back up approximately 4 stitches away. Sew the leaf base down with 3–4 firm stitches through both the leaf base and the ball surface. Fasten off securely inside the ball.
Repeat for all six leaves.
Place the completed ball inside the clay pot. If the ball sits slightly loose, pack gravel around the sides between ball and pot interior. Add a thin layer of gravel over the visible soil ball surface.
Foam vs Soil Ball — Quick Comparison
| Foam Version | Crocheted Soil Version | |
|---|---|---|
| Leaf attachment | Wire stems in foam | Sewn yarn tails |
| Adjustable after planting | Yes — any time before gravel | No — fixed once sewn |
| Extra materials | Floral foam + wire | Brown yarn + fiberfill |
| Fully crochet result | No | Yes |
| Recommended for | All skill levels | Intermediate and above |
Tips by Skill Level
For Beginners
Make one large leaf first before committing to all six. Work through all three rows on a single leaf — check the stitch count, check the wire coverage, check the tip shape. If something is off, you only have one leaf to undo rather than three. Once the first leaf looks right, the remaining five will be faster and more consistent.
Slow down at the tip. The U-turn at the tip of each leaf is where most beginners lose their place. Practice the motion on a short test chain of 15 stitches before starting: work 5 sc along one side, chain at the tip, work back into those chains, continue down the underside of the original chain. When that motion feels natural, your actual leaf will not feel confusing.
Count stitches at the end of every row. Large leaf: 84 after Row 1, 86 after Row 2, 88 after Row 3. Small leaf: 68 / 70 / 72. If your count is off by 1–2, check the tip first — the most common mistake is missing one of the two increase stitches at the tip marker in Row 3.
Never skip the stitch markers. They take three seconds to place and save several minutes of confusion later. A locking stitch marker or a loop of contrasting yarn through the back loop of the stitch both work equally well.
Take Row 3 slowly. You are holding both the wire and the crochet in position while inserting the hook. Work 4–5 stitches, reposition your grip, work another 4–5. If the wire shifts, pause and reposition before continuing.
For Intermediate Crocheters
Focus on even tension at stitch transitions. The points where stitch type changes — sc to hdc, hdc to dc, dc to tr — are where tension inconsistencies are most visible. Keep the same pull-through tension regardless of stitch type and the transitions will read as smooth and invisible.
Block each leaf before assembly. Dampen a cloth and press gently against the green section of each finished leaf. Do not wet the wire or the yellow border. This takes 5 minutes per leaf and significantly improves the surface texture — removing any slight ridging between rows that is common with cotton yarn.
Shape the wire before encasing. Once Row 3 is complete the wire is locked in position and reshaping is difficult. Spend an extra minute bending the doubled wire to closely follow the leaf outline before Row 3 begins.
Fix wire exposure immediately. If wire is visible through the yellow border after Row 3, address it while the yarn is still slightly loose. Thread a short length of yellow yarn onto your needle and work small running stitches over the exposed area, pulling adjacent sc stitches closed over the wire.
Vary leaf heights for a more naturalistic result. The pattern produces leaves of consistent height within each size group. Making one small leaf with a slightly shorter foundation chain creates a younger-looking leaf that adds realism when placed in the outer position.
For Advanced Crocheters
Add natural color variation to the green body. Real snake plant leaves have subtle light and dark stripes running lengthwise. Recreate this by working Row 1 in a deep forest green and Row 2 in a slightly lighter sage green — or hold a thin strand of lighter green alongside the main yarn for selected sections of Row 2. The shift reads as natural striping when viewed from the front.
Adapt the pattern for other Sansevieria varieties:
- Sansevieria moonshine — broader, paler silver-green leaves. Use silvery sage green yarn with a white or cream border instead of yellow.
- Sansevieria hahnii (bird’s nest) — very short, wide rosette-forming leaves. Reduce the foundation chain to 20 and reverse the stitch height — sc toward the tip, dc at the base.
- Sansevieria cylindrica — tubular leaves. Work in the round decreasing to a point, no wire needed if worked tightly over a wooden dowel.
Apply the wire encasement technique to other projects. The method of folding a wire in half and encasing it in the border row works on any flat crochet leaf or petal. Once mastered here, apply it to monstera leaves, philodendron hearts, or crochet floral arrangements.
Add a matching crochet pot cover. Work a flat circle base to match the pot diameter in your chosen color, then work straight sc rounds upward for the pot height. End with a BLO round for a clean rim edge. A bobble stitch or moss stitch surface adds texture without distracting from the plant above.
Frequently Asked Questions
Can I make this without wire stems?
Yes — but the leaves will not stand upright. Without a wire frame, even firm cotton fabric does not have enough rigidity to hold a vertical position. Leaves made without wire can be sewn flat onto fabric as botanical appliqués, used in wall hangings, or attached to tote bags and cushion covers where standing upright is not needed.
What is the difference between dry floral foam and wet floral foam?
Wet floral foam — the dense dark green type sold for fresh flower arrangements — absorbs water and will eventually crumble inside a sealed pot. Dry floral foam, also sold as grey floral foam or Styrofoam floral foam, is firmer and designed for dried and artificial arrangements. It does not absorb water and holds wire stems securely without deteriorating. Using wet foam in this project will result in leaves gradually loosening as the foam breaks down. Always use the dry type.
The wire is showing through the yellow border — how do I fix it?
The most common cause is sc stitches that are too loose in Row 3. To fix a completed leaf, thread yellow yarn onto a tapestry needle and work small horizontal running stitches over the exposed area, pulling adjacent sc stitches closed over the wire. For future leaves, pull the yarn slightly more firmly through each stitch in Row 3 — firm enough to encase the wire diameter, not so tight that the stitch distorts.
How do I clean the finished plant?
Cotton leaves can be gently hand washed. Hold each leaf under cool running water and press gently with your fingers to release surface dust. Lay flat to dry completely before reshaping. Do not submerge the clay pot or wet the floral foam. Wipe the pot exterior with a damp cloth only. Gravel can be removed, rinsed separately, and replaced once dry. Do not machine wash — the wire inside the leaves will rust if the fabric stays damp for extended periods.
How long does this project take?
Beginners: approximately 4–6 hours total — 30–40 minutes per leaf across six leaves, plus 20–30 minutes for assembly. Intermediate: 3–4 hours for all six leaves plus assembly. Advanced: under 3 hours working efficiently.
The assembly step takes the same time at any level. The leaves are independent pieces — stopping between leaves causes no continuity issues, making this a good multi-session project.
Can I make more than six leaves for a fuller plant?
Yes. Add up to three more small leaves in a second outer ring, or two more large leaves to the inner cluster. Each additional leaf needs its own wire stem. Scale up the pot and foam proportionally — more stems need more foam surface area to hold securely. Keep the same staggered arrangement principle: large leaves inner, small leaves outer, no two pointing in exactly the same direction.
Conclusion — A Plant That Needs Nothing from You
A real snake plant is one of the most forgiving houseplants you can own. The crochet version is even simpler — no watering schedule, no seasonal changes, no repotting. It sits exactly where you put it and looks exactly the same every single day.
What we built here is a plant that holds its shape because of how it is constructed — not despite being yarn. The row-by-row construction along a foundation chain, the mixed stitch heights that create the pointed tip without any separate shaping, the wire encased in the yellow border that gives every leaf its structure — these techniques work together and produce something that looks genuinely real.
We made every leaf ourselves, from the first foundation chain to the last piece of gravel in the pot. Every decision in this article comes from working through the pattern directly. What you see in the photograph above is exactly what these instructions build.
Start with one large leaf. Follow Row 1 through to the tip, work back along the underside of the chain, and see how the leaf outline appears in your hands at the end of that first row. The remaining five leaves will feel easier each time.
We would love to see how yours turns out. 🌿