
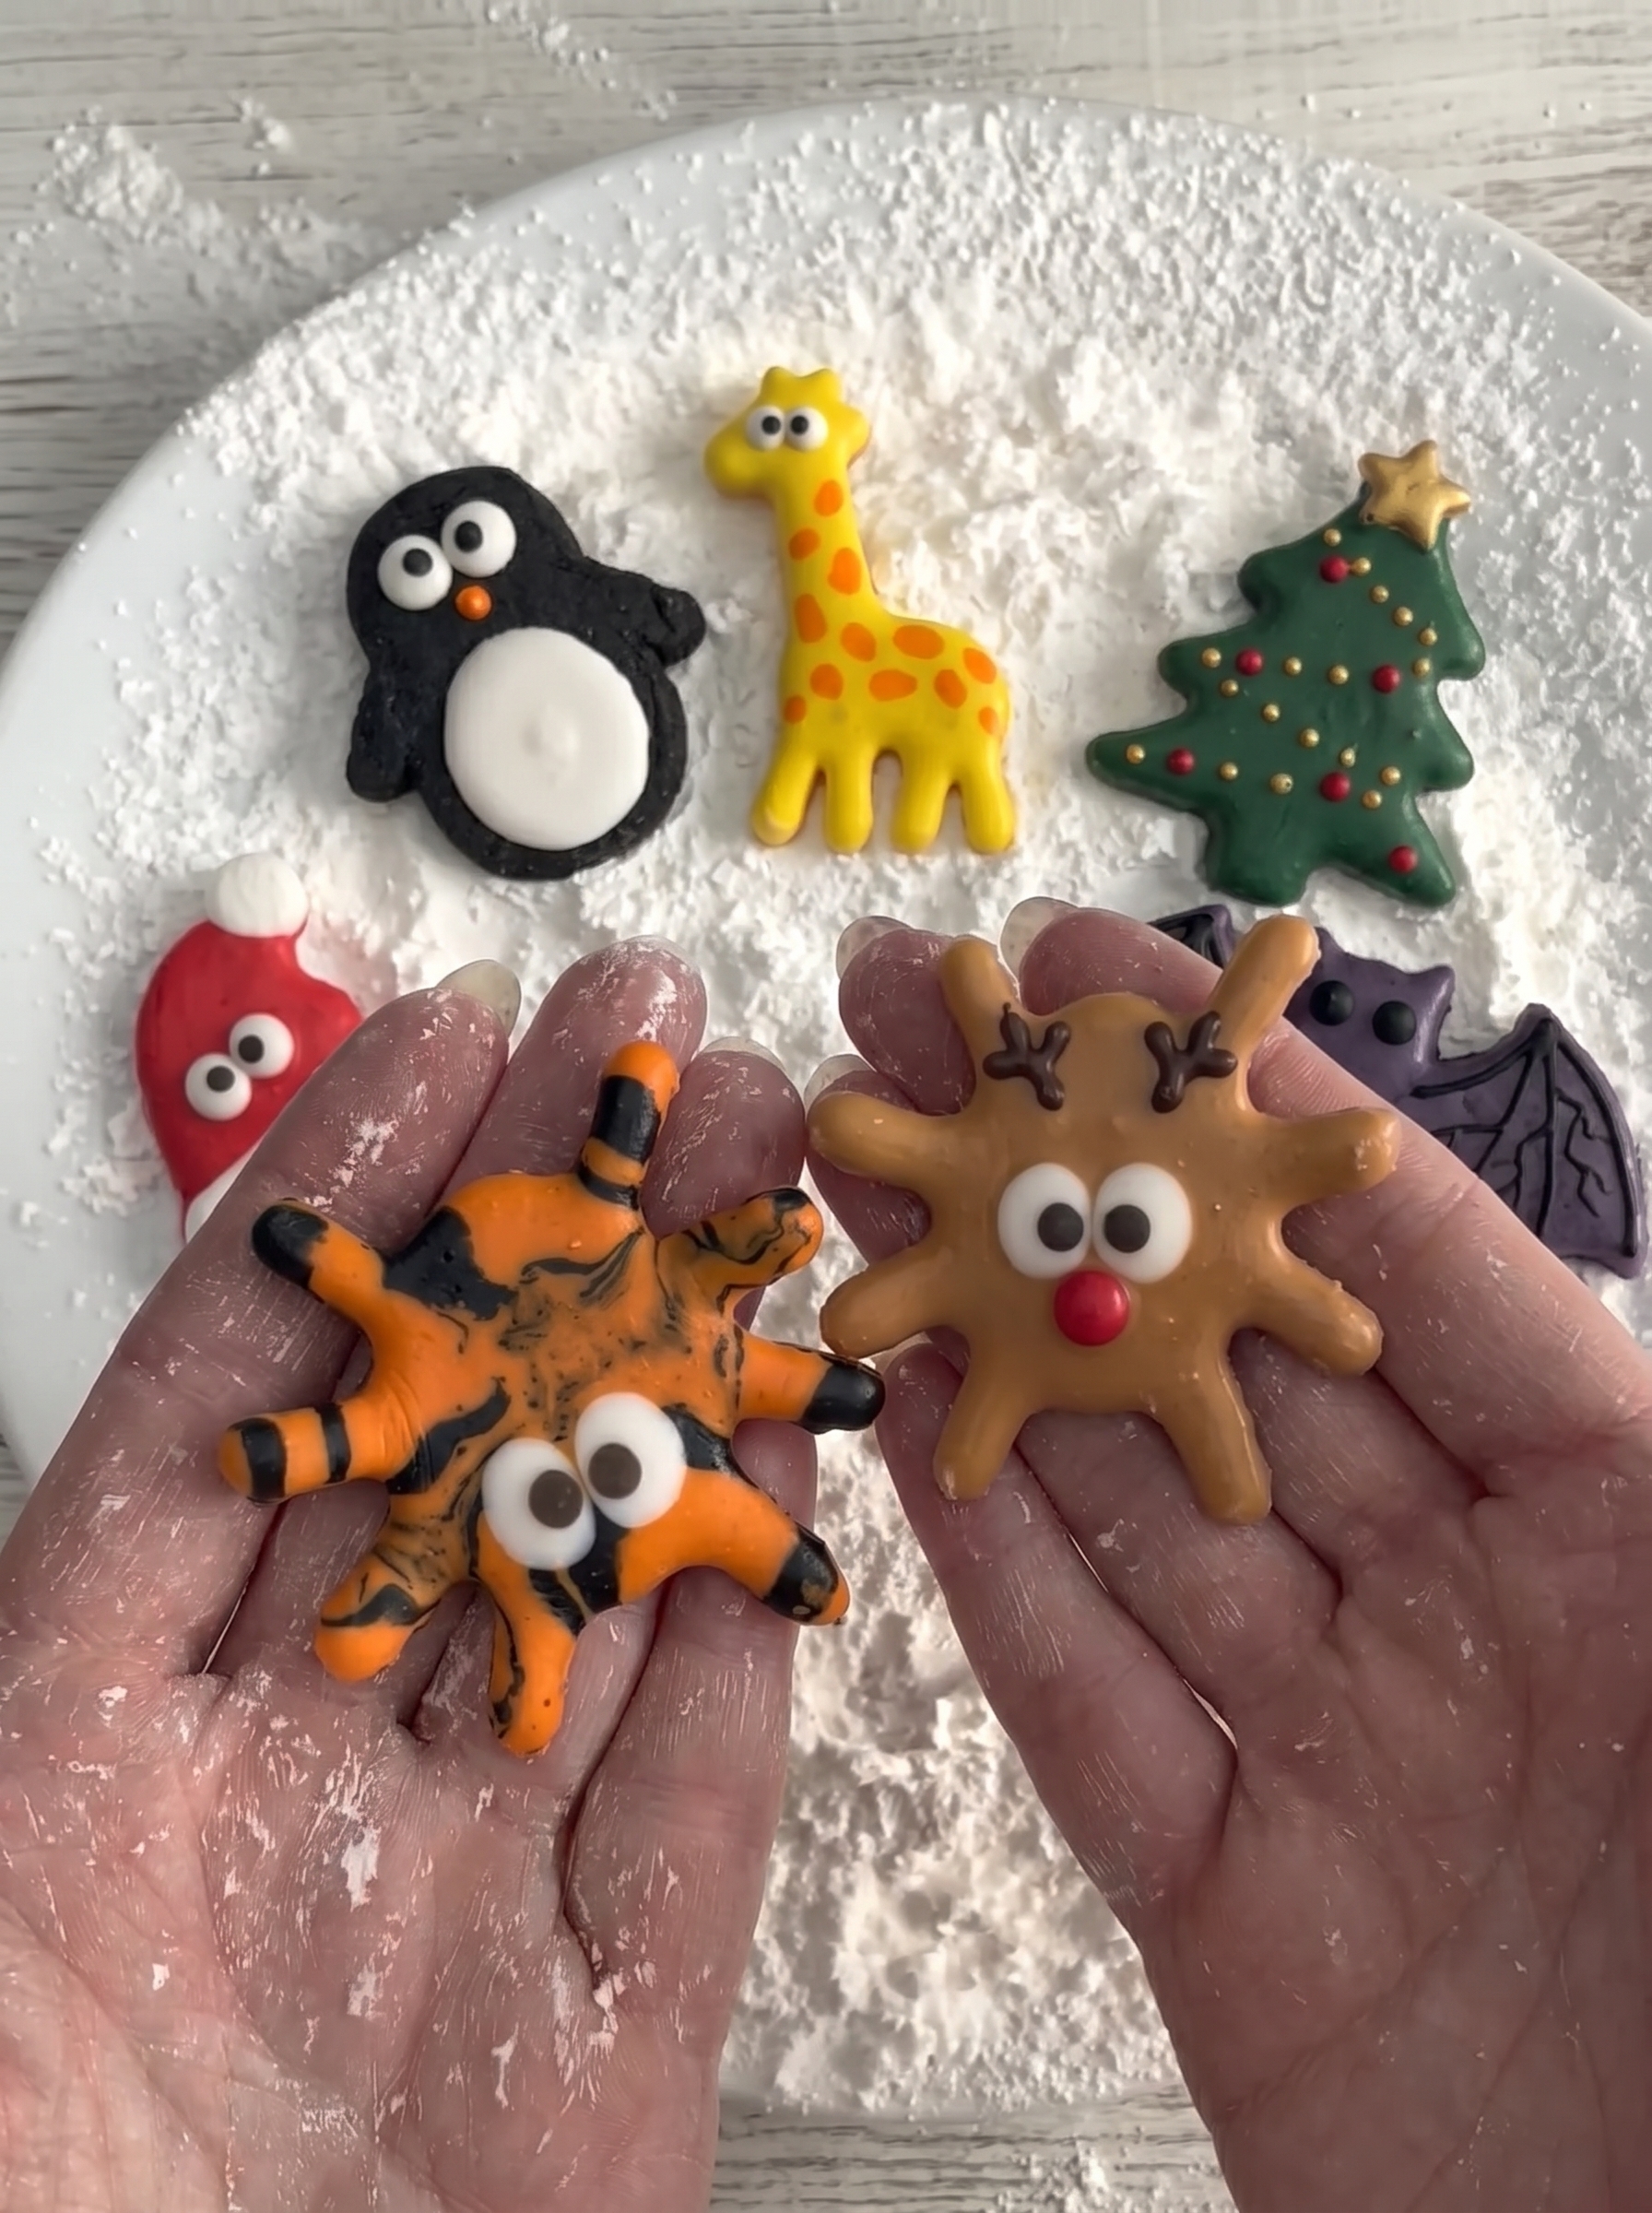
These viral squishy marshmallow candy shapes are taking over every corner of the internet — and once you see how they are made, you will completely understand why. Picture a bright blue whale, a hot pink starfish, or a white unicorn head, perfectly shaped, smooth as a toy, and slightly jiggly when you hold it — all made at home with nothing more than a cookie cutter and a plate of cornstarch.
The secret behind these incredible candies is the starch mogul method — the exact same technique professional candy factories use to make gummy bears and shaped marshmallows at industrial scale. The difference is that you do not need a factory, a mold machine, or any special equipment. You press a cookie cutter into a deep bed of cornstarch, pipe in your marshmallow mixture, cover it, let it set, and lift out a perfectly shaped candy every single time. It sounds almost too simple, and that is exactly what makes it so satisfying to watch and even more satisfying to make.
The texture is what really sets these apart from any marshmallow you have tried before. It sits right in the middle between a cloud-soft traditional marshmallow and an elastic gummy candy — firm enough to hold a precise shape with clean edges, jiggly enough to feel almost like a squishy toy when you press it. The moment you lift the cookie cutter and see your shape sitting perfectly in the white starch nest is genuinely one of the most satisfying things you can do in a kitchen.
What makes this recipe truly special is that one single base recipe gives you unlimited shapes and colors. Whale, starfish, dolphin, giraffe, octopus, butterfly, unicorn, teddy bear — you change only the cookie cutter and the food coloring, and the rest of the process stays exactly the same every time. No candy thermometer, no corn syrup, no complicated candy-making skills required. Just sugar, gelatin, water, a blender, and whatever cookie cutter catches your eye.
Pick your shape, pick your color, and let’s make something magical today.
Why You’ll Love These Squishy Marshmallow Candy Shapes
- One base recipe makes any shape you want — whale, starfish, unicorn, butterfly, giraffe, or anything your cookie cutter collection holds. Same ingredients, same steps, infinite results.
- No candy thermometer needed — just boil, blend, and pipe. Simpler than almost every other marshmallow recipe out there.
- That perfect squishy-jiggly-elastic texture that looks like a toy and feels like one too — firm enough to hold crisp edges, soft enough to bounce back when pressed.
- The real professional starch mogul method at home — the same technique candy factories use, done on your kitchen counter with zero special equipment.
- No special molds — just cookie cutters pressed into a deep plate of cornstarch. Any shape you can find a cutter for, you can make.
- Naturally gluten-free and dairy-free — the whole recipe is already free of both, no substitutions needed.
- Endlessly customizable — change the color, add eye details, pipe on spots or stripes, mix flavors. Every batch can look completely different.
- Perfect for kids’ parties, edible gifts, or just a fun kitchen project — these are the kind of treats that make people stop and ask “wait, you made that yourself?”
Squishy Marshmallow Candy Shapes
Squishy Marshmallow Candy Shapes (Starch Mogul Method)
Soft, jiggly, toy-like marshmallow candies molded into any shape you want — whale, starfish, dolphin, giraffe, octopus — using the viral starch mogul method. Same base recipe, endless shapes, endlessly fun.
- Prep Time: 20 minutes
- Rest Time:: 3 hours
- Cook Time: 15 minutes
- Total Time: 3 hours 35 minutes
- Yield: 12–15 1x
- Category: Candy
- Method: Starch Mogul Molding
- Cuisine: American
Ingredients
Marshmallow Base:
- 20 g (2½ tablespoons) powdered unflavored gelatin
- 100 ml (⅓ cup + 1 tablespoon) cold water — for blooming gelatin
- 100 ml (⅓ cup + 1 tablespoon) water — for the syrup
- 400 g (2 cups) granulated sugar
- 1 teaspoon vanilla paste
- Gel food coloring of your choice
Starch Bed & Finishing Dust:
- 100 g (¾ cup) cornstarch
- 100 g (¾ cup) powdered sugar
For Eyes & Details:
- Small amounts of white and black fondant, OR pre-made candy eyes, OR melted white and dark chocolate
- Contrasting gel food coloring for spots, stripes, or mane details
Instructions
- Mix the cornstarch and powdered sugar together in a wide deep plate. Smooth the surface flat. Press your chosen cookie cutter firmly into the starch bed to create a clean shaped impression. Use a soft brush to sweep the impression clean inside, paying attention to all corners and points. Set the tray aside.
- Sprinkle the gelatin powder over 100 ml of cold water in a large heatproof mixing bowl. Do not stir. Leave to bloom for 10 minutes until fully absorbed and spongy.
- Combine the remaining 100 ml of water with the 400 g of sugar in a small saucepan. Bring to a boil over medium heat without stirring, then reduce to low and simmer steadily for 10 minutes. Remove from heat immediately.
- Pour the hot syrup slowly into the bloomed gelatin. Add the vanilla paste and your chosen gel food coloring. Blend on the highest speed for a full 10 minutes until the mixture is thick, glossy, fluffy, and holds its shape — it should look like a shiny pourable cloud.
- Transfer immediately to a piping bag. Pipe into each shaped impression, filling slightly above the surface to create a gentle dome. Work quickly.
- While the base is still completely wet, add eye details — white dot first, black pupil on top. Add any additional detail colors for spots, stripes, or mane details immediately after.
- Use a soft brush or fine mesh sieve to gently dust the cornstarch mixture over each filled shape until completely covered. Refrigerate for a minimum of 3 hours or overnight.
- Lift the cookie cutter straight up to reveal the finished candy. Ease it out of the starch nest gently. Brush off all cornstarch dust with a clean soft brush until the surface is completely clean and smooth.
Notes
- The cornstarch mixture is not an ingredient — brush it all off completely before serving.
- Work in a cool kitchen — heat makes the mixture set too fast.
- Same base recipe works for every shape — only the cutter and color change.
- Store in an airtight container at room temperature with parchment between layers for up to 3–5 days. Do not refrigerate after unmolding.
Nutrition
- Serving Size: 1 candy
- Calories: 88 kcal
- Sugar: 19 g
- Sodium: 10 mg
- Fat: 0 g
- Saturated Fat: 0 g
- Carbohydrates: 22 g
- Protein: 1 g
- Cholesterol: 0 mg
Ingredients for Squishy Marshmallow Candy Shapes
Key Ingredients Overview
This recipe works because every ingredient has one specific job, and together they create that perfect squishy-jiggly texture that makes these candies look and feel like tiny toys.
Gelatin is the backbone of the whole thing. It is what gives the candy its structure, its bounce, and that elastic quality that makes it hold a perfectly shaped whale or starfish without collapsing. Without enough gelatin, the candy stays too soft and loses its shape. Too much and it becomes rubbery and hard. The ratio here is calibrated specifically for the starch mogul method so the texture lands exactly in that sweet spot between marshmallow and gummy.
Sugar and water form the simple syrup base. Boiling them together and simmering for 10 minutes builds the sugar concentration that gives the candy its body and that slight translucent glossy appearance when it comes out of the mold. No corn syrup needed here — plain granulated sugar does the job perfectly.
Vanilla paste adds depth of flavor without adding extra liquid the way extract does. It keeps the marshmallow base tasting warm and rounded rather than flat or overly sweet.
Gel food coloring is what gives you those vivid toy-like colors — the bright ocean blue, hot pink, sunshine yellow. Gel coloring is essential here because it delivers intense color without adding water to the mixture. Liquid food coloring dilutes the marshmallow and affects the texture, so gel is the only version worth using for this recipe.
The cornstarch and powdered sugar mixture is your mold system and your finishing dust in one. Mixed 50/50, it creates a bed that holds the impression of any cookie cutter cleanly, absorbs just enough moisture from the surface of the candy as it sets to create that smooth non-sticky finish, and brushes off completely once the candy is unmolded. It is not an ingredient in the candy — it is the tool that makes the whole method work.
Ingredient Notes & Substitutions
- Gelatin — powdered vs sheet: Powdered unflavored gelatin is the easiest to work with for this recipe and dissolves cleanly into the mixture. If you only have sheet gelatin, use approximately 5 sheets to replace 20g of powdered. Bloom them in cold water, squeeze out excess water before adding to the syrup, and proceed as normal.
- Vanilla paste vs extract: Vanilla paste gives better flavor depth and keeps the mixture thick. Vanilla extract works as a 1:1 swap but use a good quality one — cheap extract leaves a sharp alcohol taste in an otherwise delicate candy.
- Gel vs liquid food coloring: Gel coloring is non-negotiable for best results. Liquid coloring adds water which thins the marshmallow mixture and weakens the set. If gel is unavailable, powder food coloring is the next best option — never liquid.
- Cornstarch ratio: The 50/50 mix of cornstarch and powdered sugar is the classic mogul ratio. More cornstarch makes the bed drier and gives a slightly more matte finish. More powdered sugar makes it sweeter on the outside. Keep the ratio balanced for the best result.
- Vegan option — agar agar: Agar agar powder can replace gelatin at roughly a 1:1 ratio by weight, but the texture will be firmer and less elastic — closer to a firm jelly than a marshmallow. It sets faster so you will need to work even more quickly once blended. The result is still delicious but different in character.
- Eye and detail options: White and black fondant rolled into tiny balls and pressed in while wet gives the cleanest cartoon eye finish. Pre-made candy eyes work just as well and save time. Melted white and dark chocolate piped from a small bag is a great alternative that sets firmly and tastes great.
- Sugar type: Standard white granulated sugar works perfectly. Caster sugar dissolves slightly faster in the syrup stage but makes no difference to the final texture. Avoid brown sugar or raw sugar — both change the color of the base and affect the final candy color.
Recipe Success Tips
- Get the starch bed deep enough. This is the foundation of the whole method. Your cornstarch and powdered sugar mixture needs to be at least 3–4 cm deep in the plate or tray so the cookie cutter can press in fully and create a clean-walled impression. A shallow bed means the sides of your shape collapse inward when you pipe and the candy loses its crisp edges. Fill the plate generously — you can always reuse the starch bed for the next batch.
- Brush the impression clean before piping. After pressing the cookie cutter in, there will always be loose starch dust sitting inside the impression. Use a soft flat brush to sweep it away gently before you pipe anything in. This step is what separates a clean professional-looking candy from one with a rough powdery surface. Pay special attention to any tight corners — horn tips, fin points, star arm tips — where starch tends to collect.
- Blend for the full 10 minutes without shortcuts. This is the step most people rush and the one that matters most. The blending is what transforms the warm syrup and gelatin into that thick glossy cloud-like mixture that holds its shape in the mold. At 5 minutes it still looks too liquid. At 8 minutes it starts to thicken. At 10 minutes it reaches that perfect pourable-but-holds-its-shape consistency. Stop early and your candies will be flat and won’t hold their form.
- Work fast the moment blending is done. The marshmallow mixture starts setting the second it cools. Have your piping bag ready before blending finishes, transfer the mixture immediately, and pipe without stopping. If you need multiple colors, prepare all piping bags before you start blending so you lose no time between steps.
- Fill the mold slightly above the surface. Don’t just fill to the edge of the cookie cutter — pipe just a little above it so the candy has a slight dome. This dome is what gives the finished candy that satisfying squishy rounded look, and it compensates for the slight settling that happens as the candy sets in the fridge.
- Add all detail colors while the base is still wet. Eye dots, spots, stripes, mane details — every piped detail needs to go on while the base marshmallow surface is still soft and wet. This is the only way the details bond into the surface rather than sitting on top. If the base starts to skin over before you finish the details, they will fall off when you unmold.
- Cover gently — never press the brush down hard. When you sweep the cornstarch mixture over the filled shapes to cover them for setting, use a light hand. Pressing too firmly distorts the domed surface of the candy and pushes the details out of position. Think of it as dusting, not covering — a gentle cloud of powder settling over the shape naturally is all you need.
- Unmold with patience after full setting time. Three hours minimum in the fridge, overnight if possible. Trying to unmold too early is the fastest way to ruin a batch — the candy will be soft enough to deform the moment you touch it. Once fully set, lift the cookie cutter gently straight up, then use your fingers or a small spatula to ease the candy out of its starch nest. Brush off the excess powder with a clean soft brush and the smooth surface underneath will be perfectly clean.
How to Make Squishy Marshmallow Candy Shapes Step-by-Step
Prepare the Starch Bed and Create Your Mold
Start by mixing the cornstarch and powdered sugar together in a wide deep plate or round tray until fully combined — this is your starch bed. Pour it in generously, at least 3–4 cm deep, and smooth the surface flat with your hand. Now press your chosen cookie cutter firmly and evenly straight down into the starch bed, making sure every edge of the cutter makes clean contact with the starch. Lift the cutter straight up slowly and you will see a perfect shaped impression left behind. Use a soft flat brush to sweep any loose starch dust from inside the impression, paying close attention to any tight corners or points. The walls of your mold should look sharp and defined before anything goes in.
Bloom the Gelatin
Pour 100 ml of cold water into a large heatproof mixing bowl. Sprinkle the 20g of powdered gelatin evenly over the surface — never stir it yet, just let it sit. Within about a minute you will see it absorb the water and turn from a powder into a thick spongy mass. Leave it undisturbed for 10 full minutes. This blooming step is what allows the gelatin to hydrate properly so it dissolves completely and evenly when the hot syrup hits it. Skipping or rushing it leads to lumpy gelatin that never fully incorporates and ruins the texture of the finished candy.
Make the Sugar Syrup
While the gelatin blooms, combine the remaining 100 ml of water with the 400g of granulated sugar in a small saucepan. Place over medium heat and stir just once to combine, then leave it completely alone. Let it come to a full boil, then reduce to low heat and let it simmer steadily for 10 minutes. Do not stir during this time — stirring encourages crystallization and can turn your syrup grainy. After 10 minutes the syrup will be slightly thickened and very hot. Remove from heat immediately and get ready to blend.
Blend to Glossy Cloud Stage
Pour the hot sugar syrup slowly and carefully into the bowl of bloomed gelatin. The gelatin will melt instantly on contact with the heat. Add your vanilla paste and gel food coloring now. Using a stand blender or hand blender on the highest speed, blend continuously for a full 10 minutes without stopping. Watch the transformation happen — at first it looks like colored liquid, then it starts to foam, then it thickens and turns opaque, and by 10 minutes it has become a thick glossy fluffy cloud that holds its shape when you lift the blender but is still just fluid enough to pour. This is exactly the consistency you need. Transfer immediately to your piping bag.
Pipe Into the Molds
Hold the piping bag directly over the shaped impression and pipe the marshmallow mixture in steadily, starting from one end and working toward the other so you fill every corner without trapping air bubbles. Fill the impression slightly above the surface so it domes gently over the top of the cookie cutter edge. Work quickly and confidently — the mixture is already beginning to cool and set from the moment it left the blender. If you are making multiple shapes, move from one to the next without pausing.
Add Eye and Detail Colors
While the base is still completely wet and soft, add your details. For the eye: pipe a small round dot of white marshmallow mixture or place a small piece of white fondant on the face area of the shape, then immediately add a tiny black dot in the center for the pupil. For additional details like spots, stripes, or a mane: pipe these in now using a second piping bag filled with a contrasting color mixture. Everything needs to go on while the base is wet so the details sink slightly into the surface and bond permanently rather than sitting on top and falling off later.
Cover and Refrigerate
Use a soft brush or a fine mesh sieve to gently dust the cornstarch and powdered sugar mixture over each filled shape, covering it completely until the color underneath is no longer visible. Place the entire tray in the refrigerator for a minimum of 3 hours — overnight is better. The cold sets the gelatin structure fully and firms the candy so it holds its shape perfectly when unmolded. Do not rush this step.
Unmold and Finish
Once fully set, remove the tray from the fridge. Grip the edges of the cookie cutter and lift it straight up slowly and steadily. Your shaped marshmallow candy will be sitting perfectly in its white starch nest, smooth and firm. Use your fingers or a small spatula to ease it out gently. Use a clean soft brush to dust off all the cornstarch mixture from the surface — brush until the candy is completely clean and the color underneath shows through clearly. The surface should be smooth, slightly elastic, and completely non-sticky.
Color & Detail Guide
This section is what separates a good-looking batch from one that looks completely professional. The details are small but they make an enormous difference in the final result.
How to Pipe Clean Cartoon Eyes
The eye is the detail that gives every shape its personality — get it right and the candy looks like a character. Get it wrong and it looks like a mistake.
The rule is always white first, black center second, and both must go on while the base surface is still completely wet. Pipe a small round white dot using a round tip or the cut tip of a piping bag. The dot should be smooth and domed — if it spreads flat immediately the base mixture is already starting to set and you need to work faster next time. While the white dot is still soft, place or pipe a smaller black dot precisely in the center. Press it in very slightly so it sinks just enough to bond. The finished eye should look like a clean white circle with a black pupil centered inside it — round, crisp, and slightly raised above the surface.
Eye position matters per shape. For the whale and dolphin, place the eye on the right side of the body, roughly one third from the front. For the starfish, center it in the body. For the frog, use two eyes side by side at the very top of the head. For the unicorn, place it on the face area below the horn. When in doubt, look at your reference image and place it exactly where it sits there.
How to Do Two-Tone and Multi-Color Shapes
Two-tone shapes like the tiger octopus and the giraffe require speed and confidence. Pipe your base color first and fill the mold completely. Then immediately — without waiting even 30 seconds — switch to your second piping bag and add the detail color directly on top of the still-wet base. The detail color will sink very slightly into the surface and bond as both layers set together in the fridge.
For stripe patterns like the tiger octopus, pipe bold lines of the second color across the arms and body. Then drag a clean toothpick lightly through both colors in one direction for a marbled stripe effect. This only works while both colors are still completely wet and soft.
For spot patterns like the giraffe or strawberry, use a small round piping tip and pipe each dot with a quick confident squeeze and release. Dots that are hesitant or dragged look messy. Quick and decisive gives you clean round spots every time.
For layered details like the unicorn mane, pipe each color separately in flowing wavy lines alongside each other. Pink first, purple second, right next to each other so the edges touch slightly. The colors stay distinct but blend at the edges naturally as they set.
How to Do Raised Dot Details
Raised dots — like the spots on the starfish arms or the ornament dots on the Christmas tree — need a slightly thicker mixture than the base fill to stay raised rather than spreading flat. If your mixture has already cooled slightly and thickened a little more in the piping bag, that is actually ideal for dot details. Pipe each dot with a firm quick squeeze straight down, then lift straight up without dragging. The dot should sit slightly proud of the surface like a small hemisphere.
If your dots keep spreading flat it means the base surface is too warm or the detail mixture is too thin. Let the base set for 60 seconds before adding dots and work with a firmer mixture if possible.
Gel Color Mixing Guide
You do not need to buy every color separately. These combinations cover the full shape library:
| Target Color | Mix |
|---|---|
| Sky blue (whale, dolphin) | Blue gel only |
| Ocean blue (octopus) | Blue + tiny drop black |
| Hot pink (starfish) | Pink gel only |
| Coral pink (flamingo) | Pink + tiny drop orange |
| Bright yellow (giraffe) | Yellow gel only |
| Orange (tiger octopus) | Yellow + red, equal parts |
| Lime green (frog) | Yellow + blue, more yellow |
| Sage green (cactus) | Green + tiny drop white |
| Forest green (Christmas tree) | Green gel only |
| Purple (butterfly) | Blue + red, more blue |
| Lavender (flower) | Purple + white |
| Caramel brown (teddy bear) | Yellow + red + tiny drop black |
| Pearlescent white (unicorn) | White gel only |
| Red (strawberry, heart) | Red gel only |
| Black (spider, penguin) | Black gel — use generously |
Start with less color than you think you need — gel coloring is concentrated and a little goes a long way. Add one drop at a time and blend before adding more. You can always deepen the color but you cannot lighten it once it is in the mixture.
Flavor Variations
The base recipe is vanilla by default — warm, classic, and universally loved. But the same method works perfectly with almost any flavoring, and changing the flavor to match the color and shape makes each candy feel like a complete experience rather than just a pretty shape.
Strawberry — add 1 teaspoon of strawberry extract or strawberry paste to the mixture at the same time as the vanilla. Pair with pink or red gel coloring. Use for the starfish, heart, or strawberry shape. The flavor is bright and fruity and matches the color so naturally that people expect it the moment they see the candy.
Lemon — add 1 teaspoon of lemon extract and a tiny pinch of citric acid for a sharp clean citrus hit. Pair with yellow gel coloring. Use for the giraffe or flower shape. The citric acid gives a slight tang that balances the sweetness of the sugar base beautifully.
Watermelon — add 1 teaspoon of watermelon flavoring. Pipe the base in green and immediately pipe a layer of pink mixture in the center before the green sets, creating a two-layer watermelon cross-section effect. This one requires speed but the result is one of the most striking visual pieces in the whole collection.
Blue Raspberry — add 1 teaspoon of blue raspberry flavoring. Pair with deep blue or purple gel coloring. Use for the whale, dolphin, or octopus shape. Blue raspberry is one of the most nostalgic candy flavors and makes these shapes taste as fun as they look.
Vanilla Cloud — keep the vanilla paste but skip the food coloring entirely. The result is a pure white candy with a soft pearlescent finish from the starch bed. Beautiful for the unicorn, the heart, or the flower shape. Simple, elegant, and lets the shape speak for itself.
Mango — add 1 teaspoon of mango extract and pair with a warm orange-yellow color. Use for the giraffe or butterfly shape. Mango flavoring is underused in homemade candy and gives these a sophisticated tropical twist that surprises people in the best way.
A note on flavoring quantities: all extracts and pastes are added at the blending stage alongside the vanilla. Start with 1 teaspoon and taste the mixture as you blend — the flavor will be slightly more intense in the finished candy than in the raw mixture, so do not over-add. Natural pastes give cleaner flavor than artificial extracts but both work in this recipe.
Serving Suggestions
These squishy marshmallow candy shapes are as versatile as they are beautiful. Here are the best ways to serve and share them:
Kids’ birthday party favor bags by theme — build an ocean party pack with whales, dolphins, and starfish all in coordinating colors. A safari pack with giraffes, frogs, and teddy bears. A Halloween pack with spiders and pumpkins. Package three or four shapes per cellophane bag tied with a ribbon and you have the most memorable party favor anyone at the table has ever received.
Ocean or safari themed dessert table centerpiece — arrange a full collection of ocean shapes — whale, dolphin, starfish, octopus — on a white platter dusted lightly with extra cornstarch mixture to look like sand. The visual impact of a full matching collection displayed together is stunning and photographs extremely well for social content.
Edible gift boxes — layer the finished candies in a small gift box with parchment paper between each layer to prevent sticking. Add a handwritten tag with the flavor. This is one of the most thoughtful and surprising homemade gifts you can give — nobody expects handmade candy that looks this professional.
Baby shower table — blue whale shapes for a boy theme, pink starfish for a girl theme, or a mix of both for a neutral palette. These are soft enough for guests of all ages and visually match almost any pastel baby shower color scheme perfectly.
Lunchbox surprise — wrap one or two shapes individually in small parchment squares and tuck them into a lunchbox. The reaction from a child opening their lunch and finding a perfectly shaped squishy candy is completely worth the extra five minutes of effort.
Holiday seasonal shapes — Christmas trees in December, hearts for Valentine’s Day, pumpkins for Halloween, flowers for Mother’s Day. The same recipe runs through every season of the year with nothing more than a different cookie cutter and a different color. One recipe, twelve months of content.
Storage Instructions
These candies store well when handled correctly — the key is keeping them away from moisture and humidity, which are the two things that will ruin the texture faster than anything else.
At room temperature — best option for short term:
Store the finished candies in an airtight container at room temperature for up to 3–5 days. Place a sheet of parchment paper between each layer to prevent the shapes from sticking to each other. Keep the container away from direct sunlight, heat sources, and any steam — a cool dry cupboard is ideal. At room temperature the texture stays at its best — soft, slightly elastic, and smooth on the outside.
Do not refrigerate after unmolding.
This surprises most people but refrigerating the finished candies draws moisture from the air and makes the surface tacky and soft. The cornstarch coating that gives them their smooth finish absorbs humidity and turns sticky in a cold environment. Once they are unmolded and dusted clean, room temperature storage is always the right choice.
Freezing is not recommended.
The gelatin structure does not survive freezing and thawing well. The texture becomes grainy and wet on the outside once thawed and the shape can distort slightly. There is no reliable way to freeze these and maintain the quality that makes them worth making in the first place.
Before storing — brush off all cornstarch dust completely.
This step is non-negotiable. Any cornstarch mixture left on the surface of the candy will continue absorbing moisture from the candy itself over time, creating a damp powdery coating that ruins both the appearance and the texture. Take the extra minute to brush every surface of every candy clean with a soft dry brush before placing them in the container.
Parchment between layers — always.
Even well-dusted candies will stick together if stored in direct contact, especially in warmer weather. Cut parchment sheets to fit your container and place one between every layer without exception.
Food safety note:
These candies contain no raw eggs, no dairy, and no ingredients that spoil quickly at room temperature. The high sugar content acts as a natural preservative. As long as they are stored in a sealed container away from moisture and heat, they are completely safe to eat for the full 3–5 day window. Beyond 5 days the texture begins to change noticeably — the outside softens and the shape loses some of its crispness — so plan your batches accordingly and make only what you will use or gift within that window.
FAQ About Squishy Marshmallow Candy Shapes
What is the starch mogul method?
The starch mogul method is the technique professional candy factories use to mass-produce shaped gummy candies and marshmallows. A bed of cornstarch is used as a mold system — impressions are pressed into it, liquid candy mixture is piped in, and the starch absorbs just enough surface moisture as the candy sets to create a smooth non-sticky finish. The name comes from the industrial mogul machines that do this automatically at factory scale. At home you replace the machine with a cookie cutter and a plate of cornstarch, but the principle is exactly the same.
Do I need a candy thermometer?
No. Unlike most marshmallow recipes that require cooking the sugar syrup to a precise temperature, this recipe uses a simple timed simmer — boil the syrup and simmer for 10 minutes on low heat. The timing replaces the thermometer. As long as you keep the heat low and steady and do not rush the simmer, the syrup reaches the right concentration naturally without any measuring equipment needed.
Why do I need to blend for the full 10 minutes?
The blending is what builds the structure of the marshmallow. During those 10 minutes the gelatin network expands, air incorporates into the mixture, and the texture transforms from liquid syrup into that thick glossy cloud-like consistency that holds a shape in the mold. At 5 minutes the mixture is still too thin and will spread flat in the mold rather than holding its form. At 10 minutes it has enough body to fill every corner of the impression cleanly and dome slightly above the surface. Stopping early is the single most common reason homemade marshmallow candies fail to hold their shape.
Almost any metal cookie cutter works with this method. The best shapes for beginners are ones with smooth rounded edges and no extremely thin points — whales, circles, hearts, and stars are all forgiving and easy to unmold. More detailed shapes with very fine points like antlers or delicate wings are possible but require a deeper starch bed and extra care when brushing the impression clean. Plastic cookie cutters work but tend to leave less clean impressions than metal ones, so metal is always the better choice when available.
Why did my candy not hold its shape?
There are three common causes. First, the blending time was too short and the mixture was too thin when piped. Second, the candy was unmolded before it had fully set — always give it the full 3 hours minimum and preferably overnight. Third, the kitchen was too warm when piping, causing the mixture to spread before it could set in the mold. Work in a cool kitchen, blend for the full time, and always give the fridge the time it needs.
Can I make these vegan?
Yes, with one substitution. Replace the powdered gelatin with agar agar powder at roughly the same weight. The texture will be different — firmer and less elastic, closer to a firm jelly than a traditional marshmallow — but the starch mogul method works the same way and the shapes will hold cleanly. Note that agar sets faster than gelatin so you need to work even more quickly once blending is done. Everything else in the recipe is already plant-based.
Why is my mixture too stiff to pipe?
This happens when the mixture has cooled too much before piping, which causes the gelatin to begin setting while still in the bowl or piping bag. To avoid it, have your piping bag ready and open before blending finishes and transfer the mixture the moment blending is done. If it does stiffen before you finish piping, place the piping bag in a bowl of warm water for 20–30 seconds to soften it slightly, then continue. Never microwave the mixture directly as this can break down the gelatin structure.
Can I use liquid food coloring instead of gel?
It is possible but not recommended. Liquid food coloring adds water to the mixture which thins it and weakens the gelatin set. The colors also tend to be less vibrant than gel, meaning you need more liquid to achieve the same intensity which compounds the problem. Gel food coloring is concentrated, water-free, and gives those vivid toy-like colors that make these candies so visually striking. Powder food coloring is the best alternative if gel is not available — it adds color with zero liquid.
How do I get clean crisp edges on the shape?
Three things determine edge quality. First, the starch bed must be deep enough — at least 3–4 cm — so the cutter presses in fully with clean walls. Second, brush the impression thoroughly clean before piping, especially in any tight corners. Third, fill the mold confidently and quickly without stopping mid-pipe, which can create uneven edges where the mixture paused and partially set. Clean edges come from a clean mold, a well-blended mixture, and confident fast piping.
How do I add multiple colors to one shape?
The key is speed and preparation. Have all your piping bags filled and ready before you start piping the base color. Pipe the base color first and fill the mold completely. Then immediately switch to your detail color bag and add spots, stripes, or mane details while the base is still completely wet. Both colors will set together in the fridge and bond permanently. For marbled effects, drag a clean toothpick lightly through both colors immediately after piping the second color. For layered effects like the watermelon cross-section, pipe the outer color first around the edges and the inner color in the center before either has a chance to set.
Final Thoughts
These squishy marshmallow candy shapes are proof that the most impressive-looking treats are not always the most complicated ones to make. One simple recipe, one plate of cornstarch, and whatever cookie cutter you have on hand — that is genuinely all it takes to make something that looks like it came from a professional candy shop.
What makes this recipe truly special is that it never gets old. Every new shape is a completely fresh result even though the process is exactly the same. Once you make your first whale or starfish and feel that satisfying moment of lifting the cookie cutter to reveal a perfectly shaped candy sitting in its white starch nest, you will immediately start thinking about what shape to make next.
Make a batch this week, try a new shape every time, and share your creations with us. Tag @savorgastronomy with a photo of your shapes — we especially love seeing the color combinations and character details our readers come up with. Drop your shape in the comments below too — which one are you making first? 🐳⭐🦄🦋