There is a unique magic reserved for the most intricate of crafts—the kind that test your skill, patience, and precision. If you are an experienced crocheter ready to begin a truly legendary project, you have found your challenge. It’s time to bring a mythical beast to life, one tiny stitch at a time.
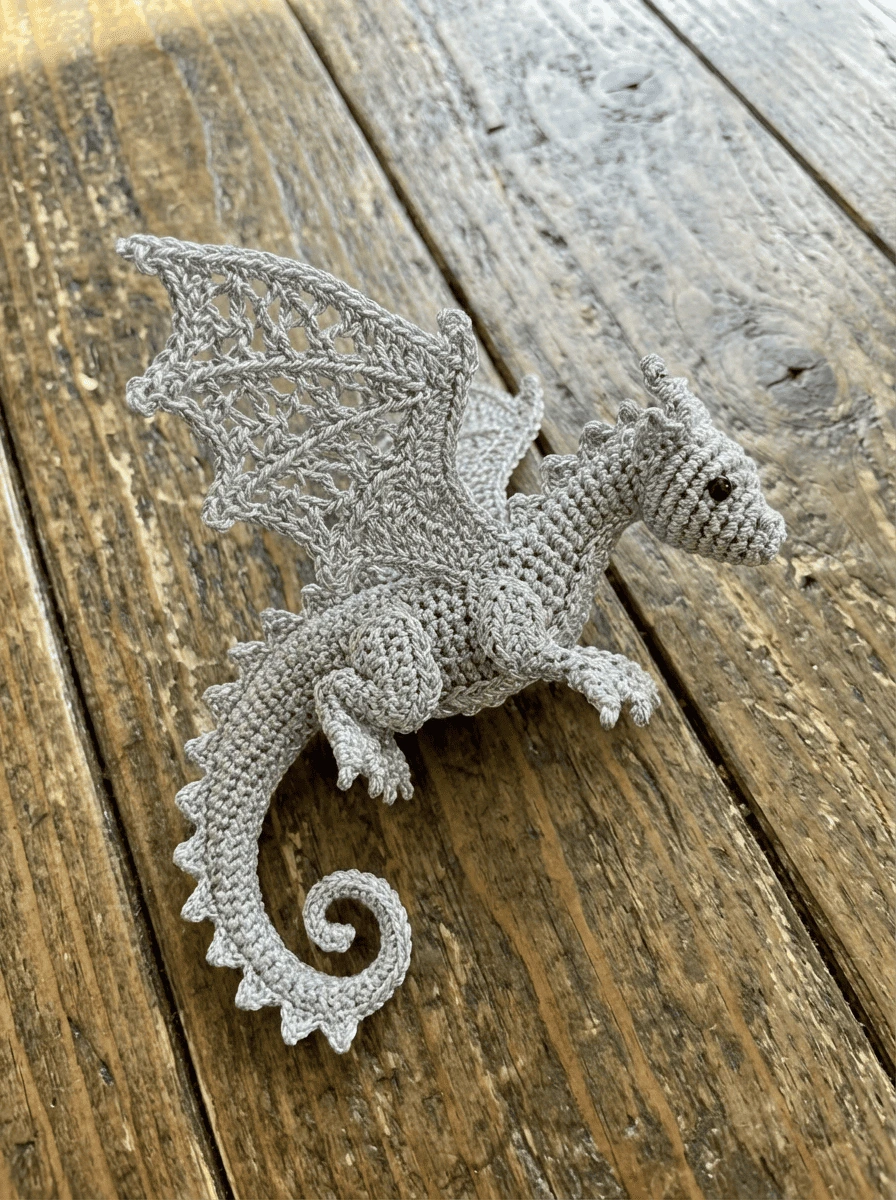
This article contains the free pattern for a miniature, breathtakingly detailed Crochet Dragon Ornament. This is an Advanced Level pattern designed specifically for crocheters who are comfortable working with fine crochet thread, a tiny steel hook, and complex amigurumi shaping.
This is not a quick afternoon make; it is a true work of art. To build this magnificent creature, we will move beyond basic shapes and employ special techniques, including:
- Internal Wire Armatures for a fully poseable spine and limbs.
- Short-Round Shaping to create permanent, anatomical bends.
- Lace Filigree Geometry to form delicate, see-through wings that hold their form.
By treating your hook like a sculptor’s tool, you will build a magnificent ornament worthy of any treasure hoard. If you are ready to test your skills and create a truly spectacular piece, then read on. Let the adventure begin.
The Advanced Crafter’s Toolbox (Materials & Foundational Techniques)
To build a professional-grade miniature, you must begin with the correct hardware and an understanding of the core techniques. This project is a piece of fiber engineering; substituting these specific materials or methods will change the structural integrity and final look of your work.
Material Specifications
- The Thread: Size 10 Metallic Crochet Thread. Silver or Gold are the recommended choices for showcasing the best stitch definition.
- Difficulty: Expert | Scale: Miniature (Brooch/Ornament Size)
- The Hook: A 1.0mm Steel Hook is mandatory for this project.
- The Internal Skeleton:
- Main Body & Spine: 1.5mm Bonsai Wire or 18-gauge floral wire.
- Wings & Limbs: 20-gauge floral wire.
- Stuffing: High-density polyester fiberfill.
- Tools & Notions:
- Jewelry Pliers (for bending and crimping wire)
- Duct Tape or similar strong tape
- Forceps or a small wooden dowel (for precise stuffing)
- Tapestry Needle
- Scissors
- Safety Eyes: One pair of 4mm
Preparing the Internal Skeleton
The secret to a poseable miniature is the internal armature. This acts as the backbone of your build, allowing the dragon to hold its head high while the tail spirals on a surface. Proper preparation is essential for a safe and durable finished piece.
Before inserting any wire into your crochet work, you must cap the ends.
- Using pliers, fold the sharp tip of the wire over on itself.
- Crimp the folded end down as flat as possible.
- Wrap this crimped tip tightly with a small piece of duct tape.
This process prevents the sharp points from poking through your metallic thread or sticking out of the limbs over time. It also provides a small anchor for the stuffing to grip onto inside the narrow pieces.
Special Technique: The “Inside-Out” Method
For micro-crochet of this scale, it is highly recommended to work all your pieces “inside-out.” This means the “right” side of your stitches (the smooth ‘V’s) should face inward as you crochet, leaving the more textured “wrong side” on the exterior of the finished piece.
There are three key reasons for this professional technique:
- It Creates a Scaly Texture: The “wrong side” of the stitch has a pebbled, organic look that mimics the scales of a mythical creature.
- It Provides Cleaner Lines: This method hides the slight diagonal “lean” that naturally occurs when working in a continuous spiral. This ensures your anatomical details, like the nose bridge and eye sockets, remain perfectly centered.
- It Defines the Shape: The texture helps to create cleaner surface lines and crisper angles, which is critical for this high-definition design.
Abbreviations
This pattern uses standard US crochet terminology.
| Abbreviation | Meaning |
|---|---|
| mr | magic ring |
| ch | chain |
| st | stitch |
| sl st | slip stitch |
| sc | single crochet |
| hdc | half double crochet |
| dc | double crochet |
| tr | treble (or triple) crochet |
| inc | increase (2 sc in one st) |
| dec | decrease (sc 2 together) |
| […] | repeat the sequence in brackets |
| x | times (e.g., repeat 6x) |
The Free Crochet Dragon Ornament Pattern
This pattern is a detailed guide to creating the dragon ornament. Please read through this entire section carefully before you begin, as it contains important information regarding the required skill level and the specific materials needed.
Part 1 – Facial Architecture (The Head, Horns, & Frills)
The head is the most critical part of the dragon. While most patterns start with a round ball, this design uses a foundation chain start to create a powerful, elongated muzzle and realistic cranial structure.
The Sculpted Head
Worked in a continuous spiral from the snout up.
Rnd 1: Ch 4. Starting in the 2nd ch from the hook: 2 sc, 3 sc in the last ch. Working along the opposite side of the chain: 1 sc, inc in the last ch. (8)
Rnd 2: inc, 1 sc, (inc) x 3, 1 sc, (inc) x 2. (14)
Rnd 3: Sc evenly around. (14)
Rnd 4 (The Nose Bridge): 5 sc, hdc inc x 2, 7 sc. (16)
Rnd 5 (The Nostrils): 5 sc, ch 2 (skip 1 st), 2 sc, ch 2 (skip 1 st), 7 sc.
Note: The chain spaces create the deep, realistic nostril pits. Do not crochet into the ch-2 spaces during the next round.
Rnd 6: 5 sc, skip the ch-space, 2 sc, skip the ch-space, 7 sc. (14)
Rnd 7: (1 sc, inc) x 7. (21)
Rnd 8–10: Sc evenly around. (21)
Rnd 11 (Eye Socket Sculpting): Work HDC between the posts around. (21)(inserting the hook between the vertical bars of the stitches rather than the top loops). This technique flattens the recessed eye sockets.
Rnd 12: (sc 5, dec) x 3. (18)
Insert Safety Eyes: At this point, insert your 4mm safety eyes into the flattened sockets created in Rnd 11. Secure the washers firmly on the inside.
Rnd 13: (sc 1, dec) x 6. (12)
Stop here and insert a 4-inch piece of wire through the back of the head into the snout. Stuff the snout firmly around the wire.
Rnd 14: dec x 6. (6)
Finish: Fasten off, leaving a long tail for assembly.
Head Frills & Horns
These details provide the aggressive silhouette.
The Frills (Make 2):
Row 1: Ch 6. Starting in 2nd ch: 5 sc, turn. (5)
Row 2: Ch 3, sl st in 2nd ch from hook (picot), sc in next 2 sts, ch 2, sl st in 2nd ch from hook, sc in last 2 sts.
Finish: Fasten off.
The Curved Horns (Make 2):
We use “Short Rounds” to force a permanent backward arch.
Rnd 1: 4 sc in Magic Ring (MR). (4)
Rnd 2: (sc, inc) x 2. (6)
Rnd 3: Sc around. (6)
Rnd 4 (Short Rnd): 3 sc, turn.
Rnd 5 (Short Rnd): 3 sc, turn.
Rnd 6: Sc around all 6 sts.
Finish: Fasten off, leaving a tail for sewing
Part 2 – The Muscular Body & Tail (Tail Tip, Curl, & Torso)
In advanced amigurumi, the transition from the tail to the body is often where patterns lose their realism. We use Anatomical Short Rounds and Stitch Height Variation to “sculpt” the yarn, forcing the tail into a permanent spiral and giving the torso a muscular, arched spine.
This section is worked in a continuous spiral. We recommend working inside out to achieve the high-definition texture.
1. The Tapered Tail Tip
Rnd 1: 4 sc in Magic Ring (MR). (4)
Rnd 2: (sc, inc) x 2. (6)
Rnds 3–10: Sc evenly around. (6)
Rnd 11: (2 sc, inc) x 2. (8)
Rnds 12–18: Sc evenly around. (8)
Stop here. Slide your prepared wire spine into the tail tip. You will now crochet the remaining rounds around this central wire.
2. The Anatomical Tail Curl (Short Rounds)
This specific cycle forces the fabric to bend.
Rnd 19 (Short Rnd): 4 sc, turn. (4)
Rnd 20 (Short Rnd): Do not ch, 4 sc, turn. (4)
Rnd 21: Work all the way around the 8 stitches of the tail base. (8)
Rnd 22: (3 sc, inc) x 2. (10)
Rnds 23–30: Repeat the Short Round cycle (Rnds 19–21). Note: Adding extra rows to only one side of the tube creates the permanent curve.
3. The Muscular Haunches & Torso
We now expand the tail into a powerful body using stitch height variation.
Rnd 31 (Expansion): (4 sc, inc) x 2. (12)
Rnd 32 (Haunch Shaping):
- Belly (Stitches 1-6): 6 sc.
- Back (Stitches 7-12): 6 hdc inc. (18)
Rnd 33:
- Belly: 6 sc.
- Back: (sc, inc) x 6. (24)
Rnd 34 (The Sprawl):
- Belly: 8 sc.
- Back: 16 hdc. (24)
Rnds 35–40: Repeat Rnd 34. The HDC (Half Double Crochet) on the back adds the volume needed for a muscular silhouette.
4. The Shoulder Taper & Closing
Stuff the torso firmly around the wire as you work to maintain structural integrity.
Rnd 41 (Shoulder Shaping): (2 sc, dec) x 6. (18)
Rnd 42: Sc evenly around. (18)
Rnd 43: (sc, dec) x 6. (12)
Finish stuffing. Ensure the wire spine is centered and exiting through the neck opening.
Rnd 44: dec x 6. (6)
Finish: Fasten off, leaving a tail. Weave the yarn through the final loops and pull tight around the wire.
Part 3 – The Front Limbs (with elbow joint mapping)
The silhouette of this dragon suggests movement and life. To achieve this, the anatomy must be built into the crochet fabric itself. We use Short-Round Joint Mapping to create a permanent elbow, forcing the arm to bend forward naturally without needing excessive wire shaping.
Make 2. Worked in a continuous spiral. We recommend working inside out for maximum scale-like texture.
Rnd 1: 5 sc in Magic Ring (MR). (5)
Rnd 2: inc x 5. (10)
Rnds 3–6: Sc evenly around. (10)
The Elbow Joint (Short-Round Mapping)
This specific sequence forces the limb into a permanent anatomical bend.
Rnd 7 (Short Rnd): 5 sc, turn. (Do not work the full round).
Rnd 8 (Short Rnd): Do not ch, 5 sc, turn.
Rnd 9: Now work all the way around the base, including the unworked stitches from Rnd 6. (10)
Note: You will see the limb naturally begin to “hook” forward. This is the elbow.
Rnds 10–18: Sc evenly around. (10)
Rnd 19 (Shoulder Expansion): (sc 1, inc) x 5. (15)
Finish: Fasten off, leaving a long tail for sewing.
Adding the Detail: The Micro-Claws
This “wrapped-point” technique creates high-definition, non-stitch claws.
- Take a 2-inch piece of 24-gauge wire.
- Fold it into a “V” shape and insert it into the paw (Rnd 2).
- Thread your needle with Silver Metallic thread.
- Apply a tiny drop of adhesive to the wire tip and wrap the thread tightly from the tip down to the paw base.
- Repeat for three claws per paw.
Part 4 – The Rear Haunches (with hip cap and weighted paw)
The rear haunches are the “anchor” of your build. In high-definition amigurumi, if the back legs are too thin, the dragon loses its predatory silhouette and becomes top-heavy. We use Volume-Shifting Short Rounds to create a wide, powerful hip that tapers into a slender lower leg and a heavy, weighted paw, ensuring the dragon remains stable and poseable.
Make 2. Worked in a continuous spiral. Work inside out to maintain the crisp, scaled texture.
Rnd 1: 6 sc in Magic Ring (MR). (6)
Rnd 2: inc x 6. (12)
Rnd 3: (sc 1, inc) x 6. (18)
Rnd 4: Sc evenly around. (18)
The Hip Cap (Volume-Shifting Short Rounds)
This technique creates the muscular “flare” of the upper thigh.
Rnd 5 (Short Rnd): 9 sc, turn. (Leave the remaining stitches of the round unworked).
Rnd 6 (Short Rnd): Do not ch, 9 sc, turn.
Rnd 7: Work (sc 1, dec) x 6 around the entire base (including the short rows and the unworked stitches from Rnd 4). (12)
Note: You will now see a distinct “cap” or “bulge” forming. This is the anatomical hip.
The Lower Leg Taper
Rnds 8–15: Sc evenly around. (12)
The Weighted Paw (Volume Expansion)
We now expand the base to create the heavy, rounded foot.
Rnd 16 (Paw Base): inc x 12. (24)
Rnd 17: (sc 2, dec) x 6. (18)
Rnd 18: (sc 1, dec) x 6. (12)
Stuff the paw firmly at this stage.
Rnd 19: dec x 6. (6)
Finish: Fasten off, leaving a 10-inch tail for assembly.
Part 5 – The Filigree Wings (Wing Spines & Membrane)
The filigree wing is a defining feature of this advanced project. Unlike standard crochet wings that are solid blocks of color, this design uses Lace Geometry—a precise combination of chain-space “windows” and Extended Single Crochet (esc)—to create a delicate, “bat-like” openwork that allows light to pass through while retaining a razor-sharp silhouette.
Make 2 wings.
A. The Wing Spines (The Skeleton)
First, we create the bone structure for the wings. This part is worked in a continuous spiral around a wire.
Rnd 1: 4 sc in Magic Ring (MR). (4)
Rnds 2–25: Sc evenly around. (4)
Insert a 4.5-inch piece of 20-gauge wire. Crimp the ends with pliers to ensure safety. Crochet 2 more rounds to encapsulate the wire and close the tip.
Finish: Fasten off. Bend the wire into a sharp “✓” shape to establish the top ridge of the wing.
B. The Filigree Membrane
This section is worked in rows and attached directly to the prepared Wing Spines. Use your 1.0mm hook for maximum stitch definition.
1. The Filigree Foundation
Row 1: Join your Silver Metallic thread at the “elbow” (the bend) of the prepared wing spine. Ch 3, work 4 dc into the base of the 3rd ch from the hook. Turn. (4)
Row 2: Work 1 esc (Extended Single Crochet) in each stitch across. Turn. (4)
Row 3 (Initial Lace Row): esc inc, ch 2 (skip 1 stitch), esc inc. Turn. (6)
Row 4: esc in each stitch across, working directly into the ch-2 space as if it were a stitch. Turn. (6)
2. Tiered Expansion
Row 5: esc inc, 4 esc, esc inc. Turn. (8)
Row 6 (High Filigree): esc 1, ch 3 (skip 2 stitches), 2 esc, ch 3 (skip 2 stitches), esc 1. Turn.
Rows 7–15: Continue increasing by 2 stitches every other row. Alternate one solid row of ‘esc’ with one “lace row” (using ch-spaces). Note: As you move toward Row 15, increase the number of ch-3 windows to create the intricate mesh pattern.
3. The “Edge Hardening” (Crab Stitch & Picots)
This row is critical for preventing the wings from curling and for creating the sharp points.
The Border: Do not turn your work. Work a row of Crab Stitch (Reverse Single Crochet) along the entire bottom edge of the membrane.
The Sharp Points: After every 4th Crab Stitch, work a Hardened Picot: Ch 3, slip stitch into the 2nd chain from the hook, sc in the next, and resume the Crab Stitch.
4. Surface Detail: The Wing Veins
This adds 3D depth to the lace.
- Thread your tapestry needle with a single strand of Silver Metallic thread.
- Embroider three raised lines (veins) starting from the “elbow” of the wing spine and radiating out toward the jagged points of the border.
- Use a Stem Stitch or a Surface Slip Stitch to ensure the veins stand out against the filigree mesh.
Part 6 – Final Ornamentation (The Dorsal Ridge & Tail Spade)
This section covers the final crocheted pieces that complete the dragon’s iconic, predatory silhouette. The dorsal ridge and tail spade are created separately and attached during the final assembly.
1. The Royal Dorsal Ridge
One of the most striking features of this miniature dragon is the razor-sharp ridge of spikes running from the crown of the head to the tip of the tail. We create a structural “fin” that not only adds visual complexity but also helps reinforce the “S-curve” of the internal wire spine.
This piece is worked in rows and should be measured against your dragon’s spine before finishing.
The Spinal Foundation
Row 1: Foundation: Ch 45 (or the exact length from the base of the horns to the start of the tail spade).
Starting in the 2nd ch from the hook: Sl st 2, *[Sc 2, Hdc 1, Sc 2, Sl st 1]*. Repeat from * to * across the entire chain.
Note: This creates a “rolling” foundation that mimics the natural musculature of a dragon’s back.
The Royal Picot Series (The Scales)
Row 2: Ch 1, turn.
- Valley: Sl st into the first 2 sl sts.
- Peak: In the next Sc, work: (Sc, Ch 3, Sl st in 2nd ch from hook, Hdc in same st). This creates a reinforced, 3D point.
- Valley: Sl st into the next 3 stitches.
- Peak: In the next Hdc, work: (Hdc, Dc, Ch 3, Sl st in 3rd ch from hook, Dc, Hdc). This creates the larger “primary” scales for the mid-back.
Repeat this sequence, alternating between small and large picot peaks as you move down the spine, decreasing the size of the picots as you reach the tail tip.
Surface Stitch Reinforcement
Row 3: Once Row 2 is complete, do not fasten off. Work a row of Surface Slip Stitches back along the base of the foundation chain (Row 1). This creates a “platform” of metallic thread that will sit flush against the dragon’s back, making the sewing process much more stable.
2. The Royal Tail Spade
The tail spade acts as a visual “anchor” for the entire silhouette.
This piece is worked in the round and then flattened.
Rnd 1: 4 sc in Magic Ring (MR). (4)
Rnd 2: (sc 1, inc) x 2. (6)
Rnd 3: (sc 2, inc) x 2. (8)
Rnd 4: (sc 1, inc) x 4. (12)
Rnd 5 (Flattening): Flatten the piece so the edges meet. Work 6 sc through both layers to close the base. Turn. (6)
Rnd 6 (The Predatory Points): (ch 3, sl st in 2nd ch from hook, sc in next ch, sl st to the next available stitch on the base) x 3.
Finish: Fasten off, leaving a 10-inch tail.
The Art of Assembly & Finishing
In advanced amigurumi engineering, the way you connect your pieces is just as important as the stitches themselves. This stage is where your dragon finds its soul. To achieve a high-definition silhouette, we must use Skeletal Posing and a specific Functional Assembly Order. By following this technical sequence, you ensure the weight of the metallic thread is perfectly balanced, and the internal wire frame is locked into a lifelike predatory stance.
Master Assembly Sequence
Before beginning, you must finalize the internal skeleton. The wire extending from the neck and tail must be bent into a continuous, fluid “S” shape. This acts as the central support system for your build. For all joins, use a Whip Stitch, sewing under the vertical posts of the stitches rather than the top loops to create an invisible seam.
Assembly Order
1. Stabilization: The Belly Armor First (Optional)
If you have created a separate belly piece, you must attach it first to prevent the torso from stretching or twisting. Pin the entire length from the throat to the start of the tail spiral and sew meticulously along both long edges. This plate acts as an “anchor” for all subsequent parts.
2. The Cranial Mount (Head Join)
Ensure the head is stuffed very firmly. Slide the head onto the neck wire, making sure the wire runs along the internal top-center of the head for support. Pull the neck fabric up to meet the base of the skull and use the seamless whip stitch method to join the two. Angle the nose slightly downward for a more regal, focused expression.
3. The Predator Stance (Limb Attachment)
Anatomical placement is the difference between a toy and a masterpiece.
- Front Limbs: Position the “shoulders” approximately 7 stitches apart on the chest. Angle them so the short-round “elbows” point forward.
- Rear Haunches: Position the wide hips over the largest curve of the back. If using internal leg wires, push them deep into the body stuffing toward the tail to lock the legs into the “S-curve” frame.
4. Wing Armature & Aerodynamics
Take the completed wing spines. Insert the exposed wire ends into the shoulder ridge of the body, angling the wire so it stays within the stuffing. Sew the wings at a downward slant (sloping toward the tail) to create a sense of motion. Reinforce the join by sewing around the internal wire of the wing spine.
5. Finishing the SilhouetteEye Socket Sculpting
- Facial Details: Attach your Horns and Frills just behind the eye sockets. Use the short-round curves of the horns to frame the face.
- Dorsal Ridge: Start at the base of the head, exactly between the horns. Pin the ridge down the center of the “S-curve” spine. Ensure the ridge is slightly taut. Use a tapestry needle to sew through the reinforced “Surface Slip Stitch” base created on the ridge piece.
- Tail Spade: Slide the open base of the Tail Spade over the blunt tip of the spiral tail. Align the sharp points with the dorsal spine and sew firmly in place.
Facial Sculpting & Final Polish
The final 1% of the build is what defines a true masterwork. In this concluding section, we will refine the face with soft sculpting techniques and apply the final decorative elements that give the dragon its lifelike and detailed appearance.
1. Facial Sculpting
To achieve a professional, life-like result, we use Anatomical Soft Sculpting and Surface Stitch Definition. This creates recessed eye sockets and flared nostrils that catch the light and provide depth.
Tension Sculpting (The Eye Sink)
This step must be performed after the head is firmly stuffed but before attaching the final eye beads.
- Thread a long needle with a double strand of matching metallic thread.
- The Entry: Insert the needle at the base of the head (where it will join the neck) and bring it out in the center of the left eye socket (the HDC post area from Rnd 11).
- The Anchor: Move one stitch over and re-insert the needle, bringing it back out at the base of the head.
- Tension: Pull both ends of the thread firmly until the eye socket “dips” inward. Tie a secure knot at the base.
- Repeat: Perform the same process for the right eye socket. Ensure both depths are symmetrical to maintain the dragon’s balance.
Surface Nostril & Brow Definition
To give the muzzle its predatory flare and define the dragon’s gaze.
- The Nostril Flare: Join your yarn at the corner of the nostril pit (Rnd 5). Work (Surface Sl St, 3 Surface SC, Surface Sl St) in a “U” shape around the upper edge of the chain-space pit. This creates a raised “hood” over the nostril.
- Anatomical Eyelids: Using your tapestry needle, embroider a thick, horizontal line directly above the eye socket. Angle the outer corner slightly downward to create a “serious” or “sleepy” guardian expression.
- The Brow Ridge: Work a row of Surface Slip Stitches directly above the eyelid. This reinforces the sculpted brow, making it look like a distinct skeletal feature.
2. Final Polish & Master Pose
Royal Beading & Light Catching
To enhance the metallic thread, add micro-beads along the “pressure points” of the anatomy.
- The Crown: Sew three tiny glass seed beads at the base of each horn.
- The Dorsal Line: Place one bead every 5th picot along the spinal ridge. This draws the eye along the “S-curve.”
- The Eyes: Apply a tiny drop of high-clarity jewelry glue into the center of your sculpted sockets. Press 4mm half-beads firmly into the “sink” created in the previous step.
The Master Pose: Setting the Skeleton
Your dragon is poseable, but it needs a “Master Set” to look professional.
- The Spine: Hold the dragon by the torso and gently press the tail spiral into a tight, downward coil.
- The Neck: Pull the head upward and tilt the snout slightly to the left or right. A slight “tilt” adds a sense of curiosity and life to the character.
- The Wings: Spread the filigree membranes wide, then use your thumb to “dent” the wire spines slightly downward. This creates a “draped” effect that looks heavy and realistic.
- The Claws: Ensure the front paws are tucked slightly inward, “cradling” the space beneath the snout.
Conclusion: Your Legendary Masterpiece is Complete
Congratulations! If you have reached this point, you have not just completed a crochet pattern; you have crafted a miniature masterpiece. Creating this dragon is a true test of skill, and the result is a stunning, heirloom-quality ornament that you can cherish for years to come. It is a testament to your patience, precision, and passion for the art of crochet.
Whether it hangs proudly on your Christmas tree, guards a shelf of precious books, or is given as a truly unforgettable gift, your crochet dragon is a symbol of a challenge met and a legend brought to life.
I would be absolutely thrilled to see your magnificent creation! If you’ve made a dragon using this pattern, please consider sharing a photo. For a place to connect with other skilled crafters, share your triumphs, and find more inspiration.
An Advanced Crafter’s FAQ
This pattern pushes the boundaries of standard amigurumi. Working on such a small scale with fine thread presents unique challenges. This guide will help you master the key techniques required for a successful build.
Why should I work my project “inside-out”?
For the neatest and most professional appearance on this small scale, it is highly recommended to work this amigurumi “inside-out.” This means the “right” side of your stitches (the smooth ‘V’s) faces inward as you crochet. When the piece is finished, the more textured “wrong side” is on the exterior. This provides a cleaner, more defined look that mimics the organic, overlapping scales of a dragon. This technique also hides the slight “lean” of the stitches that occurs when working in a continuous spiral, ensuring your anatomical markings remain perfectly centered.
Any tips for working with fine thread and a tiny hook?
Handling a 1.0mm steel hook and metallic thread requires a different set of motor skills than working with bulky wool. Be patient with yourself as your hands develop this new muscle memory through repetition. If you find the thread slipping, try adjusting your tension by wrapping it an extra time around your pinkie finger. Most importantly, always work in bright, high-contrast light. This makes it easier to identify the parts of each stitch and prevents eye strain.
How do I make sure the lacy wings hold their shape?
The most common concern with filigree wings is sagging. To ensure your wings maintain their majestic stance, never skip the internal wire skeleton. We recommend 18-gauge or 20-gauge floral wire, which is strong enough to support the thread. Additionally, the final row of Crab Stitch (Reverse SC) on the wing membrane acts as a structural cord, creating a tensioned ring around the lace that prevents the points from curling inward over time.
Can I use regular yarn instead of metallic thread?
While it is possible to use regular yarn, it is not recommended for this specific ornament pattern. Size 10 metallic thread provides a “crispness” and stitch definition that cotton or acrylic cannot match. At this tiny scale, regular yarn is much heavier and would likely cause the delicate wings and tail to lose their shape and become “blobby.” Using regular yarn will also result in a much larger dragon that would require a heavier gauge of wire for support.
What is the best way to create an invisible seam during assembly?
To avoid a “homemade” look, use a specific assembly order and a seamless join technique. For all joins, use a Whip Stitch. Instead of going through the top loops of the stitches, sew under the vertical posts on each piece. Pull the thread tight every 3-4 stitches to cinch the pieces together, making the seam disappear into the texture of the fabric.
How does “soft sculpting” give the dragon its expression?
Soft sculpting, or tension sculpting, is what refines the face and gives the dragon its soul. By using a needle and matching thread to pull the eye sockets inward from a hidden anchor point (like the neck join), you create recessed “brows” that catch shadows. This simple technique gives the dragon its focused, intelligent gaze, transforming it from a toy into a lifelike creature
Ready for your next project?