There is a particular kind of crochet project that stops people mid-sentence when they see it. Not because it is colorful or large or decorated with buttons and bows — but because for just a split second, they are not entirely sure it is made of thread at all.
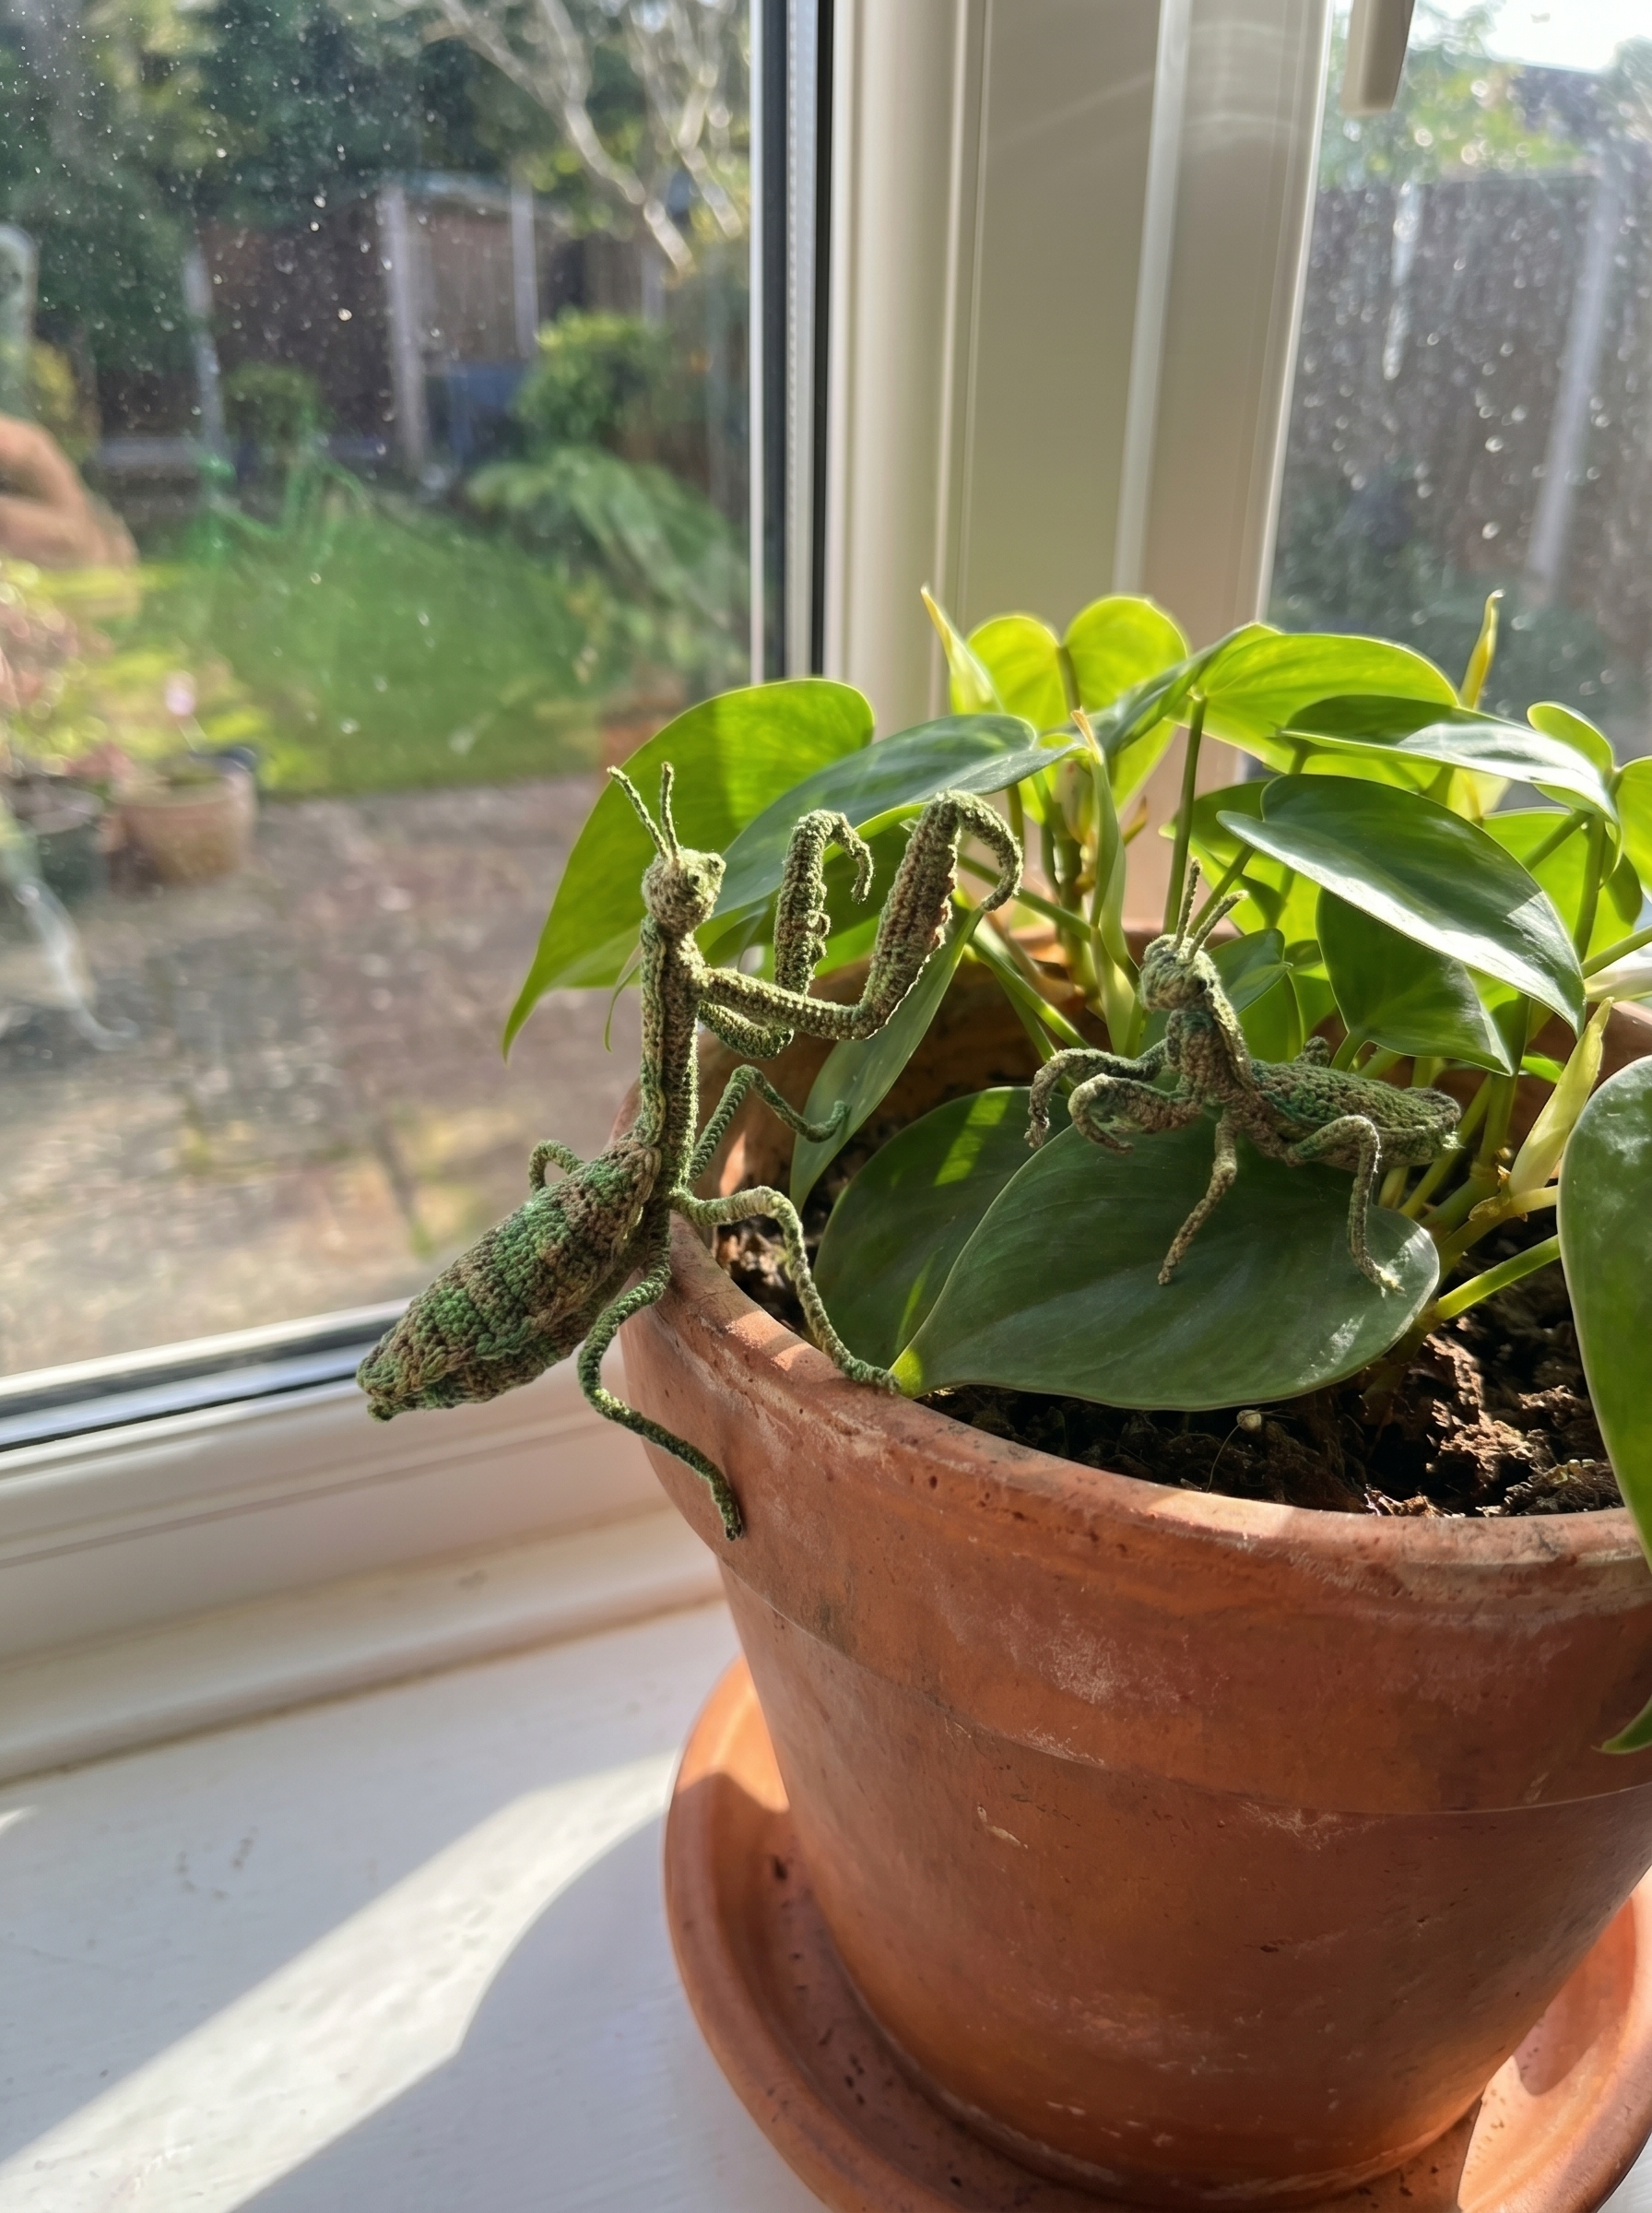
This praying mantis is that kind of project.
I have always found mantises almost hypnotic to watch. The way they hold completely still, head tilted at that precise angle, front arms raised like they are mid-thought — there is something ancient and deliberate about them that no other insect quite captures. When I decided to recreate one in crochet, I knew from the beginning that cute was not the goal. Real was the goal.
What makes this construction so extraordinary is the marriage of two techniques that most crocheters keep completely separate — ultra-fine thread crochet and copper wire armature. The wire runs through the entire body, both arms, and all six legs, which means your finished mantis is not a stuffed toy. It is a poseable sculpture. You can bend every limb, tilt the head, raise the arms into that iconic prayer position, and place it in any stance you can imagine. Set it on a twig, perch it on the rim of a plant pot, pose it mid-strike on a piece of driftwood — it holds every position you give it.
This is not a beginner project and I will not pretend otherwise. But if you have been crocheting for a while and you are looking for something that will genuinely stretch your skills, teach you techniques you have never used before, and produce a finished piece that makes people’s jaws drop — you are in exactly the right place.
- Skill Level: Advanced
- Estimated Time: 12–15 hours across multiple sessions
- Finished Size: Palm-sized — approximately 8–12 cm from head to tail tip when posed upright
- Hook Size: 0.50 mm
- Construction Method: Continuous spiral rounds (no joining), flat rows for wings
This guide is written for you if you are:
- An experienced amigurumi maker ready for a serious technical challenge
- A nature lover who wants a display piece that looks like it belongs in a natural history museum
- A thread crochet enthusiast wanting to explore wire armature construction for the first time
- A collector or maker who creates pieces intended for display rather than play
- Someone who tried this construction before and wants a more detailed walkthrough to get it right this time
What You Will Need
Before we talk about a single stitch, let’s talk about materials — because this project lives or dies by what you put into it. At this scale, every choice matters more than it would in a standard amigurumi. The wrong thread weight, a slightly too-large hook, or wire that is too stiff can shift your finished mantis from breathtakingly realistic to disappointingly lumpy. This section will make sure that doesn’t happen to you.
Thread
You will need two colors of sewing thread for this entire project:
- Green jeans sewing thread — this covers everything. The head, the neck, the full body, the tail, both wings, the neck cover, both forearms, and the thread wrapping on all six legs and both antennae. Buy more than you think you need — running out mid-body on Round 47 is not a situation you want to find yourself in.
- Black sewing thread — used only for embroidering the eyes. A small amount goes a long way here.
The word sewing thread is doing a lot of heavy lifting in this pattern and it is worth pausing on it. This is not crochet cotton. This is not embroidery floss. This is the thread you find on a spool in a fabric store — the kind used to sew garments. Jeans sewing thread specifically is a polyester-cotton blend that is slightly thicker and more durable than standard sewing thread, and that specific weight is what produces the dense, firm, almost shell-like fabric texture that makes this mantis look real rather than crafted.
If you substitute a heavier thread — even just stepping up to size 10 crochet cotton — your mantis will be noticeably larger and softer, and the fine surface detail that creates the realistic insect texture will be lost. If you want your finished piece to look like the photos, use jeans sewing thread. It is that simple.
Hook
0.50 mm crochet hook — and yes, that number is correct.
If you have never worked at this scale before, hold your hook next to a standard sewing needle. They are approximately the same diameter. This is the world you are entering, and it requires a genuine adjustment period. Before you begin the pattern itself, spend 20–30 minutes simply crocheting a small practice swatch in your chosen thread. Get your hands used to the grip, get your eyes used to finding the stitches, and get your tension settled before you commit to Round 1 of the actual mantis.
A hook in the range of 0.40–0.60 mm will work if that is what you have available, but stay as close to 0.50 mm as possible. Going larger loosens the fabric and can allow stuffing to show through. Going smaller makes the work unnecessarily difficult without meaningfully improving the result.
Wire
The copper wire is not an optional embellishment in this construction — it is the skeleton. Without it you have a stuffed toy. With it you have a sculpture. Every poseable element of this mantis depends on the wire being correctly prepared and correctly placed, so read this section carefully before you begin cutting anything.
Here is exactly what you need to prepare before you start crocheting:
- For the head: One single piece of soft copper wire, 8 cm long. This gets inserted into the head cavity after Round H7 and gives the head its rigid, upright structure.
- For the legs: Six bundles, each made from 4 strands of copper wire twisted tightly together, each bundle approximately 12 cm long before twisting. These insert through openings left in the body at specific rounds and form all six legs.
- For the forearms: Two bundles, each made from 4 strands of copper wire approximately 8 cm long before twisting. After twisting, three of the four strands are trimmed to 6.75 cm and one strand is left at approximately 1.5 cm. These insert into the finished forearm pieces before the final rounds are closed.
- For the antennae: Two single pieces of copper wire, each approximately 3.5 cm long. These attach at the head after assembly.
A note on wire type — use soft, bendable copper wire. The key word is soft. Craft stores sell copper wire in various gauges and the one you want feels pliable and easy to bend with your fingers. Stiff wire will fight you during posing and risks distorting the fabric around it. Aim for approximately 28–30 gauge. Do not substitute pipe cleaners — they are too thick, too fuzzy, and too difficult to wrap cleanly with thread.
Prepare and cut all your wire pieces before you begin crocheting. Having them ready at each insertion point prevents mistakes and keeps your construction flowing smoothly.
Other Supplies
- Polyester fiberfill stuffing — packed firmly and evenly throughout the body
- Beads — for the eyes (used alongside black thread embroidery)
- Stitch marker — essential, since the entire body is worked in continuous spiral rounds
- Sharp scissors
- Tapestry needle — for sewing pieces together and weaving in ends
A Honest Word About Substitutions
Every material listed in this section was chosen for a specific reason at a specific scale. That said, making is always personal and sometimes availability or budget requires adjustments. Here is where you have genuine flexibility and where you really don’t:
You can change: the color of your thread (any color of jeans sewing thread works), the type of wire within the same gauge range (soft aluminum craft wire is a good copper substitute), and whether or not you add beads to the eyes.
You really shouldn’t change: the thread weight, the hook size by more than 0.1 mm in either direction, or the wire armature itself. These three elements are the foundation of everything the finished mantis looks and feels like. Adjust them and you are making a different project — which is completely valid, but manage your expectations about the result matching what you see in the photos.
Gauge & Finished Measurements
Understanding Gauge at This Scale
If you come from a standard amigurumi background, you are used to gauge meaning a specific number of stitches per centimeter that you need to match exactly. At sewing thread weight with a 0.50 mm hook, gauge works a little differently — and understanding that difference will save you a lot of frustration before you even begin.
At this scale, gauge is less about hitting a precise number and more about achieving the right quality of fabric. There are three things your fabric needs to be, and all three matter equally:
Firm and dense — when you hold your swatch and gently tug it, it should have almost no give. The fabric should feel closer to stiff canvas than soft knit. If it stretches easily or you can see daylight through it when held up to a light source, your tension is too loose.
X-shaped stitches throughout — this is achieved by using the yarn-under method rather than the standard yarn-over. If your stitches look like V’s on the surface of your fabric, you are crocheting with the standard method and the surface texture of your mantis will look wrong. The yarn-under method and how to work it is explained in full detail in the next section — but the key point here is that your gauge swatch should already show X-shaped stitches before you begin the pattern.
Consistent from start to finish — this construction runs through 76 rounds on the main body alone, and your tension needs to be the same on the final abdomen round as it was on the first head round. Tension that drifts — loosening as your hands warm up or tightening when you pick up after a break — will create visible irregularities in the long straight neck section that are very difficult to disguise.
Your Gauge Swatch — Do Not Skip This
I know. Nobody enjoys making a gauge swatch. But at 0.50 mm with sewing thread, a swatch is genuinely worth the 15 minutes it takes — not primarily to measure, but to calibrate your hands and eyes before committing to Round H-1 of the actual mantis.
Crochet 15 sc x 15 rounds in your chosen thread and hook, using the yarn-under method throughout. Then ask yourself honestly:
Can I see through the fabric when I hold it to a light source?
If yes — tighten your tension before starting.
Do the stitches look like V’s or X’s on the surface?
If V’s — keep practicing the yarn-under method until X’s appear consistently.
Does the fabric feel firm enough to contain stuffing without any fiberfill showing through?
If no — tighten your tension before starting.
Is my hand reasonably comfortable after 15 rounds at this scale?
If severely cramping — experiment with how you hold the hook and plan for shorter work sessions.
Only when all four answers satisfy you should you cast on your magic ring.
Finished Measurements
The completed mantis is a palm-sized sculpture — small enough to sit comfortably in one hand with room to spare. Here is a section by section breakdown of approximate measurements when the piece is assembled and posed in a neutral upright standing position:
| Section | Approximate Measurement |
|---|---|
| Full body — head tip to tail tip | 10–12 cm |
| Each wing | 3–4 cm long |
| Each leg before posing | 6 cm |
| Each forearm | 6–7 cm |
| Each antenna | 3.5 cm |
| Overall height when posed upright | 8–10 cm |
These are guides, not targets. Your finished mantis may sit slightly outside these ranges depending on your personal tension and thread weight — and that is completely fine. A mantis that finishes at 11 cm rather than 10 cm is still a beautiful mantis.
Why the Finished Size Is Flexible
Here is something interesting about wire armature construction that standard stuffed amigurumi cannot offer — the finished size of your mantis is partially in your hands even after the last stitch is made.
The wire running through the legs, forearms, and body means that how you pose the piece significantly affects how large it appears. A mantis posed low and flat in a stalking position reads as smaller than the same mantis posed fully upright with legs extended. The measurements above reflect a natural neutral standing pose, but your mantis can look meaningfully different depending on the stance you give it.
This is worth keeping in mind both during assembly — when you are deciding how to cut and prepare your wire lengths — and after finishing, when you are settling on your display pose. There is no single correct finished size. There is only the pose that makes your mantis look most alive to you.
Want to Make a Bigger One? — The Complete Scaling Guide
The construction you have just read works at sewing thread scale. But every single round, every stitch sequence, every wire insertion point, and every assembly step scales perfectly to any yarn weight you choose. The mathematics stay identical. Only the materials around them change — and they need to change together, not in isolation.
Here is everything you need to know to make a larger version of this mantis.
Step 1 — Choose Your Target Size
Use this table as your starting point:
| Target Size | Yarn Weight | Hook Size | Approximate Finished Height |
|---|---|---|---|
| Original | Sewing thread | 0.50 mm | 10–12 cm |
| Small scale-up | Size 10 crochet thread | 1.5 mm | 15–18 cm |
| Medium | Fingering / sock weight | 2.0–2.5 mm | 20–25 cm |
| Large | DK weight | 3.5 mm | 30–35 cm |
| Giant | Worsted weight | 4.5–5.0 mm | 45–55 cm |
These heights are approximate — your personal tension will shift them. Always swatch before committing.
Step 2 — Calculate Your Scale Factor
This number is the foundation of every other decision you make for your scaled version.
Crochet a swatch of 10 sc x 10 rounds in your chosen yarn using the yarn-under method. Then crochet the same swatch in the original sewing thread. Measure both swatches and divide the larger measurement by the smaller one. That result is your scale factor.
For example: if your DK weight swatch measures 4 cm x 4 cm and your sewing thread swatch measures 1.2 cm x 1.2 cm, your scale factor is approximately 3.3.
Write this number down. You will use it for every wire length calculation in the project.
Step 3 — Scale Your Wire Gauge
This is the adjustment most makers overlook and it is the one that matters most structurally. A larger mantis body is dramatically heavier than the original — thin copper wire that works perfectly at sewing thread scale will buckle under a worsted weight body. As you scale the yarn up, the wire must get stronger at the same rate.
| Scale | Wire Type | Recommended Gauge |
|---|---|---|
| Original | Soft copper wire | 28–30 gauge |
| Small scale-up | Copper or aluminum craft wire | 24–26 gauge |
| Medium | Aluminum craft wire | 20–22 gauge |
| Large | Aluminum armature wire | 18–20 gauge |
| Giant | Aluminum armature wire | 14–16 gauge or doubled 18 gauge |
Aluminum armature wire — available from sculpture supply stores and online — is the best choice at large and giant scale. It is lighter than copper at equivalent strength, which matters when the wire needs to support a significantly heavier fabric and stuffing body.
Step 4 — Scale Your Wire Lengths
Multiply every wire length from the original construction by your scale factor:
| Component | Original Length | Formula | Example at Scale Factor 3x |
|---|---|---|---|
| Head wire | 8 cm | × scale factor | 24 cm |
| Each leg bundle | 12 cm | × scale factor | 36 cm |
| Each forearm bundle | 8 cm | × scale factor | 24 cm |
| Each antenna | 3.5 cm | × scale factor | 10.5 cm |
Cut and prepare every wire piece before you begin crocheting. Label each bundle with a small sticky note so you reach for the right piece at the right moment without measuring again mid-project.
Step 5 — Adjust Your Stuffing Strategy
At original scale, pure polyester fiberfill throughout the body works perfectly. At larger scales, fiberfill alone in a wide abdomen tends to compress and sag over time. Use a hybrid approach for anything medium scale and above:
Fill the widest section of the abdomen — the rounds corresponding to the AB zone — with a combination of fiberfill and plastic poly pellets. The pellets add density and weight stability that prevents the abdomen walls from collapsing inward over months and years.
Keep pure lightweight fiberfill in the narrower sections — the neck tube, the tail taper, and the upper thorax — where you need the stuffing to be easily shaped and repositioned as you stuff progressively.
For large and giant scale, consider adding a central spine wire running the full length of the body from head to tail tip, in addition to the head wire. This gives the entire torso a rigid internal backbone that prevents any mid-body sagging regardless of how the stuffing settles over time.
Step 6 — Know What Gets Harder at Giant Scale
Scaling up solves some challenges and creates new ones. Here is what to prepare for:
The forearm spines become much more visible. At sewing thread scale, a slightly uneven spine stitch virtually disappears into the fine fabric. At DK or worsted weight, every spine stitch is clearly visible from across the room — its angle, its size, its position. Slow down even further during the forearm rounds at larger scale and check each spine before moving on to the next round.
The wing texture becomes more pronounced — which is actually a good thing. The ribbed veining created by alternating FLO and BLO rows is subtle and delicate at thread scale. At larger yarn weights it becomes striking and dramatic. Lean into it rather than trying to minimize it.
Assembly requires significantly more physical effort. Sewing pieces together through thick fabric with thicker thread is harder work than it sounds. Use a large-eye tapestry needle proportional to your yarn weight and take breaks during assembly just as you do during crocheting.
Posing a Giant Mantis
A large or giant mantis with thick aluminum armature wire in its legs is extraordinarily satisfying to pose — the wire holds position firmly, the piece has real physical presence, and the larger scale allows for much more nuanced and dramatic stances than the tiny original permits.
Work through the posing slowly and always with both hands — one hand stabilizing the section you want to stay straight, the other applying the bend at exactly the point you want it. Thick armature wire is much less forgiving of accidental kinks than fine copper wire. A kink in 14 gauge aluminum at the wrong point is essentially permanent.
For the most dramatic large-scale display, consider the deimatic posture — wings fully spread, forearms raised and fanned wide, body angled upright as if facing down a predator. This is the threat display real mantises use, and at 50 cm tall it is genuinely breathtaking to look at.
The scale mathematics in this guide work for any yarn weight and any hook size. The construction does not care how large you make it — only the materials need to keep pace with the scale. The largest crocheted mantis display pieces made to date reach approximately 60–70 cm in height. There is absolutely no reason yours could not be the next one.
Stitch Guide & Special Techniques
Before your hook touches the thread, take time to read this section fully. This construction uses a handful of techniques that may be new to you even if you have years of amigurumi experience — and understanding them before you begin will make every round smoother and more confident.
Abbreviations Used
| Abbreviation | What It Means |
|---|---|
| sc | Single crochet |
| MR | Magic ring |
| inc | Increase — 2 sc worked into the same stitch |
| dec | Decrease — worked invisibly across 2 stitches |
| ch | Chain |
| hdc | Half double crochet |
| dc | Double crochet |
| sl st | Slip stitch |
| FLO | Front loop only |
| BLO | Back loop only |
| st / sts | Stitch / stitches |
| (sts) * n times | Repeat everything inside the brackets n times |
The Techniques That Make This Mantis What It Is
This construction uses four techniques that go beyond standard amigurumi. Two of them you will use in virtually every single round. Two of them appear in specific sections but are critical to the realism of the finished piece. Practice all four before you begin the pattern.
Technique 1 — The Yarn-Under Single Crochet
This is the most important technique in the entire guide. Read it carefully, practice it until it feels natural, and use it for every single crochet stitch throughout the entire construction.
Most crocheters learn the yarn-over method as their default single crochet. In the yarn-over method, you wrap the thread over the top of the hook before pulling through — and the result is a V-shaped stitch on the surface of your fabric. This is perfectly correct for most crochet. For this mantis, it produces the wrong texture entirely.
The yarn-under method reverses the direction of that wrap. Instead of coming over the top of the hook, the thread comes up from underneath — you are scooping the thread from below rather than wrapping it from above. The result is an X-shaped stitch instead of a V-shaped one, and the difference to the fabric is dramatic.
How to work it:
- Insert your hook into the stitch as normal
- Instead of wrapping thread over the hook from back to front, bring the thread up from underneath the hook — scooping upward from below
- Pull the loop through and complete your single crochet as normal
It will feel strange for the first 20–30 stitches. That is completely normal. Push through the awkwardness — once your hands adjust, it becomes automatic.
If you catch yourself reverting to yarn-over at any point during the project, frog back to that point and redo it.
Technique 2 — The 3-DC Bobble Stitch
The bobble stitch appears in one specific round of the head section and creates the two subtle raised bumps that represent the mantis’s compound eye sockets.
How to work a 3-dc bobble:
- Yarn over, insert hook into the stitch, pull up a loop, yarn over, pull through 2 loops — stop here.
- Repeat this entire step twice more into the same stitch. You now have 4 loops on your hook.
- Yarn over and pull through all 4 loops at once to close the bobble.
The bobble should push outward toward you on the right side of your work.
Technique 3 — The Forearm Spine Stitch
This stitch appears five times across the forearm section and creates the serrated spines along the inner edge of the mantis’s raptorial arms.
How to work the forearm spine:
- Slip stitch into the front loop only of the next stitch
- Chain 2
- Slip stitch into the second chain from the hook
- Slip stitch back into the same original stitch you started from
After working each spine, use your fingernail or the tip of your hook to gently push it outward so it sits at a clean right angle.
Technique 4 — Continuous Spiral Rounds
The entire main body of this construction — from the very first round of the head all the way to the final round of the tail — is worked in continuous spiral rounds. This means no joining, no chains to start new rounds, and no visible seam lines anywhere on the finished body.
- At the end of each round you do NOT slip stitch to join
- At the start of each new round you do NOT chain 1 or chain 2
- You simply continue crocheting into the next stitch
- Your stitch marker is the only thing marking where each round ends and the next begins — move it up at every single round without exception
Before You Begin — Essential Notes
Read this section before you pick up your hook. These are not gentle suggestions — they are the habits and decisions that separate a finished mantis you are proud to display from one that frustrated you into abandoning it halfway through. Every point here comes from real experience with this construction.
Your Tension is the Foundation of Everything
At 0.50 mm with sewing thread, tension inconsistencies that would be invisible in a standard amigurumi become clearly visible in the finished fabric. After every few stitches, consciously pull the thread snug with your non-hook hand. Your fabric should feel firm and almost stiff — if you can stretch it easily or see light through it, your tension needs to tighten before you go any further.
This is most critical across the long straight body section — a run of identical rounds where it is very easy for your tension to drift gradually without you noticing. Check your fabric regularly during this section by pinching it between your fingers and feeling for any soft or loose areas.
Your Stitch Marker is Not Optional
The continuous spiral construction has no natural visual markers to tell you where one round ends and the next begins — especially in sewing thread where the stitches are tiny and all look similar. A locking stitch marker moved up at the start of every single round is the only reliable system. Do not try to track your rounds by eye or memory.
Cut and Prepare Your Wire Before You Begin
Every wire insertion in this construction has a window — a point where the opening is the right size to accept the wire before it narrows too far. Miss that window and you will be unpicking finished rounds to get the wire in.
Cut all your wire pieces before you cast on your magic ring. Curl or fold the sharp cut ends slightly so they cannot pierce the fabric from inside. Label each bundle with a small sticky note so you grab the right piece at the right moment.
Stuff as You Go — Not All at Once
The body is a long continuous tube and attempting to add all the stuffing through the tail opening at the end is both difficult and ineffective. Begin stuffing the head as soon as the wire is inserted and the opening is still accessible, and continue adding small amounts of fiberfill every 8–10 rounds as you work down the body.
Use a toothpick, the blunt end of a darning needle, or the eraser end of a pencil to push stuffing into narrow sections and distribute it evenly. Stuff more firmly than feels natural.
Read Every Round Before You Crochet It
Several rounds in this construction involve mid-round direction changes, chain spaces used as stitch anchors, and techniques that are genuinely unusual in amigurumi. The head shaping rounds and the forearm rounds in particular contain instructions that read strangely on paper until you visualize what they are building.
Before beginning any round that contains a chain, a turn, a slip stitch detail, or a BLO/FLO instruction — read the entire round through from start to finish. Visualize the movement. Then begin.
Work in Short Sessions
This is a 12–15 hour project that should be spread across multiple sittings of no more than 45–60 minutes each. The combination of a sub-millimeter hook, fine thread, and close concentration is genuinely tiring on your hands, wrists, and eyes.
Work in good light — a daylight LED lamp is ideal. If your hand starts to cramp or your eyes start to strain, stop. Put the work down. Come back fresh.
The Full Construction Guide
This guide presents the construction in eight clearly labeled sections, built in the order you will actually make them. Read each section fully before beginning it. Every structural decision — wire insertions, attachment points, loop variations — is explained in context so you understand not just what to do but why.
PART A — The Main Body
Head, Neck, Thorax, Abdomen & Tail
This is the heart of the entire construction. Everything else — wings, legs, forearms, antennae — attaches to or grows from this single continuous piece. It is worked from the very tip of the head all the way down to the pointed tail without ever joining or cutting your thread.
The main body spans 76 rounds total, broken into five distinct anatomical zones:
| Zone | Rounds | What It Builds |
|---|---|---|
| Head | H-1 to H-8 | The triangular mantis head with eye sockets and face shaping |
| Neck | N-1 to N-24 | The long elegant neck tube |
| Thorax | T-1 to T-7 | The chest area with wing and leg attachment points |
| Abdomen | AB-1 to AB-24 | The wide segmented belly |
| Tail | TL-1 to TL-12 | The tapering pointed tail tip |
Work through each zone in sequence without cutting your thread between them. Your stitch marker moves up at every single round throughout.
HEAD ZONE — Rounds H-1 through H-8
H-1: 3 sc into MR. [3 sts]
H-2: Work dc, sc into first st, inc in next 2 sts. [6 sts]
H-3: (Sc in next st, inc in next 2 sts) twice. [10 sts]
H-4: (Sc in next 2 sts, inc in next 2 sts) twice, sc in next 2 sts. [14 sts]
H-5: Sc in next 3 sts, inc in next 2 sts, work 3-dc bobble in next st, sc in next st, ch 1 skip next st, sc in next st, ch 1 skip next st, sc in next st, work 3-dc bobble in next st, inc in next 2 sts. [18 sts]
What is happening here: The two bobble stitches create raised bumps at the eye socket positions. The two chain-1 spaces with skipped stitches become the anchor points for your antennae later. This round shapes the entire face — do not rush it. Read it through completely before you begin.
H-6: Sc in next 9 sts, sc into ch-1 space, sc in next st, sc into ch-1 space, sc in next 4 sts, ch 1 then turn your work, sc in next 10 sts, ch 1 then turn your work again, sc in next 10 sts, sc in last 2 sts. [18 sts]
What is happening here: This is the most technically unusual round in the entire construction. You will change direction twice mid-round — working back and forth across 10 stitches to build a flat facial plane before continuing around. Read the full round before beginning, visualize both turns, and work stitch by stitch. This is the round that shapes the mantis face from a tube into something that actually looks like a head.
H-7: Sc in next 5 sts, dec over next 2 sts, dec over next 2 sts, sc in next 5 sts, dec over next 2 sts, dec over next 2 sts. [14 sts]
WIRE INSERTION — do this now, before continuing: After completing H-7, your head opening is still accessible. Insert your prepared 8 cm copper wire into the head cavity now. Once the wire is in, begin stuffing the head firmly with fiberfill. Continue adding stuffing gradually as you work down through the neck and body — do not wait until the end.
H-8: Sc in next 4 sts, dec over next 2 sts, dec over next 2 sts, sc in next 2 sts, dec over next 2 sts, dec over next 2 sts. [10 sts]
NECK ZONE — Rounds N-1 through N-24
This zone is 24 identical rounds. The neck is a straight tube of 10 stitches that gives the mantis its distinctive elongated silhouette. It is the longest repetitive section in the construction.
N-1 through N-24: Sc in each st around. [10 sts each round]
Staying on track through the neck: Move your stitch marker up at the start of every single round. Count the visible spiral ridges on the outside of the tube to verify your round count — each ridge is one round. Mark every fifth round with a small piece of contrasting thread tied loosely around one stitch. Keep your tension consistent — the neck is where tension drift is most common and most visible.
THORAX ZONE — Rounds T-1 through T-7
The thorax is where the body begins to widen and where all the attachment points for wings and legs are built directly into the fabric. Pay close attention to the notes on each round — several of them leave structural openings that you will need later.
T-1: Inc in first st, sc in next 3 sts, inc in next st, sc BLO in next 2 sts, sc in next st, sc BLO in next 2 sts. [12 sts]
WING ATTACHMENT — mark these stitches now: The sc BLO stitches in T-1 leave their front loops exposed on the surface of the fabric. These exposed loops are where both wings attach during assembly. Place a small piece of contrasting thread through each BLO stitch as you work them so they are easy to locate later. Do not substitute regular sc for these stitches.
T-2: Sc in each st around. [12 sts]
T-3: Inc in first st, sc in next 5 sts, inc in next st, sc in next 5 sts. [14 sts]
T-4: Sc in next 2 sts, ch 1 skip next st, sc in next 3 sts, ch 1 skip next st, sc in next 7 sts. [14 sts]
FIRST LEG PAIR OPENINGS — keep these clear: The two skipped stitches in T-4 create the insertion openings for your first pair of legs. Do not fill these chain spaces with anything — they need to remain open and accessible. If you are worried about losing track of them, mark each one with a locking stitch marker.
T-5: Inc in first st, sc in next st, sc into ch-1 space, sc in next 3 sts, sc into ch-1 space, sc in next st, inc in next st, sc in next 5 sts. [16 sts]
T-6: Sc in next 3 sts, ch 1 skip next st, sc in next 3 sts, ch 1 skip next st, sc in next 8 sts. [16 sts]
SECOND LEG PAIR OPENINGS — keep these clear: Same as T-4. The two skipped stitches here are the insertion openings for your second pair of legs. Mark them and keep them open.
T-7: Sc in next 3 sts, inc into ch-1 space, sc in next 3 sts, inc into ch-1 space, sc in next 8 sts. [18 sts]
ABDOMEN ZONE — Rounds AB-1 through AB-24
The abdomen is the widest part of the mantis body. It expands steadily across the first several rounds, then holds at 26 stitches through a series of alternating sc and sl st rounds that create the characteristic segmented rings of the mantis abdomen. This segmentation is one of the most realistic details in the entire construction — the sl st rounds pull inward slightly, creating natural-looking body rings without any additional finishing work.
AB-1: Sc in next 4 sts, inc in next st, sc in next 3 sts, inc in next st, sc in next 9 sts. [20 sts]
AB-2: Sc in next 5 sts, inc in next st, sc in next 3 sts, inc in next st, sc in next 10 sts. [22 sts]
AB-3: Sc in each st around. [22 sts]
AB-4: Sl st in each st around. [22 sts]
AB-5: Sc in next 6 sts, inc in next st, sc in next 3 sts, inc in next st, sc in next 11 sts. [24 sts]
AB-6: Sc in next 7 sts, inc in next st, sc in next 3 sts, inc in next st, sc in next 12 sts. [26 sts]
AB-7: Sc in each st around. [26 sts]
AB-8: Sl st in each st around. [26 sts]
AB-9 through AB-11: Sc in each st around. [26 sts]
AB-12: Sl st in each st around. [26 sts]
AB-13 through AB-15: Sc in each st around. [26 sts]
AB-16: Sl st in each st around. [26 sts]
AB-17 through AB-19: Sc in each st around. [26 sts]
AB-20: Sl st in each st around. [26 sts]
AB-21 through AB-23: Sc in each st around. [26 sts]
AB-24: Sl st in each st around. [26 sts]
Understanding the segmentation rounds: Every sl st round creates one visible ring around the abdomen. The sl st pulls slightly tighter than sc, creating a subtle indentation in the fabric that mimics the natural segment boundaries of a real mantis body. Do not skip these rounds or substitute sc — they are doing important visual work.
TAIL ZONE — Rounds TL-1 through TL-12
The tail tapers steadily from 26 stitches down to 6 over 12 rounds, with sl st segmentation rounds placed at regular intervals to continue the body ring pattern into the tail. Keep your decreases placed consistently and your tension even — the pointed tail silhouette is one of the most recognizable features of the finished mantis.
TL-1: Sc in next 10 sts, dec over next 2 sts, sc in next 7 sts, dec over next 2 sts, sc in next 5 sts. [24 sts]
TL-2: Sc in next 8 sts, dec over next 2 sts, sc in next 5 sts, dec over next 2 sts, sc in next 7 sts. [22 sts]
TL-3: Sc in next 6 sts, dec over next 2 sts, sc in next 5 sts, dec over next 2 sts, sc in next 7 sts. [20 sts]
TL-4: Sl st in each st around. [20 sts]
TL-5: Sc in next 5 sts, dec over next 2 sts, sc in next 5 sts, dec over next 2 sts, sc in next 6 sts. [18 sts]
TL-6: Sc in next 5 sts, dec over next 2 sts, sc in next 4 sts, dec over next 2 sts, sc in next 5 sts. [16 sts]
TL-7: Sc in next 4 sts, dec over next 2 sts, sc in next 5 sts, dec over next 2 sts, sc in next 3 sts. [14 sts]
TL-8: Sl st in each st around. [14 sts]
TL-9: Sc in next 4 sts, dec over next 2 sts, sc in next 5 sts, dec over next 2 sts, sc in next st. [12 sts]
TL-10: Sc in next 3 sts, dec over next 2 sts, sc in next 5 sts, dec over next 2 sts. [10 sts]
TL-11: Sc in next 2 sts, dec over next 2 sts, sc in next 4 sts, dec over next 2 sts. [8 sts]
TL-12: Sc in next st, dec over next 2 sts, sc in next 3 sts, dec over next 2 sts. [6 sts]
Fasten off and leave a long tail for closing.
To close the tail: Thread your tapestry needle with the long tail. Weave through all 6 remaining stitches, pull firmly to gather and close, then secure with several small knots on the inside. Weave the end in invisibly.
PART B — The Right Wing
The wings grow directly from the body — they are not separate pieces that get sewn on afterward. They are worked in flat rows starting from the exposed front loops left by the BLO stitches in Round T-1, expanding outward using a combination of dc, hdc, and sc stitches to build a naturally curved wing shape. The alternating FLO and BLO rows create a subtle ribbed surface that mimics real wing veining beautifully.
Position yourself with the head of the mantis facing toward you before beginning.
RW-1: Sl st into the first exposed front loop from T-1, ch 2, dc into the same st, dc into next st, ch 2, turn. [2 sts]
RW-2: Dc inc BLO in next st, dc inc BLO in next st, ch 2, turn. [4 sts]
RW-3: Dc inc FLO in first st, dc FLO in next 3 sts, ch 2, turn. [5 sts]
RW-4: Dc BLO in next 4 sts, dc inc BLO in next st, ch 2, turn. [6 sts]
RW-5: Dc inc FLO in first st, dc FLO in next 5 sts, ch 2, turn. [7 sts]
RW-6: Dc BLO in next 6 sts, dc inc BLO in next st, ch 2, turn. [8 sts]
RW-7: Dc inc FLO in first st, dc FLO in next 7 sts, ch 1, turn. [9 sts]
The wing is now at its full width of 9 stitches. From here the stitch mix changes — you will begin using sc and hdc alongside dc to shape the wing edge and begin the narrowing toward the tip.
RW-8: Sc BLO in next 4 sts, hdc BLO in next 3 sts, dc BLO in next 2 sts, ch 2, turn. [9 sts]
RW-9: Dc FLO in next 2 sts, hdc FLO in next 3 sts, sc FLO in next 4 sts, ch 1, turn. [9 sts]
RW-10: Sc BLO in next 4 sts, hdc BLO in next 3 sts, dc BLO in next 2 sts, ch 2, turn. [9 sts]
RW-11: Dc FLO in next 2 sts, hdc FLO in next 3 sts, sc FLO in next 4 sts, ch 1, turn. [9 sts]
RW-12: Sc BLO in next 4 sts, hdc BLO in next 3 sts, dc dec BLO over next 2 sts, ch 2, turn. [8 sts]
RW-13: Dc FLO in next 8 sts, ch 2, turn. [8 sts]
RW-14: Dc dec BLO over next 2 sts, dc dec BLO over next 2 sts, dc dec BLO over next 2 sts, dc dec BLO over next 2 sts, ch 1, turn. [4 sts]
RW-15: Dec FLO over next 2 sts, dec FLO over next 2 sts. [2 sts]
Fasten off and leave a long tail for securing.
PART C — The Left Wing
The left wing is a mirror image of the right wing. The construction is identical in length and structure — the only difference is that increases and decreases are placed on the opposite side so the two wings curve symmetrically away from each other when attached.
Begin at the same position as the right wing — head facing you, starting from the first exposed front loop of T-1 — but work on the opposite side of the body.
LW-1: Sl st into first exposed front loop from T-1 on the left side, ch 2, dc into same st, dc into next st, ch 2, turn. [2 sts]
LW-2: Dc inc BLO in next st, dc inc BLO in next st, ch 2, turn. [2 sts]
LW-3: Dc FLO in next 3 sts, dc inc FLO in next st, ch 2, turn. [5 sts]
LW-4: Dc inc BLO in first st, dc BLO in next 4 sts, ch 2, turn. [6 sts]
LW-5: Dc FLO in next 5 sts, dc inc FLO in next st, ch 2, turn. [7 sts]
LW-6: Dc inc BLO in first st, dc BLO in next 6 sts, ch 2, turn. [8 sts]
LW-7: Dc FLO in next 7 sts, dc inc FLO in next st, ch 2, turn. [9 sts]
LW-8: Dc BLO in next 2 sts, hdc BLO in next 3 sts, sc BLO in next 4 sts, ch 1, turn. [9 sts]
LW-9: Sc FLO in next 4 sts, hdc FLO in next 3 sts, dc FLO in next 2 sts, ch 2, turn. [9 sts]
LW-10: Dc BLO in next 2 sts, hdc BLO in next 3 sts, sc BLO in next 4 sts, ch 1, turn. [9 sts]
LW-11: Sc FLO in next 4 sts, hdc FLO in next 3 sts, dc FLO in next 2 sts, ch 2, turn. [9 sts]
LW-12: Dc dec BLO over next 2 sts, hdc BLO in next 3 sts, sc BLO in next 4 sts, ch 2, turn. [8 sts]
LW-13: Dc FLO in next 8 sts, ch 2, turn. [4 sts]
LW-14: Dc dec BLO over next 2 sts, dc dec BLO over next 2 sts, dc dec BLO over next 2 sts, dc dec BLO over next 2 sts, ch 1, turn. [4 sts]
LW-15: Dec FLO over next 2 sts, dec FLO over next 2 sts. [2 sts]
Fasten off and leave a long tail for securing.
PART D — The Neck Shield
This small flat piece covers the join between the head and body when viewed from above, creating a clean neat finish at the neck transition. On a real mantis this area is the pronotum — the distinctive neck plate that is one of the most recognizable features of the insect. This piece gives your crocheted mantis that same architectural detail.
NS-1: Ch 20, hdc inc into second ch from hook, hdc in next 17 ch, 3 hdc into last ch, continue working into the opposite side of the foundation chain, hdc in next 18 sts. [40 sts]
Fasten off and leave a long tail.
Flip the piece to the wrong side facing outward. Position it over the neck area of the assembled body and pin it in place before sewing. Sew down with small even stitches all the way around the perimeter using the long tail. Weave in all ends securely.
PART E — The Raptorial Forearms
Make 2 — one for each side
These are the most technically detailed pieces in the entire construction. The forearms — called raptorial arms in entomology because they are adapted for catching prey — are worked in continuous rounds with five spine stitches built in at specific points to create the characteristic serrated inner edge. They are wired but not stuffed.
Do not stuff the forearms. Wire only.
FA-1: 3 sc into MR. [3 sts]
FA-2: Work dc into first st, sc into same st, sc in next 2 sts. [4 sts]
FA-3: Inc in first st, sc in next 3 sts. [5 sts]
FA-4: Inc in next 3 sts, sc in next 2 sts. [8 sts]
FA-5 through FA-20: Sc in each st around. [8 sts each round]
FA-21: Sc in next 6 sts, ch 1 turn, sc in next 4 sts, ch 1 turn, sc in next 4 sts, sc in last 2 sts. [8 sts]
This mid-round direction change creates the wrist bend — the slight angle between the lower arm and the claw section that is immediately visible in the finished piece. Work slowly through both turns.
FA-22: Sc in each st around. [8 sts]
FA-23: Sc in next 3 sts, inc in next 2 sts, sc in next 3 sts. [10 sts]
FA-24 through FA-26: Sc in each st around. [10 sts]
FA-27: Sc in next 4 sts, inc in next 2 sts, sc in next 4 sts. [12 sts]
FA-28 through FA-30: Sc in each st around. [12 sts]
FA-31: Sc in next 5 sts, inc in next 2 sts, sc in next 5 sts. [14 sts]
FA-32: Sc in next 7 sts, work spine stitch in next st, sc in next 6 sts. [14 sts]
First spine stitch. Work it as follows: sl st into the front loop of the next st, ch 2, sl st into the second ch from the hook, sl st back into the original st. After completing it, use your fingernail to push the spine outward so it stands perpendicular to the arm surface.
FA-33: Sc in next 7 sts, sc BLO in next st, sc in next 6 sts. [14 sts]
FA-34: Sc in each st around. [14 sts]
FA-35: Sc in next 7 sts, work spine stitch in next st, sc in next 6 sts. [14 sts]
Second spine stitch — same method as FA-32.
FA-36: Sc in next 7 sts, sc BLO in next st, sc in next 6 sts. [14 sts]
FA-37: Sc in next 6 sts, dec over next 2 sts, sc in next 6 sts. [13 sts]
FA-38: Sc in next 6 sts, work spine stitch in next st, sc in next 6 sts. [13 sts]
Third spine stitch.
FA-39: Sc in next 5 sts, dec over next st and BLO st, sc in next 6 sts. [12 sts]
FA-40: Sc in each st around. [12 sts]
FA-41: Sc in next 3 sts, dec over next 2 sts, work spine stitch in next st, sc in next 6 sts. [11 sts]
Fourth spine stitch.
FA-42: Sc in next 4 sts, sc BLO in next st, sc in next 6 sts. [11 sts]
FA-43: Sc in next 5 sts, dec over next 2 sts, sc in next 4 sts. [10 sts]
FA-44: Sc in next 4 sts, work spine stitch in next st, sc in next 5 sts. [10 sts]
Fifth and final spine stitch.
FA-45: Sc in next 4 sts, sc BLO in next st, dec over next 2 sts, sc in next 3 sts. [9 sts]
FA-46: Sc in each st around. [9 sts]
FA-47: Dec over first 2 sts, sc in next 7 sts. [8 sts]
FA-48 through FA-50: Sc in each st around. [8 sts]
FA-51: Dec over first 2 sts, sc in next 6 sts. [7 sts]
FA-52 through FA-54: Sc in each st around. [7 sts]
Fasten off and leave a long tail for wire wrapping and attachment.
Wire insertion for forearms: Prepare 4 strands of copper wire approximately 8 cm long. Twist all four strands together. Trim three of the four strands to 6.75 cm — leave the fourth strand at its full length of approximately 1.5 cm beyond the others. Insert the bundle into the forearm with the shorter strands going in first. Do not stuff. The long single strand tail will be used to anchor the wire at the wrist end.
Once wired, sew each completed forearm onto the body at the neck area — approximately at the level of the thorax, just below where the head meets the body.
PART F — The Legs
The legs are structural wire elements, not crocheted pieces. They are made from twisted copper wire bundles covered completely in thread wrapping. This method produces legs that are poseable, dimensionally accurate, and — when wrapped neatly — look remarkably like real insect legs.
To make and attach all six legs:
Step 1 — Prepare the wire bundles. For each leg, take 4 strands of copper wire each approximately 12 cm long. Hold all four strands together and twist them tightly along their full length. The twisting compresses the four strands into a single firm bundle that is significantly more rigid than any individual strand alone.
Step 2 — Insert through the body. Push each twisted bundle through one of the leg openings left in the thorax zone — the chain spaces from T-4 and T-6. Center each bundle so equal length extends from both sides of the body. Each opening accommodates one bundle, giving you one leg on each side of the body per opening — three pairs of legs total.
Step 3 — Wrap the legs. Starting at the point where the wire exits the body and working outward toward the tip, wrap the exposed wire firmly and evenly with your green thread. Keep your wrapping tight and close together — gaps in the wrapping will show on the finished leg. Work all the way to the tip, then wrap back toward the body for a short distance to lock the end.
Step 4 — Build the joint thickness. At the leg joint areas, wrap your thread back and forth across a section approximately 1.5 cm wide twice over, building up extra thickness at that point. This mimics the natural joint bulge of a real insect leg and adds significant realism to the finished piece.
Step 5 — Secure and trim. Knot your wrapping thread securely at both the body end and the tip end of each leg. Trim any excess wire carefully and press the very tip slightly inward so no sharp point is exposed.
Step 6 — Repeat for all six legs. Work through the same process for every leg before moving on to posing.
PART G — The Antennae
To make both antennae:
Cut two pieces of copper wire each approximately 3.5 cm long. Fold or curl each cut end slightly to remove the sharp point.
Attach each wire at one of the chain spaces left in H-5 of the head — these are the same spaces that had stitches skipped over them during the head construction. Push the wire through the space and fold it so it is anchored firmly.
Wrap each antenna completely from base to tip with green thread using the same method as the legs. Secure at both ends.
Once wrapped, bend each antenna into a gentle upward curve — not a sharp angle, but a gradual arc that lifts from the head and curves slightly outward. Straight antennae look stiff and constructed. Curved antennae look alive.
PART H — The Eyes
Thread a tapestry needle with black sewing thread. Working directly onto the head surface at the raised bobble stitch areas created in H-5, embroider each eye with several overlapping stitches until the area has good coverage and a clear defined shape.
Work both eyes before assessing their placement. The two eyes should be symmetrical — equal distance from the center line of the head, equal size, equal density of thread coverage.
If you are adding glass seed beads, attach one bead at the center of each embroidered eye area using a beading needle and secure it with several anchoring stitches. The bead creates a glossy reflective highlight that makes the eyes look three-dimensional and genuinely alive.
Assembly — Putting It All Together
With all eight parts complete, assembly follows a specific sequence designed to give you the best access to each attachment point before the next piece makes it harder to reach.
Assembly Step 1 — Close and check the body. The tail should already be closed from Part A. Squeeze the body firmly along its full length — it should feel evenly firm with no soft patches. If any area feels loose or hollow, this is your last opportunity to open the tail slightly, add more stuffing to that area with a toothpick, and close again.
Assembly Step 2 — Attach the neck shield. Position the neck shield (Part D) over the transition area between the head and the upper body. Flip it wrong side outward, pin it flat, and sew all the way around its perimeter with small invisible stitches. When finished it should sit like a natural plate — flat, smooth, and integrated with the body rather than sitting on top of it.
Assembly Step 3 — Insert and wrap the legs. If the legs were not inserted during body construction, insert them now through the thorax openings. Center each bundle, then wrap and finish all six legs as described in Part F before attaching anything else. The legs need to be in place before the wings go on, as the wing attachment can obstruct access to the thorax area.
Assembly Step 4 — Attach the wings. Position the right wing on the right side of the body and the left wing on the left side, both with the head facing you. Align the base row of each wing with the exposed front loops from T-1. Using the long thread tails, sew each wing securely to the body with small invisible stitches. The wings in resting position should lie flat and symmetrical against the body.
Assembly Step 5 — Attach and wrap the antennae. Insert and wrap the antennae as described in Part G. Curve them after wrapping.
Assembly Step 6 — Attach the forearms. Position both forearms at the upper thorax area of the body, just below the head. Angle them upward and forward in the classic raised position. Sew each one securely to the body using the long thread tails. Once attached, use the wire inside to fine-tune the position — the serrated spine edge should face inward toward the body center line.
Assembly Step 7 — Embroider the eyes. Embroider both eyes as described in Part H. Add beads if using.
Assembly Step 8 — Final posing. With everything attached your mantis is a fully poseable sculpture. Work through the pose gradually — start with the overall body angle, then the leg stance, then the forearm position, then the fine details like antennal curve and head tilt. Bend every wire element slowly and with both hands — one hand stabilizing, one hand applying the bend — to avoid kinking.
Final inspection before you call it done:
Run through this checklist before setting your mantis in its display spot:
- All thread ends woven in and trimmed flush
- Wings symmetrical on both sides
- Eyes balanced and even
- Antennae curved naturally, not sticking straight out
- All wire tips covered with no sharp points exposed
- Body firm with no soft patches
- Legs positioned in a stable stance that allows the mantis to balance in its pose
- Forearms angled intentionally — raised with purpose, not drooping
If everything passes — you are done. And what you have made is genuinely remarkable.
Blocking & Care Instructions
Does This Piece Need Blocking?
For most standard amigurumi worked in acrylic yarn, blocking is optional or unnecessary. This mantis is different. Because it is worked in cotton-based sewing thread with a copper wire armature, a light blocking step after assembly can make a meaningful difference to the final appearance — particularly for the wings, which are worked in rows and may want to curl slightly at the edges.
That said, blocking needs to be approached carefully here because of the wire interior. Follow the guidance below closely.
Blocking the Wings
The wings are the section most likely to benefit from blocking. If yours are lying flat and smooth already, you can skip this step. If they are curling at the edges or looking uneven, here is how to address it:
Method — Wet Blocking:
- Dampen the wings only using a clean spray bottle filled with plain cool water. Mist them lightly — you want them damp, not soaking wet.
- Gently reshape each wing with your fingers, smoothing the edges flat and encouraging a gentle natural curve if desired.
- Pin the wings to a foam blocking mat or a folded towel using rust-proof pins, holding them in your desired shape.
- Allow to dry completely at room temperature — this usually takes 2–4 hours depending on your environment. Do not use heat.
- Remove the pins once fully dry.
Do NOT submerge the mantis in water. The copper wire inside the body, legs, and hands will be protected by the tight thread covering for a while, but prolonged water exposure can cause the wire to oxidize and eventually discolor the green thread from the inside out.
Blocking the Body
The body generally does not need blocking due to the firmness of the stuffing and the tight stitch density. However if any area looks slightly uneven or lumpy after assembly, you can:
- Lightly mist the affected area with cool water
- Gently massage and reshape it with your fingers
- Allow to dry in position
The copper wire inside will help the body hold whatever shape you encourage it into while damp.
A Note on Steam Blocking
Do not use steam blocking on this piece. The combination of cotton sewing thread and copper wire makes this a tricky candidate for steam — the heat can cause the wire to expand slightly and distort the fabric around it, and there is a risk of scorching such fine thread if the iron is held too close. Wet blocking with cool water is always the safer choice here.
Ongoing Care Instructions
Your finished mantis is a display piece first and foremost, but here is how to keep it looking its best over time.
Dusting: Fine thread at this scale attracts dust more readily than thicker yarn. Use a soft dry paintbrush or a can of compressed air (held at a distance) to gently dust the mantis every few weeks if it is displayed in an open area. Work from the top downward and be careful around the antennae and legs.
Spot Cleaning: If a small area gets marked or dirty, spot clean only using a barely damp cotton swab with a tiny drop of mild soap. Dab gently — never rub, as rubbing at this thread weight can distort the stitches. Allow to air dry completely.
Do Not Machine Wash: This should go without saying for a wire-armature piece, but — do not machine wash, hand wash in a sink, tumble dry, or iron this mantis under any circumstances. The wire will bend unpredictably, the stuffing will clump, and the fine thread structure will be damaged.
Storage: If you need to store the mantis rather than display it, place it in a rigid box rather than a soft bag. The wire legs and antennae will bend if the piece is compressed or has anything placed on top of it. A small jewelry box or gift box lined with tissue paper works beautifully.
Sunlight: Avoid displaying the mantis in direct sunlight for extended periods. Even though green sewing thread is generally colorfast, prolonged UV exposure can cause gradual fading over months and years. A shaded display spot or a glass display case will preserve the vivid green color much longer.
Humidity: Copper wire and cotton thread are both affected by high humidity over time. If you live in a very humid climate, consider storing or displaying the mantis with a small silica gel packet nearby to absorb excess moisture and prevent the wire from oxidizing inside the thread covering.
Troubleshooting & Common Mistakes
Every maker who has attempted this construction has hit at least one of these walls. Some hit several. This section exists so that when you hit yours — and you will — you know exactly what went wrong and exactly how to come back from it.
My stitches look like V shapes, not X shapes
This is the single most common issue with this construction and it has one cause — you are crocheting with the standard yarn-over method out of habit. Your hands know what they know, and at a certain rhythm they will default to what they have always done without you noticing.
The fix is to stop the moment you see it, not to keep going and hope it blends in. At sewing thread scale a patch of V-shaped stitches among X-shaped ones is clearly visible on the finished surface — it looks like a different fabric entirely. Frog back to the point where the V’s begin and redo from there using the yarn-under method.
To prevent it from happening again, place a small sticky note near your work that simply says YARN UNDER. Leave it there for the entire project. Most makers find the habit fully established after about 40–50 consecutive yarn-under stitches — before that point your hands will still try to revert, especially when you pick up after a break.
I lost my place in the neck zone
Twenty-four identical rounds of 10 sc is exactly as disorienting as it sounds. If you are not certain which round you are on, do not guess — guessing wrong and continuing costs you more time than stopping to count properly now.
Count the spiral ridges on the outside of the neck tube. Each ridge represents one completed round. If you used the yarn-under method consistently the ridges will be clean and easy to count. Work from the bottom of the neck upward toward the head and tally as you go.
Going forward, tie a small piece of contrasting thread around one stitch every five rounds as a checkpoint. This gives you clear anchors to count from and means the worst case scenario is being five rounds off rather than twenty.
Round H-6 is not making sense
This is the round that turns your work twice mid-round to shape the flat facial plane of the head, and it confuses almost every maker the first time. The instructions read strangely on paper because the movement they describe is genuinely unusual in amigurumi construction.
Break the round into three separate phases before you begin rather than trying to read it as one continuous instruction. Phase one is the stitches leading up to the first turn. Phase two is the back-and-forth flat section. Phase three is the stitches continuing around to close the round. Complete phase one, stop. Complete phase two, stop. Then continue with phase three. Treating it as three mini-instructions rather than one long confusing one resolves the confusion for most makers immediately.
If you have access to the original pattern photos, study them before this round. Seeing what the work should look like from both the wrong side and right side after the turns makes the instruction click in a way that words alone sometimes cannot.
My stuffing is showing through the fabric
You can see white fiberfill poking through your green stitches. This means your tension is too loose and there are gaps between stitches large enough for the stuffing to push through.
If this is happening throughout the piece the honest solution is to restart with tighter tension — partial fixes to loose fabric at this thread weight rarely look good. If it is limited to a small area, push the fiberfill away from that spot from the inside using a toothpick and then very gently pinch and compress those stitches from the outside to close the gaps slightly.
To check your tension before it becomes a problem, hold your gauge swatch up to a light source. If light passes through the fabric easily, your tension is too loose. The correctly tensioned fabric at this thread weight should be essentially opaque.
The wire is poking through the fabric at the leg or forearm tips
The cut end of a copper wire strand is sharp enough to pierce the tight thread covering from the inside, especially at the extremities where the wire sits closest to the surface.
If a wire tip has already broken through, use a tapestry needle to carefully guide it back inside the fabric, then apply a tiny dot of clear fabric glue to that spot on the inside to anchor the tip in place.
To prevent this entirely, curl or fold the very tip of each wire end before inserting using a pair of round-nose pliers. A rounded or folded tip physically cannot pierce fabric the way a sharp cut end can. Make this part of your wire preparation routine before you begin any section — do it while you are cutting and measuring, not as an afterthought when a wire is already inside a finished piece.
My wings are curling at the edges
The alternating FLO and BLO rows in the wing construction create natural tension differences between rows that can cause the fabric to want to curl, particularly if your tension varied slightly between the two loop types. This is very common and entirely fixable.
Wet block the wings following the instructions in the care section of this guide. Mist them lightly with cool water, pin them flat on a foam blocking mat while damp, and allow to dry completely before unpinning. This resolves edge curling in the vast majority of cases.
To avoid it recurring, pay attention to whether you unconsciously pull BLO stitches tighter than FLO stitches — many makers do this because BLO stitches are harder to access and the extra effort translates into extra tension. Be aware of it and consciously equalize your tension between both loop variations.
The legs feel wobbly and will not hold a pose
Either the wire bundle was not twisted tightly enough before insertion, or the thread wrapping is too loose and not gripping the wire surface firmly enough to add rigidity.
If the legs are already attached and wrapped, apply a thin line of clear-drying fabric glue underneath the thread wrapping along each leg length and allow it to dry completely with the leg held in a straight position. Once dry the thread is bonded to the wire and the leg will hold poses much more firmly.
To prevent this from the start, twist your four-strand wire bundles as tightly as possible — they should feel like a single rigid cord, not a loose bundle. When wrapping with thread, maintain tension throughout the entire wrapping process. The wrapping should feel like winding a tightly coiled spring, not like loosely covering the wire.
Frequently Asked Questions
About materials and tools
I cannot find jeans sewing thread locally. What should I use instead?
Jeans sewing thread is a polyester-cotton blend that sits slightly thicker and more durable than standard sewing thread — that specific combination is what produces the firm dense fabric this construction needs. Your best substitutes in order of preference are size 80 crochet cotton thread, standard polyester sewing thread, a single strand of 6-strand embroidery floss, or size 10 crochet thread if you are comfortable with a slightly larger finished size.
Whatever you substitute, it must be smooth rather than fuzzy or hairy. A textured thread will obscure the X-shaped stitch surface that gives the mantis its realistic appearance entirely — the texture of the thread will dominate over the texture of the stitches.
Can I use a slightly different hook size?
Moving 0.1–0.15 mm in either direction from 0.50 mm will not dramatically change the outcome — a 0.40 mm or 0.60 mm hook is workable. Going larger than 0.75 mm begins to produce a noticeably looser fabric. Going smaller than 0.35 mm is genuinely difficult to work with for most makers and offers no meaningful improvement to the result.
Can I substitute aluminum wire for the copper wire?
Yes — soft aluminum craft wire in the same gauge range is a good substitute and is often easier to find. It is also slightly lighter than copper at equivalent strength, which is a minor advantage in the finished piece. Avoid steel wire as it is too rigid for posing and can rust inside the thread covering over time. Avoid pipe cleaners — they are too thick and too fuzzy to wrap cleanly with thread.
For gauge, aim for 28–30 gauge for the legs and body insertions and 32–34 gauge for the finer antennae.
Do I need polyester fiberfill specifically?
Polyester fiberfill is the best choice for this construction — it is lightweight, does not clump, holds its shape over years, and does not absorb moisture. You will need very little of it — a golf ball sized amount is sufficient for the entire mantis.
Cotton batting will work in a pinch but tends to compress and clump over time. Wool stuffing can felt inside the tight stitches in humid conditions. Avoid tissue paper, cotton balls, or similar materials entirely — they will compress and disintegrate and leave the body feeling hollow within months.
What size beads work best for the eyes?
1–2 mm glass seed beads in black or very dark brown. Glass rather than plastic — the glass has a weight and surface sheen that plastic cannot replicate, and at this scale that difference in quality reads clearly in the finished eyes. If your tapestry needle is too thick to pass through the bead hole, use a fine beading needle for this step.
About the techniques
I have never worked with a 0.50 mm hook before. What should I know going in?
Three things matter more than anything else. First — your hands will tire more quickly than they do with standard hooks. The grip required for a sub-millimeter hook engages muscles that most crocheters rarely use. Take breaks every 45–60 minutes and do gentle hand stretches between sessions. Second — good lighting is not optional at this scale. A daylight LED lamp makes finding stitches dramatically easier and reduces eye strain significantly. Third — your speed will be much slower than your normal crochet pace. A maker who finishes a standard amigurumi in 4 hours will spend 12–15 hours on this mantis. That is not a reflection of your skill level. It is simply the reality of working at this scale.
My thread keeps splitting when I insert the hook. What am I doing wrong?
Thread splitting at this scale usually comes from one of three places. Your hook tip may be too sharp for the thread — try a hook with a slightly more rounded tip. You may be inserting the hook at a slight diagonal angle rather than straight on into the stitch. Or your tension may be too tight, compressing the stitch so tightly that the hook has to force its way in rather than entering cleanly. Slightly relaxing your thread grip while maintaining even tension often resolves splitting immediately.
The slip stitch rounds in the abdomen — are those joined rounds or continuous?
Continuous. Every round in the entire main body construction is worked in a continuous spiral without joining — including the slip stitch rounds. You are replacing the single crochet stitches in those rounds with slip stitches, not ending the round and joining with a slip stitch. Keep your stitch marker in place and keep spiraling forward through those rounds exactly as you do for every other round.
My magic ring keeps coming loose at this thread weight.
Fine smooth thread is slippery and magic rings at this scale can loosen more easily than they do in standard yarn. After completing Round H-2 and before continuing to H-3, pull the magic ring tail as firmly as possible to close it completely, then work a double knot with the tail against the working thread. Leave at least 5 cm of tail to weave in later — short tails at this thread weight can work free over time.
If magic rings consistently give you trouble at fine thread weights, start with a foundation chain of 2 and slip stitch into the first chain to form a small ring instead. This tends to be more stable at sewing thread scale and produces an almost identical starting point.
How do I find the BLO stitches from T-1 for the wing attachment?
The BLO stitches in T-1 leave their front loops unworked and sitting exposed on the surface of the fabric. Run your fingertip along that round — the BLO stitches will feel slightly raised compared to the regular sc stitches around them. The easiest approach is to mark them with a small piece of contrasting thread as you work them during T-1, so they are already flagged and waiting for you when you reach the wing construction.
About the finished piece
Is this safe for children to play with?
No — and this needs to be stated clearly. This piece is a display item for adults, not a toy. The copper wire armature has ends that can become exposed through handling and cause cuts or scratches. The construction would not survive the kind of contact a toy receives. The small bead eyes present a choking hazard for young children. Display it somewhere it can be admired and keep it well out of reach of anyone under 12.
How long will it last?
With proper display conditions — away from direct sunlight, away from high humidity, and in a location where it will not be repeatedly handled or knocked — a well-made version of this mantis should last many years. The main vulnerabilities over time are UV fading of the green thread in direct sunlight, potential wire oxidation in humid environments, and metal fatigue if the piece is repositioned repeatedly at the same wire points. A glass display dome is the single best investment you can make for its long-term preservation.
Can I sell finished pieces made from this construction?
The construction method itself — the stitch sequences, the round counts, the wire armature technique — is a functional method and cannot be owned. However the original pattern document and its specific written expression belong to its designer. If you are selling finished pieces, credit the construction method appropriately, use your own photos, and present the piece as your own handmade work rather than as a reproduction of someone else’s pattern. When in doubt about specific terms, contacting the original designer directly is always the cleanest approach.
My finished mantis does not look like the photos. Where did I go wrong?
The three most common reasons a finished mantis does not match the reference photos are using yarn-over instead of yarn-under throughout, inconsistent tension creating uneven fabric density across the body, and rushed or approximate wire work on the legs and forearms. If you make a second attempt with all three of those areas addressed specifically, you will almost certainly see a dramatic difference. Most makers who attempt this construction more than once describe their second mantis as almost unrecognizable compared to their first. The first attempt teaches you the construction. The second attempt is where the real piece lives.
How do I display the mantis securely without damaging it?
The gentlest and most reversible method is a small amount of museum putty under one or two of the feet — firm enough to prevent toppling but removable without leaving residue. For a more permanent display, a single small drop of clear-drying craft glue on the underside of one foot pressed to the display surface for 60 seconds creates a very secure and nearly invisible bond.
Conclusion
Take a moment to look at what you just made
Set it down in front of you. Step back slightly. Look at it the way someone who has never seen it before would look at it.
You made that from thread.
Not from clay, not from wire alone, not from resin or fabric or any material that starts out looking like something. You made it from a continuous length of green sewing thread, worked stitch by stitch with a hook smaller than a sewing needle, around a skeleton you built yourself from twisted copper wire. Every leg, every spine on every forearm, every segment ring on the abdomen, every curve of every antenna — you made each one of those decisions and executed each one of them with your own hands.
That is not a small thing. That is a genuinely remarkable thing.
What you have learned
This mantis was never just a mantis. It was a concentrated course in techniques that most crocheters never encounter. If you worked through this construction from beginning to end you now have real working knowledge of micro crochet at thread weight, wire armature design and integration, the yarn-under method and its effect on fabric texture, mid-round directional shaping, bobble and spike stitch detail work at fine scale, FLO and BLO alternation for surface texture in flat rows, and multi-component sculptural assembly.
These are not beginner skills. These are not even intermediate skills. These are the skills that make other makers look at your work and ask how you did it.
Every project you make from this point forward will be better for having made this one. The patience you built here, the eye for tension you developed here, the understanding of how wire and fabric work together that you gained here — all of it transfers. A 4.0 mm hook after 0.50 mm feels like a luxury. Standard amigurumi after this feels straightforward. You have recalibrated what your hands and eyes consider normal, and normal is now higher than it was before.
A word for makers who are not finished yet
If you are reading this conclusion somewhere in the middle of the construction — perhaps you are mid-abdomen and the rounds feel endless, or you have frogged the forearm section twice and you are wondering if you are capable of finishing this — I want to say something directly to you.
You are capable of finishing this.
And when you finish — and you will finish — it will feel exactly as good as you are imagining it will right now.