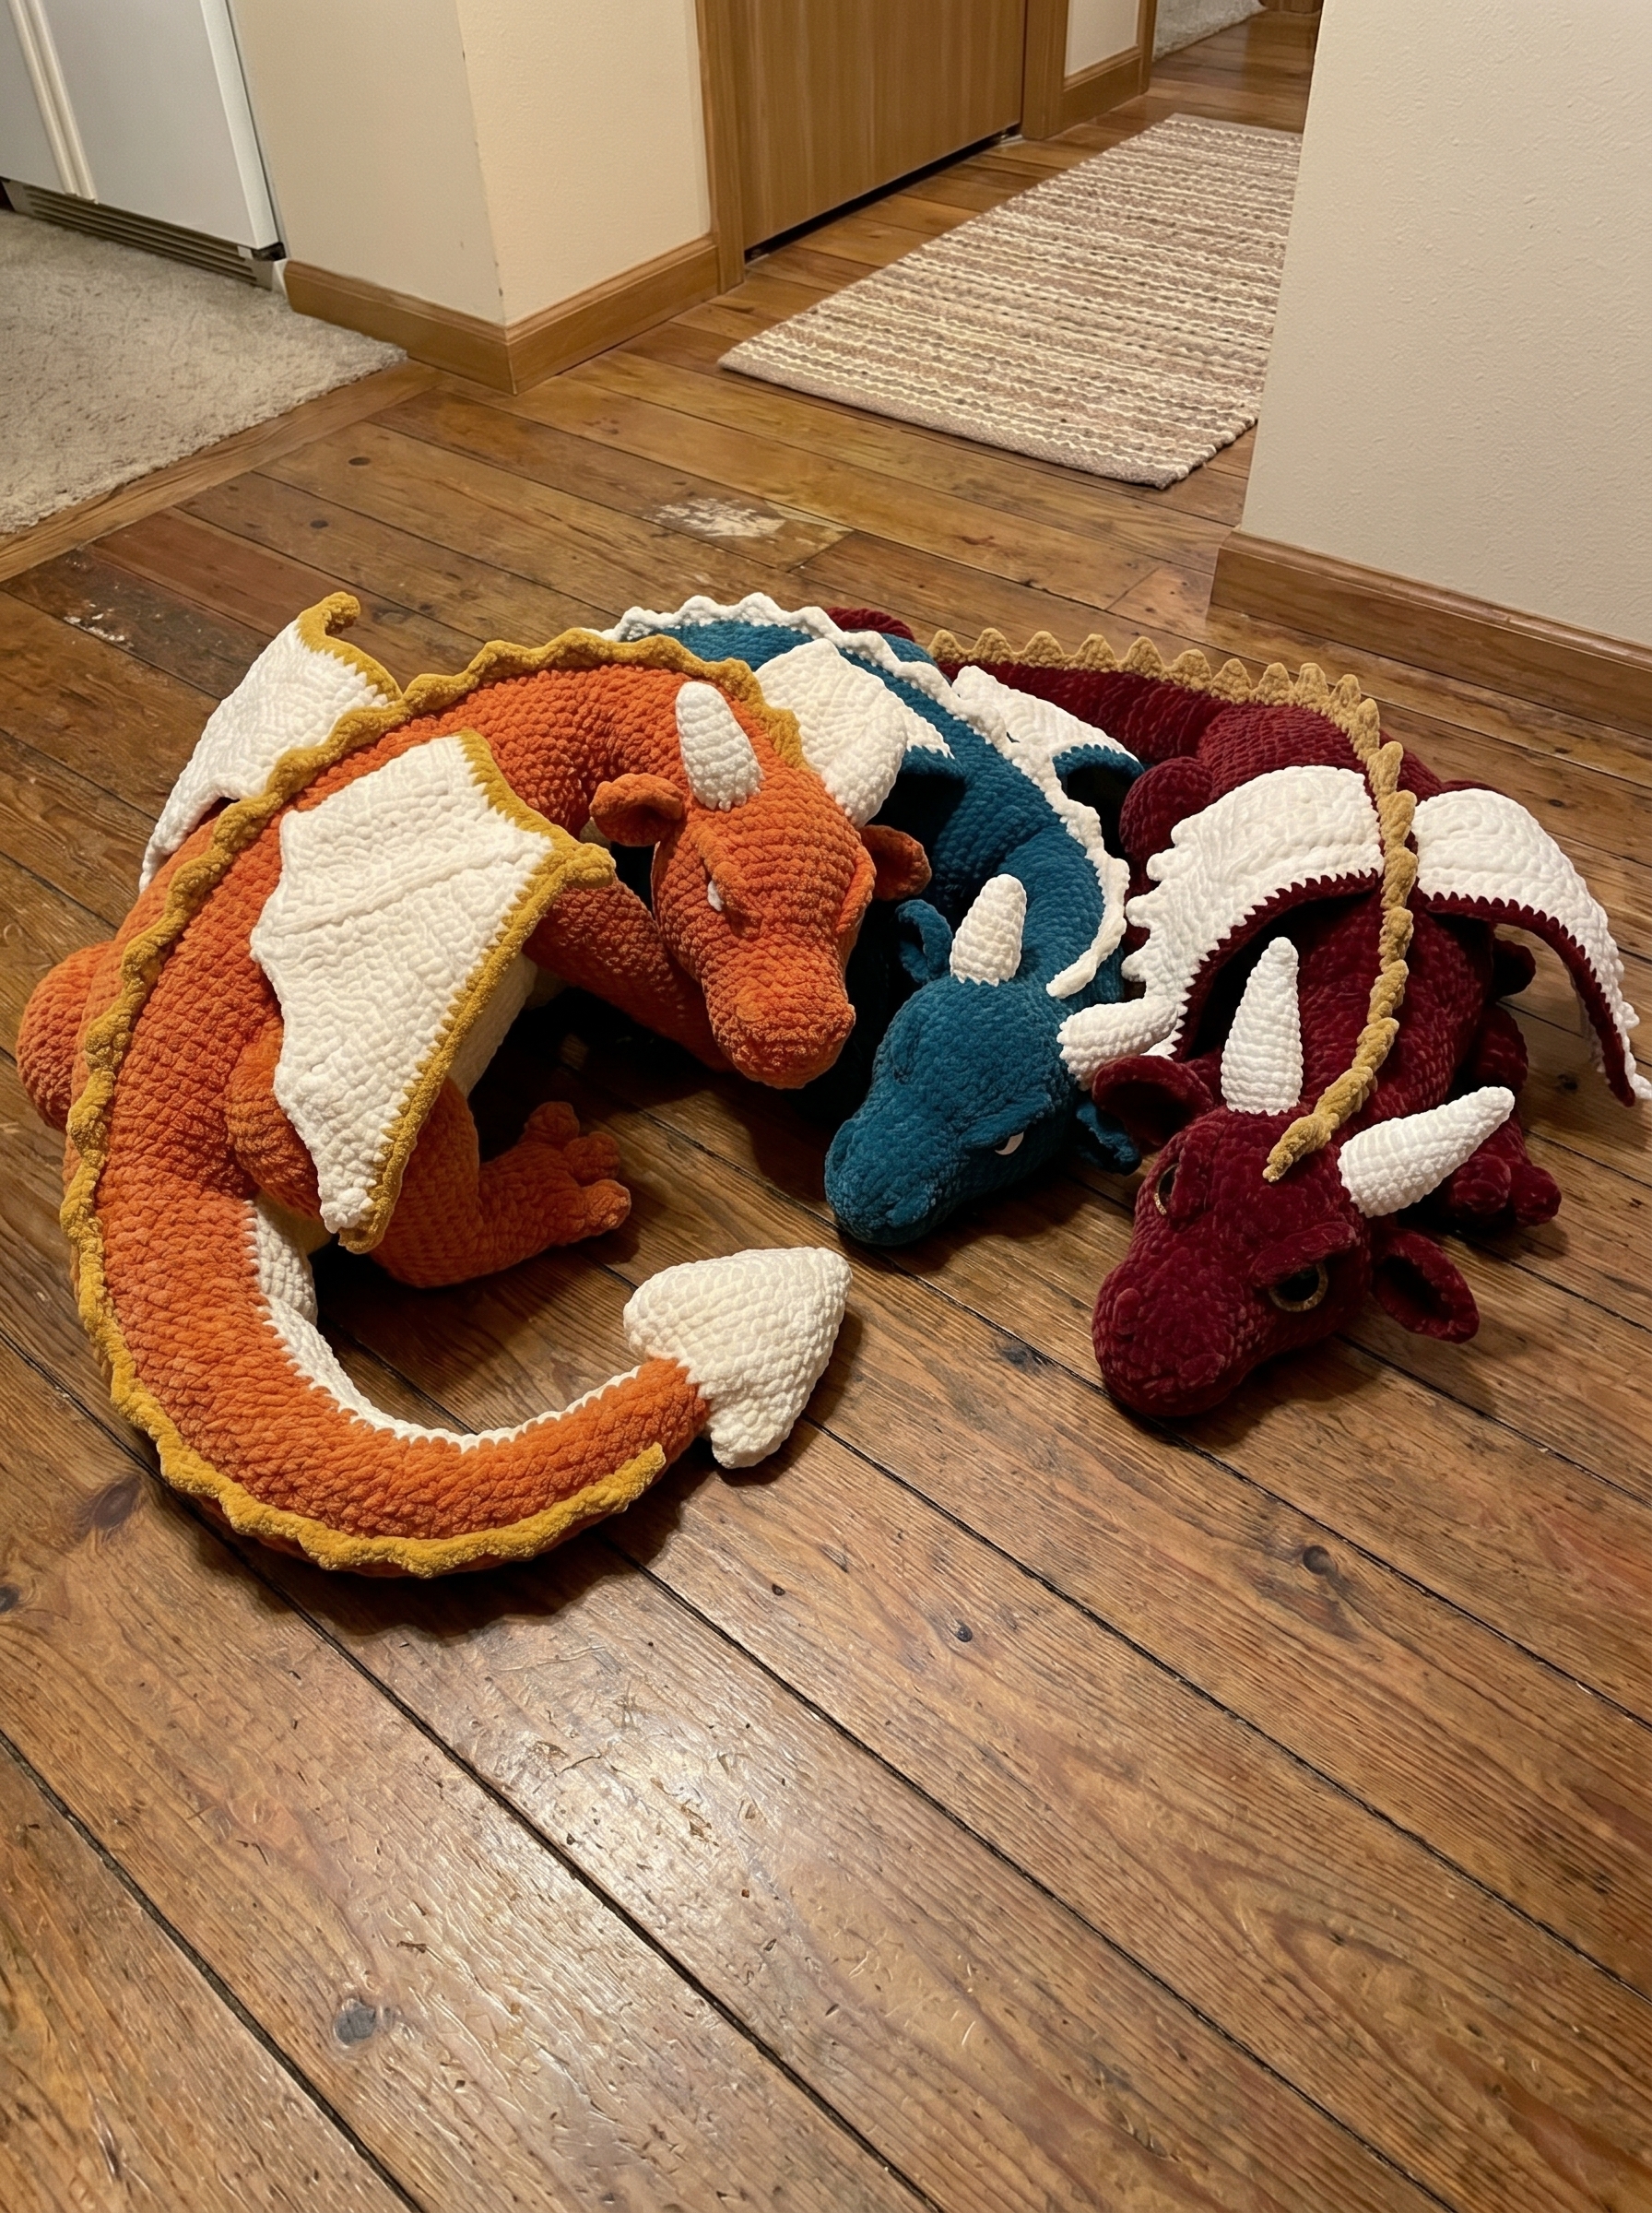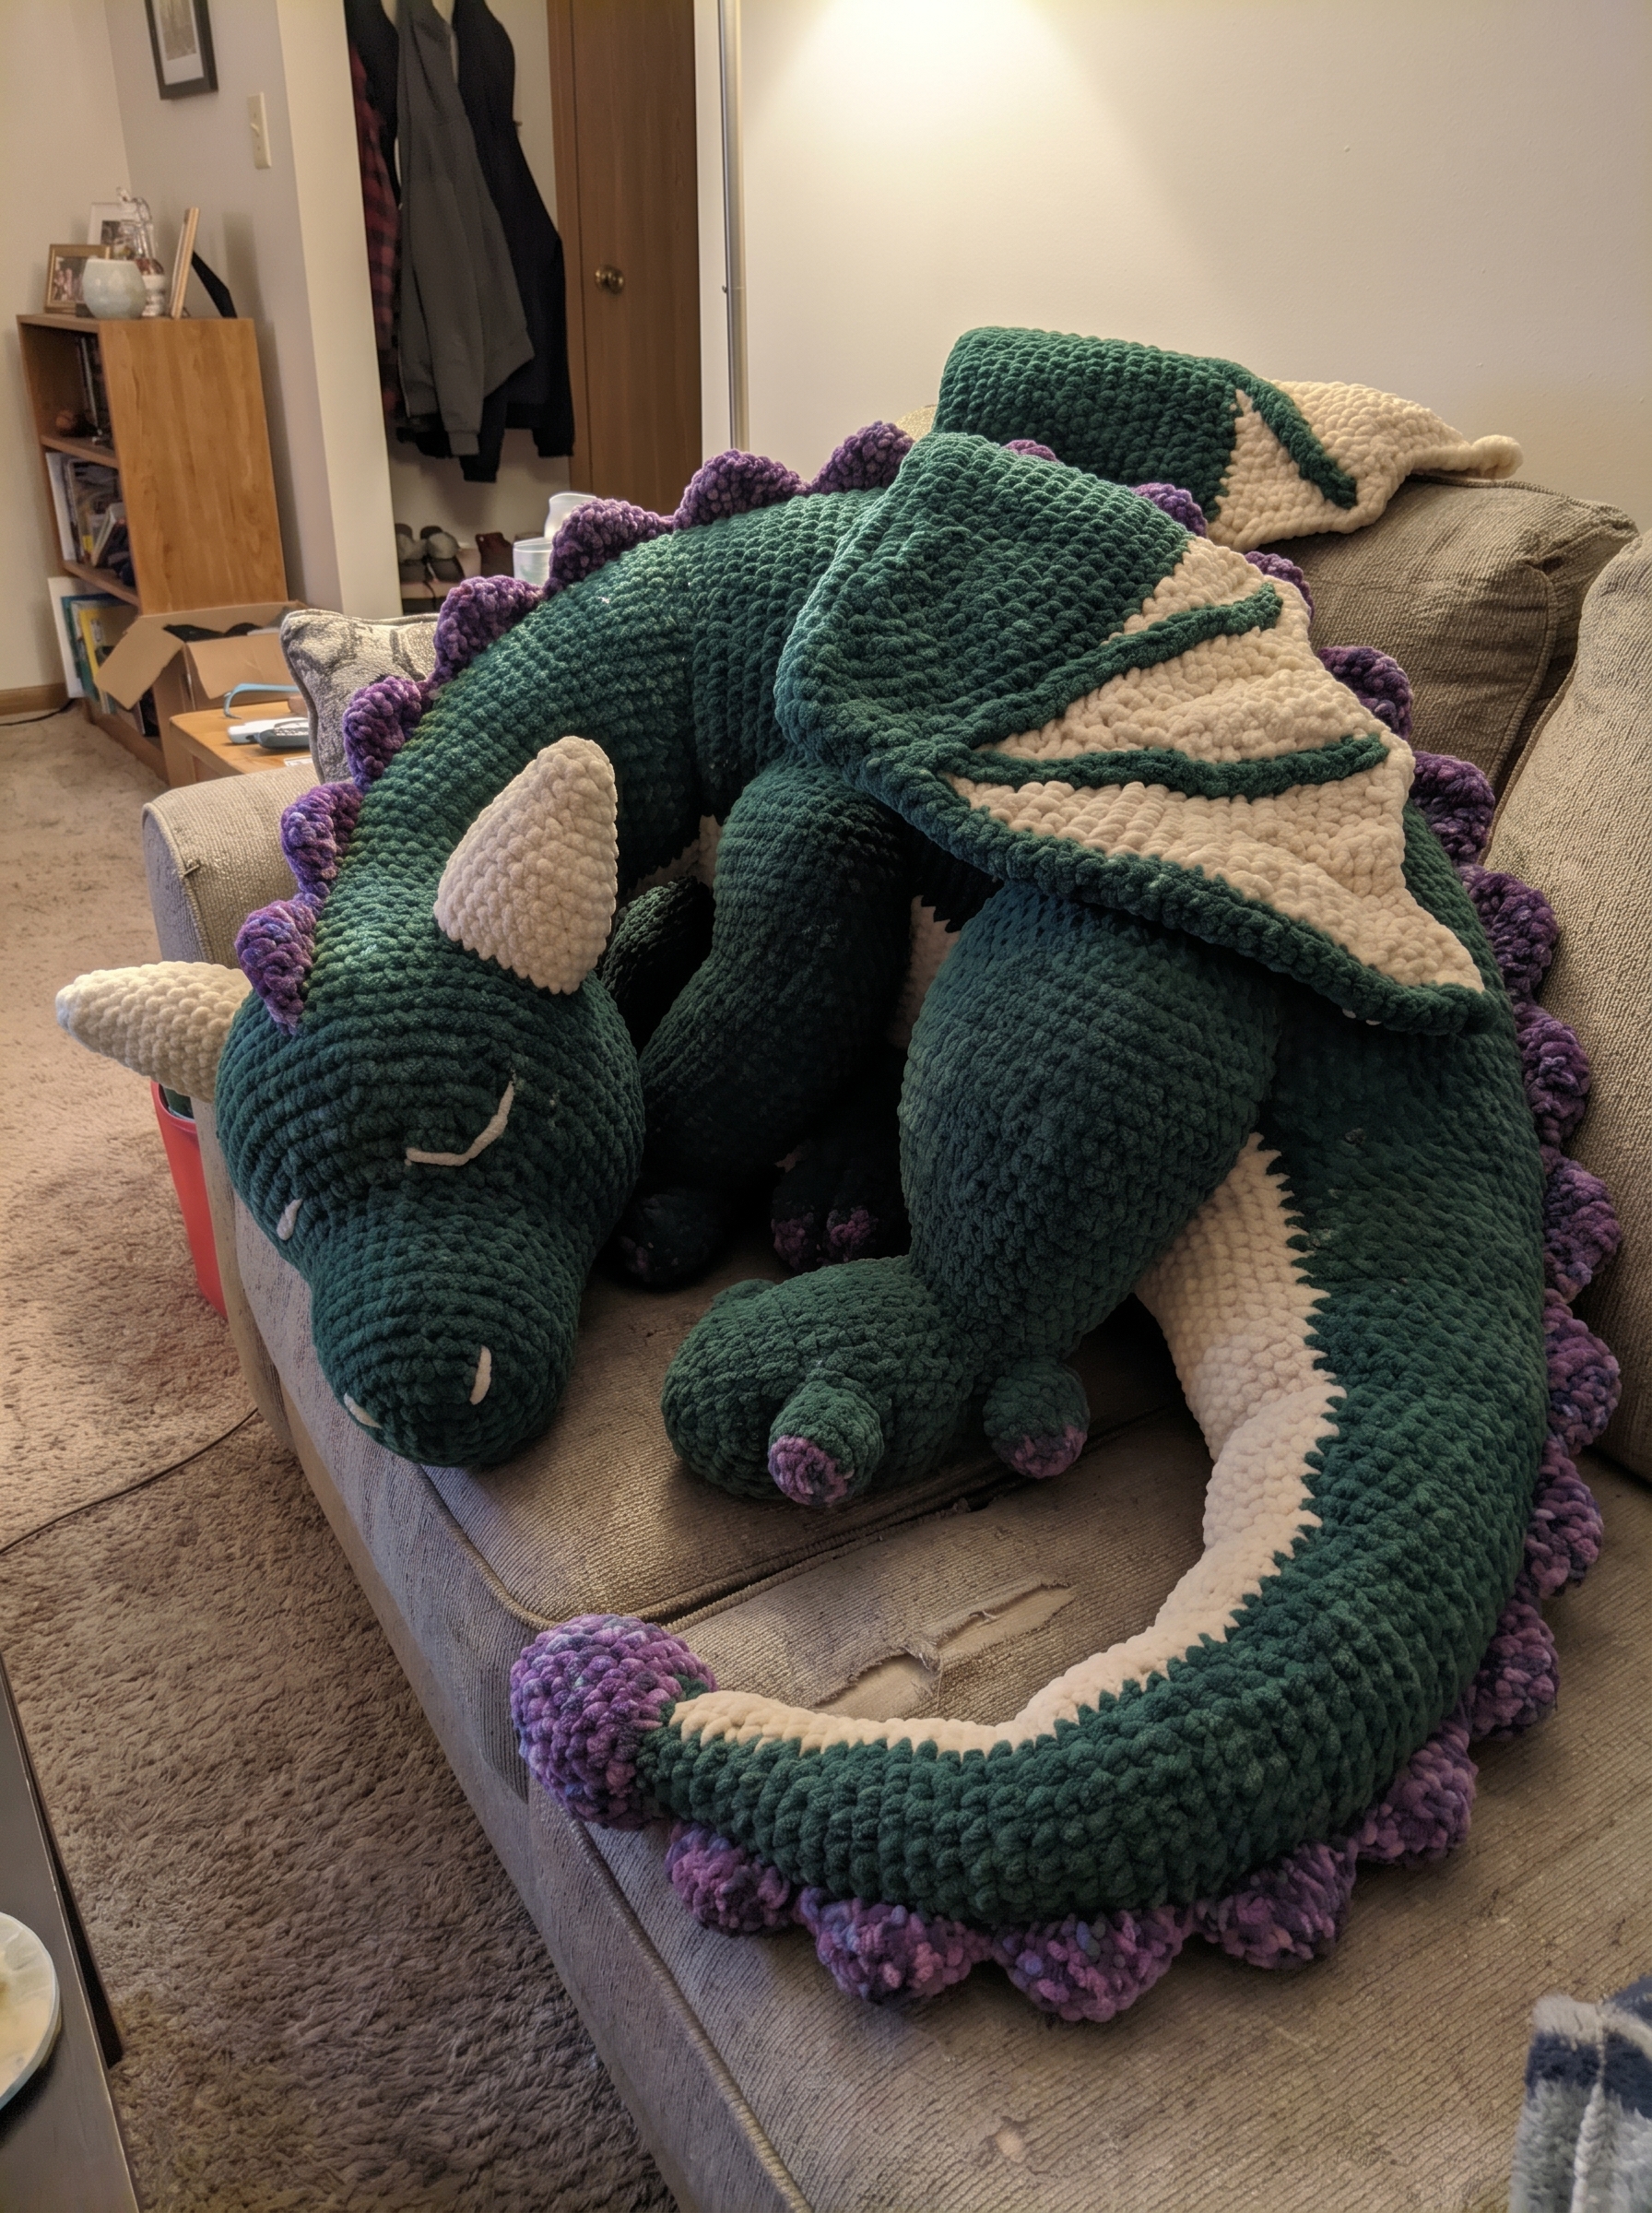
There’s something irresistible about a dragon that’s too sleepy to be scary. Thornwood is curled into a perfect spiral, nose tucked under one wing, with a row of soft purple spikes running down his back like a little crown of brambles — which is exactly where his name comes from.
This pattern makes a genuinely large, huggable dragon — couch-companion size, not desk-shelf size — worked in super bulky chenille yarn so the finished piece comes together faster than the round count might suggest. If you’ve made an amigurumi animal before and you’re ready for your first big project with wings, this one’s for you.
At a Glance
| Finished size | Approx. 27–30in (70–75cm), nose to tail tip, lying flat |
| Skill level | Intermediate to Advanced |
| Yarn weight | #6 Super Bulky Chenille |
| Hook size | 5.5mm (US I-9) |
| Construction | Worked in continuous rounds (amigurumi style); wings and ears worked flat in rows |
Exact size will vary depending on your tension and exactly how full you stuff each piece — this is a project where a swatch genuinely pays off before you commit to four legs’ worth of yarn.
Skill Level
Intermediate to Advanced. You should be comfortable with magic ring, basic increases/decreases, working in continuous rounds, and color changes. The wings and spine spikes involve a bit more shaping than a typical beginner amigurumi, but nothing here requires wire or wire-handling experience.
Materials
| Yarn Color | Role | Approx. Yardage |
|---|---|---|
| Deep Teal/Green super bulky chenille (#6) | Main body color: body, head, legs, tail | 800–1000 yds |
| Cream/Ivory super bulky chenille (#6) | Belly, wings, ears | 350–450 yds |
| Purple/Lavender (variegated) super bulky chenille (#6) | Spine spikes, tail tip, toe accents | 150–200 yds |
Hook: 5.5mm (US I-9)
Notions:
- Polyester fiberfill stuffing — a generous amount; this project uses considerably more than a standard stuffed animal
- Stitch markers
- Large-eye yarn needle
- Embroidery needle + small amount of dark or cream yarn for the face details
- Straight pins or clips, for positioning pieces before sewing
💡 A note on yarn: any super bulky chenille-style yarn works beautifully here — Thornwood’s soft, pillowy texture depends on a chenille or velvet-style yarn rather than a smooth acrylic. Smooth yarn will work structurally but will look noticeably different from the photos.
Abbreviations
| Abbreviation | Meaning |
|---|---|
| MR | Magic Ring |
| sc | Single Crochet |
| hdc | Half Double Crochet |
| inc | Increase (2 sc in one stitch) |
| dec | Decrease (invisible decrease preferred) |
| st(s) | Stitch(es) |
| sl st | Slip Stitch |
| FO | Fasten Off |
| TW | Turn Work |
| [ ] | Stitch count at end of round/row |
This pattern is written in US terminology throughout, worked in continuous rounds (no joining, no turning chain) unless a section specifically says to work in rows.
Parts List
| Piece | Quantity | Color |
|---|---|---|
| Body + Tail | 1 | Teal (with cream belly panel) |
| Head | 1 | Teal |
| Thigh/Leg | 4 | Teal |
| Tube Foot | 4 | Teal |
| Toe Accent Bobble | 16 (4 per foot) | Purple |
| Wing | 2 | Cream + Teal |
| Spine Spike — Small | 5 | Purple |
| Spine Spike — Large | 1 | Purple |
| Ear | 2 | Cream |
Techniques Used in This Pattern
A few techniques show up repeatedly in Thornwood’s construction. Here’s a quick rundown before you dive in — it’ll make the instructions below much faster to follow, especially if any of these are new to you.
Magic Ring (MR) vs. Chain Foundation:
Most of Thornwood’s pieces start with a magic ring — a small adjustable loop that closes tight with no hole at the center, which is the standard way to start an amigurumi piece worked in continuous rounds. The head is the exception: it starts from a foundation chain instead, which produces an oval rather than a circle. This is what gives the head its slightly elongated, snout-forward shape instead of a perfectly round ball.
Bobble Stitch:
The spine spikes, the tail-tip accent, and the toe details are all small bobble-style pieces — mini spheres worked with a magic ring, a quick increase, then a quick decrease, stuffed lightly and sewn on as accents. Once you’ve made one, the rest go quickly.
Invisible Decrease:
Used throughout for shaping the body, head, and legs. Unlike a standard decrease, the invisible decrease (worked through the front loops of two stitches rather than through both full stitches) leaves a noticeably smoother, less bulky line on the right side of the fabric — well worth the slightly fussier motion, especially on a large-scale piece like this one.
Working in Continuous Rounds (Amigurumi-Style):
Outside of the wings and ears, every piece here is worked in a continuous spiral rather than joined rounds — no slip-stitching to close each round, no turning chain. A stitch marker on the first stitch of each round is the easiest way to keep track of where you are, especially through the long plateau sections.
Flat Panel Construction (Wings & Ears):
Unlike the body pieces, the wings and ears are worked flat, back and forth in rows, then attached as panels rather than stuffed in the round. This gives them their characteristic flat, leaf-like profile instead of a puffy 3D shape.
Surface Crochet & Embroidery:
The wing veins, the belly-stripe edge, and the face details are all added after the main piece is complete, using a needle and a contrasting yarn color worked directly onto the finished fabric.
Part 1: Body + Tail
Worked in Deep Teal/Green, in continuous rounds, unless a color change is noted.
Foundation: MR 4 — [4]
Round 1: (sc, inc) x2 — [6]
Round 2: 6sc — [6]
Round 3: (2sc, inc) x2 — [8]
Round 4: 8sc — [8]
Rounds 5–19: Work in alternating increase/hold rounds, adding 2 sts evenly spaced on each increase round, building from [10] up to [24] over these 15 rounds (an increase round, then a plain round, repeated).
Round 20: +2 sts, evenly spaced — [26] (continues the increase pattern for one more round before the asymmetric chest shaping begins)
Round 21: +2 sts, evenly spaced — [28]
Round 22: sc5, inc, sc16, inc, sc5 — [30]
Round 23: sc6, inc, sc16, inc, sc6 — [32]
Round 24: (2sc, inc) x2, sc20, (inc, 2sc) x2 — [36]
Rounds 25–39: Work 36sc plain, with no shaping, for all 15 of these rounds. This long unbroken plateau forms the chest and belly — the single largest section of the body.
Round 40: (2sc, dec) x6, 12sc — [30]
Round 41: (8sc, dec) x3 — [27]
Round 42: (7sc, dec) x3 — [24]
Round 43: 24sc — [24]
Round 44: 24sc — [24]
Round 45: 24sc — [24]
Fasten off, leaving a long tail for sewing the head on.
Belly stripe: Starting at Round 22, switch to Cream for the center third of stitches each round (the underside), continuing through the chest plateau and back down through the tail rounds, for the zigzag-edged belly stripe. Carry the unused color loosely along the inside.
Tail tip: Work the MR4 foundation through Round 4 in Purple, then switch to Teal for the rest of the piece, for a soft purple cap at the very tip of the tail that echoes the spine spikes.
Stitch-count checkpoint: Round 24 should land you at exactly [36] stitches, matching the plateau that follows. If your count is off anywhere in Rounds 5–24, stop and recount from Round 19 ([24] stitches) forward one round at a time rather than pushing ahead.
Part 2: Head
Worked in Deep Teal/Green, in continuous rounds.
Foundation: Ch 8
Round 1: sc6, 3sc in last ch, TW, sc6, 3sc in last ch — [18]
Round 2: sc6, 3inc, sc6, 3inc — [24]
Round 3: 24sc — [24]
Round 4: 24sc — [24]
Round 5: 24sc — [24]
Round 6: 24sc — [24]
Round 7: 6inc (all concentrated at the snout end), sc18 — [30]
Round 8: (sc, inc) x6, sc18 — [36]
Round 9: (inc, 2sc) x2, sc6, (2sc, inc) x3, sc9, inc, sc5 — [42]
Round 10: (inc, 4sc) x2, 2inc, (4sc, inc) x2, sc20 — [48]
Rounds 11–18: Work 48sc plain, with no shaping, for all 8 of these rounds. This plateau establishes the full width of the head.
Round 19: (6sc, dec) x6 — [42]
Round 20: (5sc, dec) x6 — [36]
Round 21: (4sc, dec) x6 — [30]
Round 22: (3sc, dec) x6 — [24]
Round 23: 24sc — [24]
Fasten off, leaving a long tail for sewing onto the body.
Face details for this piece (add before assembly):
Eyes: Using Cream yarn and an embroidery needle, stitch two gently curved, closed-eye lines low on the face, spaced wide apart, roughly across the Round 14–17 zone.
Nostrils: Using the same Cream yarn, stitch two small curved lines at the very tip of the snout, mirrored on either side.
Part 3: Legs
Make 4 total: 2 for the front, 2 for the back (haunches). Worked in Deep Teal/Green.
Each leg has two pieces — a Thigh and a Tube Foot — made separately, then joined.
Thigh (make 4)
Foundation: MR 6 — [6]
Round 1: 6 inc — [12]
Round 2: (sc, inc) x6 — [18]
Round 3: (2sc, inc) x6 — [24]
Round 4: (3sc, inc) x6 — [30]
Round 5: (4sc, inc) x6 — [36]
Round 6: 36sc, no shaping — [36]
Round 7: 8dec, sc20 — [28]
For the 2 back legs only: insert one extra plain round of 36sc between Round 5 and Round 6, so the back haunches end up visibly larger than the front legs.
Do not fasten off and do not stuff yet — set the open piece aside. You’ll stuff it later, while sewing it onto the body, not before.
Tube Foot (make 4)
Foundation: MR 6 — [6]
Round 1: 6 inc — [12]
Round 2: 12sc — [12]
Round 3: 12sc — [12]
Round 4: 12sc — [12]
Round 5: 12sc — [12]
Stuff lightly. Fasten off, leaving a tail for sewing.
Toe Accent Bobble (make 16 — 4 per foot)
Worked in Purple.
Foundation: MR 4 — [4]
Round 1: 4 inc — [8]
Round 2: 8sc — [8]
Round 3: (dec) x4 — [4]
Stuff very lightly — these are small decorative accents, not structural pieces. Fasten off, leaving a short tail.
Assembling each leg: Sew 4 toe bobbles onto the front edge of the tube foot before attaching the foot to the thigh — 3 clustered together, 1 slightly offset and set back, for a natural toe-cluster look. Reinforce each bobble with a few extra stitches since they’re small relative to the rest of the dragon. Then sew the tube foot to the underside of the thigh, with the thigh’s decrease section (Round 7) facing up, toward where it will attach to the body.
Part 4: Wings (make 2, mirror image)
Worked flat in rows, in Cream — with Teal added afterward for the border and veins.
Foundation: Ch 8, turn
Row 1: 4sc, ch3, TW
Row 2: sc, 4hdc, hdc-inc (1 extra hdc in last st), ch1, TW
Row 3: 4sc, ch3, TW
Row 4: sc, 4hdc, hdc-inc, ch1, TW
Row 5: 4sc, ch3, TW
Row 6: sc, 4hdc, hdc-inc, ch1, TW
Row 7 (final row): sc, 7hdc, ch1, sc across the top
Rows 1–2 form one repeating cycle, worked a total of 3 times (Rows 1 through 6 above) before the final closing row. This alternating short-row pattern creates the gently stepped, feathered edge along the bottom of the wing.
Fasten off.
Finishing: With Teal, work a single round of slip stitch around the entire wing edge for a clean border. Then, using Teal, lay 3 lines of surface slip stitch (or chain stitch tacked down) fanning out from one point near the attachment edge toward the outer points, for the “vein” detail.
Attaching: Position both wings symmetrically along the top of the back, just behind the shoulders, sweeping back toward the haunches. Pin both in place and check from directly above that they sit at matching height and angle before sewing either one down permanently.
Part 5: Spine Spikes (make 6 total)
All worked in Purple.
Small Spike (make 5 — 4 for the spine arc + 1 for the head-horn)
Foundation: MR 4 — [4]
Round 1: 4 inc — [8]
Round 2: 1sc, inc, 6sc — [9]
Round 3: 9sc — [9]
Round 4: 9sc — [9]
Stuff lightly. Fasten off, leaving a tail.
Large Spike (make 1)
Foundation: MR 4 — [4]
Round 1: 4 inc — [8]
Round 2: (3sc, inc) x2 — [10]
Round 3: 1sc, inc, 7sc, inc — [12]
Round 4: 12sc — [12]
Round 5: 12sc — [12]
Stuff lightly. Fasten off, leaving a tail.
Placement, head to tail: Small (horn), Small, Small, Large, Small, Small.
Attach the first Small spike right at the top of the head, between where the ears will sit. Space the remaining 5 spikes evenly down the neck and back, with the Large spike landing near the shoulder/wing line at the center of the arc.
Part 6: Ears (make 2)
Worked flat in rows, in Cream.
Foundation: Ch 6, turn
Row 1: sc in 2nd ch from hook, sc across — [5]
Row 2: inc, sc3, inc — [7]
Row 3: 7sc, no shaping — [7]
Row 4: inc, sc5, inc — [9]
Row 5: 9sc, no shaping — [9]
Row 6: 9sc, no shaping — [9]
Row 7: 9sc, no shaping — [9]
Row 8: dec, sc5, dec — [7]
Row 9: dec, sc3, dec — [5]
Fasten off. No stuffing needed — this piece is a flat panel.
Attaching: Sew each ear flat to the side of the head, low and wide at the base, angled back slightly rather than standing straight up.
Assembly
Lay all your finished pieces out in front of you before you begin — body, head, 4 legs (with feet and toe accents already joined), 2 wings, 6 spine spikes, and 2 ears. Work through the steps below in order; some steps become much harder to do once later pieces are attached.
Step 1 — Stuff and close the body. Stuff firmly and evenly, paying special attention to the long chest plateau (Rounds 25–39) so it doesn’t lump. Leave the neck opening loosely closed for now.
Step 2 — Attach the head. Stuff the head fully, then line up its centerline with the body’s spine before stitching all the way around the neck opening. This is the seam that carries the most weight, so make it secure.
Step 3 — Attach the spine spikes. Working from head to tail in this order — Small (horn), Small, Small, Large, Small, Small — space all 6 spikes evenly down the centerline. Do this before the wings; it’s much easier to position spikes on a clear back.
Step 4 — Attach the wings. Position symmetrically on either side of the spine spike line, angled back toward the tail. Pin both in place and check from directly above before sewing either one down permanently.
Step 5 — Attach the legs. Front legs near the chest area, back legs near the hips, tucking all four in toward the body for the curled resting pose rather than splaying them flat. Stuff each thigh while sewing it on, not before.
Step 6 — Attach the ears. Low on the sides of the head, angled back at roughly 45°.
Step 7 — Curl and tack the tail. Curl the tail around toward the front of the body and tack loosely in place on the underside, where the stitches won’t show.
Final check before you call him finished: lay the dragon flat in his resting pose and look him over for a centered, symmetric spine spike arc, both wings matching in height and angle, all 4 toe-accent clusters facing the same direction, and no visible gaps at any of the joins.
Finishing Details
Smoothing: Run your hands firmly over the chenille surface after stuffing each piece, and again once fully assembled — this settles the pile and prevents visible lumps, especially across the chest plateau and the thigh “boulders.”
Belly stripe and wing vein check: Look over the finished piece for clean, sharp zigzag edges along the belly stripe and wing veins lying flat without puckering. Tack down any stray strands with a single small stitch in matching yarn.
Let him settle: Let the finished dragon rest for 24–48 hours before final photos. Chenille stuffing settles, and you may want to top off the chest or thighs once everything has had time to compact.
Notes & Variations
Color swap: This pattern works beautifully in any two-tone-plus-accent combination — try rust and cream for an autumn dragon, or navy and silver for a “frost dragon” variation.
Size adjustment: To make a smaller version, drop down to a worsted-weight (#4) yarn and a 4.0mm hook. Stitch counts stay identical; only the yarn and hook change.
Safety note: Not intended as a toy for very young children, due to the small attached pieces (toe bobbles, spine spikes) and the volume of stuffing — best suited as a display piece, photo prop, or gift for older kids and adults.
Frequently Asked Questions
What yarn is best for this crochet dragon pattern?
Super bulky chenille yarn (sometimes labeled #6 weight or “blanket yarn”) gives Thornwood his soft, plush texture and is what the materials list above is based on. A smooth worsted-weight substitute will work structurally, but the stitches will be much more visible and the look noticeably less plush than the photos.
How much yarn do I actually need?
Budget roughly 800–1000 yards of your main color, 350–450 yards of your contrast/belly color, and 150–200 yards of your accent color. Chenille tension varies a lot from crocheter to crocheter, so weigh your remaining yarn as you go rather than assuming you’ll land exactly on these numbers.
My stitch count doesn’t match the pattern. What do I do?
This is the most common issue in any amigurumi pattern, and it’s almost always a missed or doubled increase a round or two earlier. Stop, count back to the last round you’re confident was correct, and recount forward one round at a time — Part 1’s Rounds 19–24 are the densest stretch in this pattern, so that’s the first place to check.
Can I make a smaller version of this pattern?
Yes — switch to a worsted-weight (#4) yarn and a 4.0mm hook. All the stitch counts stay exactly the same; only the yarn weight and hook size change, scaling the whole project down proportionally.
Do I need wire to keep the dragon’s pose?
No. Thornwood’s curled, resting pose comes entirely from stuffing density and how you tack the tail in place during assembly — no wire armature is used anywhere in this pattern
Why does my color change look like it has a visible jog or step?
This happens when a new color is started at the very beginning of a round instead of during the last stitch of the previous round. Switch colors during the final yarn-over of the last stitch before the change for a cleaner transition.
My wings look uneven or lopsided. How do I fix that?
Pin both wings in place before sewing either one down, and check from directly above (not from the front) to judge symmetry. Wings that look fine from the side can still be mismatched in height or angle from a top-down view.
Is this pattern beginner-friendly?
It’s best suited to an intermediate-to-advanced crocheter. If you’re newer to amigurumi, practice magic ring, basic increases/decreases, and the invisible decrease on a smaller project first — there’s a lot of repetition at this scale, and the wings involve more shaping logic than a typical first project.
Why does my finished dragon look a different size than the photos?
Finished size depends heavily on individual tension, exact hook size, and how firmly you stuff each piece — three crocheters using the same pattern can easily land a few inches apart. This is normal for amigurumi generally, and especially true at this larger scale, where small tension differences compound across dozens of rounds.
Can I sell dragons made from this pattern?
Yes — you’re welcome to sell finished items made from this pattern. Please don’t republish, resell, or redistribute the written pattern itself.
Pattern and photography by Maria Lynn for Savorgastronomy. This pattern is for personal use and may be used to make and sell finished items, but please do not republish, resell, or redistribute this written pattern.
Made your own Thornwood? I’d love to see him! Tag your project so I can share in your sleepy-dragon joy.