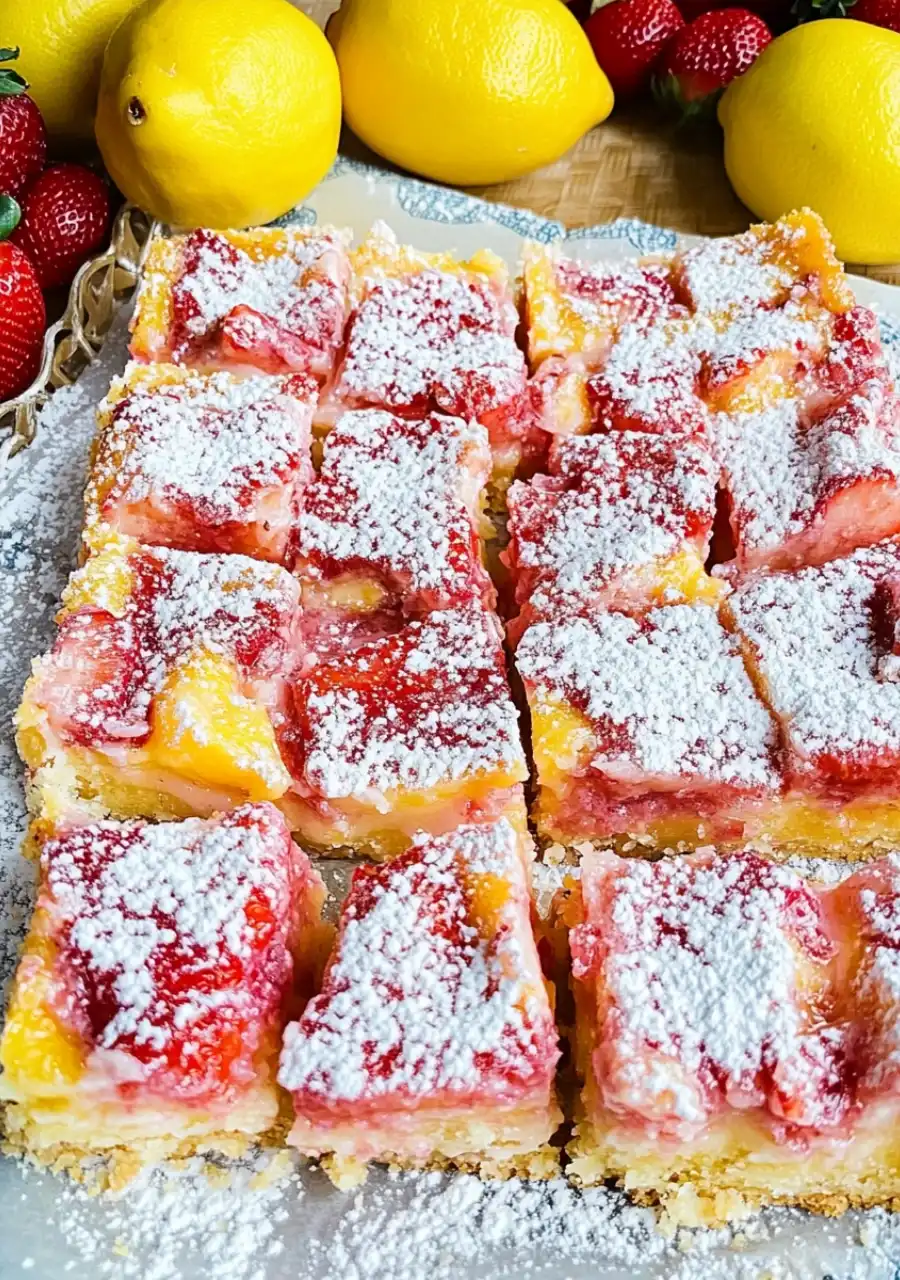
Picture slicing into a vibrant dessert bar, where the tangy zest of lemon meets the sweet juiciness of strawberries, all nestled atop a buttery, golden crust. That’s the magic of Strawberry Lemonade Bars! These bars are like a glass of strawberry lemonade in dessert form, offering a perfect balance of sweet and tart that’s as refreshing as a summer breeze. I first tasted a version of this treat at a local farmers’ market, where a small bakery had them displayed in all their pink-and-yellow glory. One bite, and I was hooked—the bright lemon, the burst of strawberry, and the crumbly crust were pure bliss.
This recipe is a breeze to whip up, taking just 10 minutes of prep and about 30 minutes in the oven, making it ideal for busy home cooks or anyone craving a quick, crowd-pleasing dessert. Whether you’re hosting a summer picnic, bringing a treat to a potluck, or simply indulging at home, these bars are sure to impress. They’re versatile, too—you can enjoy them chilled for a cool, refreshing bite or slightly warm for a cozy treat. Plus, with a gluten-free option, they’re accessible to a wide range of diets. Ready to bring a taste of summer to your kitchen? Let’s get baking!
Why You’ll Love This Recipe
-
Quick and Easy: Just 40 minutes from start to finish, perfect for last-minute gatherings or spontaneous cravings.
-
Vibrant Summer Flavors: The tangy lemon and sweet strawberries create a refreshing, crowd-pleasing taste.
-
Customizable: Adjust sweetness with powdered sugar or make it gluten-free with rice flour.
-
Make-Ahead Friendly: Store in the fridge for up to a week, ideal for planning ahead.
-
Versatile for Any Occasion: Great for picnics, parties, or a sweet treat to brighten your day.
Love easy desserts? Try these next:
- Kid-Approved Chocolate Zucchini Brownies (sneaky veggies!)
- 30-Minute Fudgy Cocoa Brownies (viral recipe!)
Strawberry Lemonade Bars
 2")
Bake sweet and tart Strawberry Lemonade Bars in 40 minutes! Juicy strawberries and zesty lemon make these perfect for summer. Try now!
- Prep Time: 10 minutes
- Cook Time: 30 minutes
- Total Time: 40 minutes
- Yield: 16 1x
- Category: Dessert
- Method: Baked
- Cuisine: American
- Diet: Vegetarian
Ingredients
For the Crust:
- 1/2 cup unsalted butter, melted
- 1/4 cup granulated sugar
- 1 1/2 cups all-purpose flour (or rice flour for gluten-free)
- Pinch of salt
For the Filling:
- 3 large eggs
- 1/4 cup sour cream
- 1 cup granulated sugar
- 2 tablespoons all-purpose flour (or rice flour for gluten-free)
- 1/2 cup lemon juice
- 1 tablespoon lemon zest
- 2 cups strawberries, diced
Instructions
- Prepare the Crust: Preheat oven to 350°F (180°C). Grease an 8 or 9-inch square baking pan or line with foil/parchment paper. In a medium bowl, mix 1/2 cup melted butter, 1/4 cup sugar, 1 1/2 cups flour, and a pinch of salt until crumbly. Press evenly into the pan’s bottom. Bake for 10-12 minutes until lightly golden. Cool slightly.
- Make the Filling: In a large bowl, whisk 3 eggs, 1/4 cup sour cream, 1 cup sugar, and 2 tablespoons flour until smooth. Stir in 1/2 cup lemon juice and 1 tablespoon lemon zest. Gently fold in 2 cups diced strawberries.
- Assemble and Bake: Pour filling over the crust, spreading evenly. Bake for 25-35 minutes until set but slightly jiggly in the center. Check at 20 minutes; baking may take up to 45 minutes depending on strawberry juiciness.
- Cool and Chill: Cool completely on a wire rack (1-2 hours). Chill in the refrigerator for at least 2 hours for clean slicing.
- Serve: Cut into 16 squares. Optionally, dust with powdered sugar. Serve chilled or at room temperature.
Notes
- Baking time varies with strawberry juiciness; check doneness early.
- Store in an airtight container in the fridge for up to 1 week.
- Freeze for up to 3 months; thaw in the fridge before serving.
- For gluten-free, use rice flour in crust and filling.
- Dust with powdered sugar just before serving for a sweet finish.
- Perfect for picnics, parties, or a refreshing snack!
Allergy Information: Contains eggs, dairy (butter, sour cream), and gluten (flour, unless using rice flour). Verify product labels for safety, especially for gluten-free or dairy-free diets.
Nutrition
- Serving Size: 1 bar
- Calories: 178kcal
- Sugar: 16g
- Sodium: 32mg
- Fat: 6g
- Saturated Fat: 3g
- Trans Fat: 0.2g
- Carbohydrates: 27g
- Fiber: 0.8g
- Protein: 2g
- Cholesterol: 50mg
Tip: Use fresh, ripe strawberries for the best flavor and texture. If using frozen strawberries, thaw and drain them thoroughly to avoid excess moisture, which can affect the filling’s consistency. Fresh lemons are key for the juice and zest to ensure a vibrant, zesty taste.
Equipment Needed
-
8 or 9-inch square baking pan
-
Mixing bowls (2)
-
Measuring cups and spoons
-
Whisk or electric mixer
-
Spatula
-
Zester or microplane (for lemon zest)
-
Knife and cutting board (for dicing strawberries)
-
Optional: Foil or parchment paper (for lining the pan)
-
Wire rack (for cooling)
How to Make Strawberry Lemonade Bars
Step 1: Prepare the Crust
-
Preheat your oven to 350°F (180°C). Grease an 8 or 9-inch square baking pan with butter or non-stick spray. For easier removal, line the pan with foil or parchment paper, leaving an overhang on two sides.
-
In a medium mixing bowl, combine 1/2 cup melted unsalted butter, 1/4 cup granulated sugar, 1 1/2 cups all-purpose flour (or rice flour for gluten-free), and a pinch of salt.
-
Stir until the mixture forms a crumbly dough that holds together when pressed. If it’s too dry, add a teaspoon more melted butter; if too wet, add a bit more flour.
-
Press the dough evenly into the bottom of the prepared pan, using your fingers or the back of a spoon to create a smooth, compact layer.
-
Bake the crust for 10-12 minutes, or until lightly golden around the edges. Remove from the oven and set aside to cool slightly while preparing the filling.
Step 2: Make the Filling
-
In a large mixing bowl, whisk together 3 large eggs, 1/4 cup sour cream, 1 cup granulated sugar, and 2 tablespoons all-purpose flour (or rice flour for gluten-free) until smooth and fully combined. The mixture should be creamy with no lumps.
-
Add 1/2 cup fresh lemon juice and 1 tablespoon lemon zest, whisking until incorporated. The lemon juice and zest will give the filling its signature tangy flavor.
-
Gently fold in 2 cups diced strawberries using a spatula, ensuring they’re evenly distributed throughout the filling. Be careful not to crush the strawberries to maintain their chunky texture.
Step 3: Assemble and Bake
-
Pour the strawberry-lemon filling over the pre-baked crust, spreading it out evenly with a spatula to cover the entire surface.
-
Bake in the preheated 350°F (180°C) oven for 25-35 minutes, or until the filling is set but still slightly jiggly in the center when the pan is lightly shaken. The edges should be firm, and the center should have a slight wobble, indicating it will set fully as it cools.
-
Note: Baking time can vary depending on the juiciness of your strawberries. Start checking for doneness at 20 minutes, and continue baking if needed, up to 45 minutes for very juicy berries.
-
Remove the pan from the oven and place it on a wire rack to cool completely to room temperature, about 1-2 hours.
Step 4: Chill and Serve
-
Once cooled, transfer the pan to the refrigerator and chill for at least 2 hours, or until the filling is firm and easy to slice. Chilling ensures clean, neat cuts and enhances the refreshing quality of the bars.
-
Use a sharp knife to cut the bars into 16 equal squares. If you lined the pan with foil or parchment, lift the bars out for easier slicing.
-
Optionally, dust the tops with confectioners’ sugar for a sweet, decorative finish just before serving.
-
Serve chilled for a refreshing treat or at room temperature for a softer, more comforting texture.
Tips and Variations
Tips for Success
-
Grease the Pan Thoroughly: Ensure the baking pan is well-greased to prevent the crust from sticking. Lining with foil or parchment paper makes removal and slicing effortless.
-
Monitor Baking Time: The juiciness of strawberries can affect baking time. Check at 20 minutes and continue baking until the filling is set but slightly jiggly. Overbaking can make the filling too firm.
-
Cool Completely Before Chilling: Allow the bars to cool to room temperature before refrigerating to prevent condensation, which can make the filling soggy.
-
Use Fresh Ingredients: Fresh strawberries and lemons provide the best flavor. If using frozen strawberries, thaw and drain them well to avoid excess liquid.
-
Clean Slices: For neat slices, chill the bars thoroughly and use a sharp knife, wiping it clean between cuts.
Variations
-
Gluten-Free Option: Use rice flour or a 1:1 gluten-free baking blend for both the crust and filling to make the bars gluten-free.
-
Vegan Adaptation: Replace eggs with flax eggs (1 tablespoon ground flaxseed + 3 tablespoons water per egg, let sit 5 minutes) and use vegan butter and dairy-free sour cream or yogurt for a vegan version.
-
Berry Swap: Substitute strawberries with raspberries, blueberries, or blackberries for a different fruit flavor. Adjust sugar if the berries are more tart.
-
Citrus Twist: Add 1 teaspoon of orange zest or lime zest to the filling for a unique citrus blend.
-
Topping Enhancements: Drizzle with a lemon glaze (mix 1/2 cup powdered sugar with 1 tablespoon lemon juice) or top with whipped cream for extra decadence.
Storage and Make-Ahead
Storage: Store the bars in an airtight container in the refrigerator for up to 1 week. The cold temperature preserves their freshness and enhances their refreshing quality. Layer with parchment paper to prevent sticking.
Freezing: Freeze the bars in a single layer in an airtight container or freezer-safe bag for up to 3 months. Thaw in the refrigerator overnight before serving. Dust with powdered sugar after thawing, as freezing may affect the sugar’s appearance.
Make-Ahead: Prepare the bars up to 3 days in advance and store in the refrigerator. They can also be baked and frozen, making them a convenient option for parties or events. Slice before serving for easy portioning.
Serving Suggestions
Ideas: These Strawberry Lemonade Bars are versatile and perfect for various occasions:
-
Summer Picnics: Pack in a cooler for a refreshing dessert at outdoor gatherings, served with fresh lemonade for a thematic touch.
-
Party Dessert: Cut into bite-sized squares for a dessert tray at birthdays, baby showers, or barbecues, where their vibrant color will stand out.
-
Afternoon Snack: Enjoy a bar with a cup of tea or coffee for a sweet pick-me-up during the day.
-
Holiday Treat: Serve at spring or summer holidays like Easter or Fourth of July, garnished with powdered sugar for a festive look.
-
Gift Idea: Package in a decorative tin or box for a thoughtful homemade gift for friends, neighbors, or teachers.
Pairings: Pair with a chilled glass of lemonade or iced tea to amplify the citrusy notes, creating a cohesive summer experience. For a more indulgent pairing, serve with a glass of sparkling Prosecco or a light white wine like Sauvignon Blanc. For non-alcoholic options, a lemon-infused sparkling water or a fruity herbal tea complements the bars’ flavors beautifully.
The Story Behind Strawberry Lemonade Bars
The Strawberry Lemonade Bars recipe is a tribute to the joy of summer and the simple pleasures of fresh, seasonal ingredients. My love for this dessert began at a bustling farmers’ market, where a local bakery was selling these bars as a seasonal special. The bright pink and yellow hues caught my eye, and the first bite was a revelation—a perfect harmony of tangy lemon and sweet strawberries, all wrapped in a buttery crust. It was like sipping a glass of strawberry lemonade on a hot day, but in a form you could hold in your hand.
Determined to recreate this magic at home, I experimented with various ratios of lemon juice, sugar, and strawberries, finally landing on this recipe that balances ease and flavor. The addition of sour cream for creaminess and the option to make it gluten-free with rice flour make it accessible to everyone. This recipe has become a staple in my kitchen, loved by family and friends for its refreshing taste and versatility. It’s a reminder that the best desserts don’t need to be complicated—they just need to capture the essence of the season and bring a smile to your face.
Frequently Asked Questions
Can I use frozen strawberries for Strawberry Lemonade Bars?
Yes, frozen strawberries can be used, but they must be thawed and drained thoroughly to remove excess liquid. Excess moisture can make the filling too watery, affecting the bars’ texture and baking time. Pat the thawed strawberries dry with paper towels before dicing and adding to the filling. Fresh strawberries are preferred for their vibrant flavor and firm texture, but frozen work well in a pinch.
How do I know when Strawberry Lemonade Bars are done baking?
The bars are done when the filling is set but still slightly jiggly in the center when the pan is gently shaken, typically after 25-35 minutes at 350°F (180°C). The edges should be firm, and the center should have a slight wobble, indicating it will fully set as it cools. Start checking at 20 minutes, as baking time varies depending on the juiciness of your strawberries, and continue up to 45 minutes if needed.
Can I make Strawberry Lemonade Bars gluten-free?
Absolutely, you can make these bars gluten-free by substituting the all-purpose flour in both the crust and filling with rice flour or a 1:1 gluten-free baking blend. Ensure all other ingredients, such as baking powder, are gluten-free to avoid cross-contamination. The texture may be slightly different, but the bars will remain delicious and retain their sweet-tart flavor.
How should I store Strawberry Lemonade Bars?
Store the bars in an airtight container in the refrigerator for up to 1 week to maintain freshness and texture. Layer with parchment paper to prevent sticking. For longer storage, freeze the bars in a single layer in a freezer-safe container for up to 3 months. Thaw in the refrigerator overnight before serving, and dust with powdered sugar after thawing if desired.
Can I use other fruits instead of strawberries?
Yes, you can swap strawberries for other fruits like raspberries, blueberries, or blackberries to create variations like Raspberry Lemonade Bars or Blueberry Lemonade Bars. Dice the fruit into small pieces to ensure even distribution in the filling. Adjust the sugar slightly if the fruit is more tart (e.g., raspberries) or sweeter (e.g., blueberries) to maintain the balance of flavors.
Can I make these bars vegan?
To make vegan Strawberry Lemonade Bars, replace the eggs with flax eggs (1 tablespoon ground flaxseed mixed with 3 tablespoons water per egg, let sit for 5 minutes) and use vegan butter and dairy-free sour cream or yogurt in place of their dairy counterparts. Ensure all ingredients are vegan-friendly, and the bars will still be delicious, though the texture may be slightly softer.
Conclusion
These Strawberry Lemonade Bars are a vibrant, refreshing dessert that captures the essence of summer in every bite. With a buttery crust, tangy lemon filling, and juicy strawberry chunks, they’re a perfect balance of sweet and tart, ready in just 40 minutes. Whether you’re serving them at a picnic, sharing with friends, or enjoying a quiet moment at home, these bars are sure to bring joy. Their ease, versatility, and gluten-free option make them a go-to recipe for any occasion. Grab some fresh strawberries and lemons, and let’s bake a batch of sunshine! Share your baking stories in the comments and PIN THIS RECIPE for your next sweet adventure.