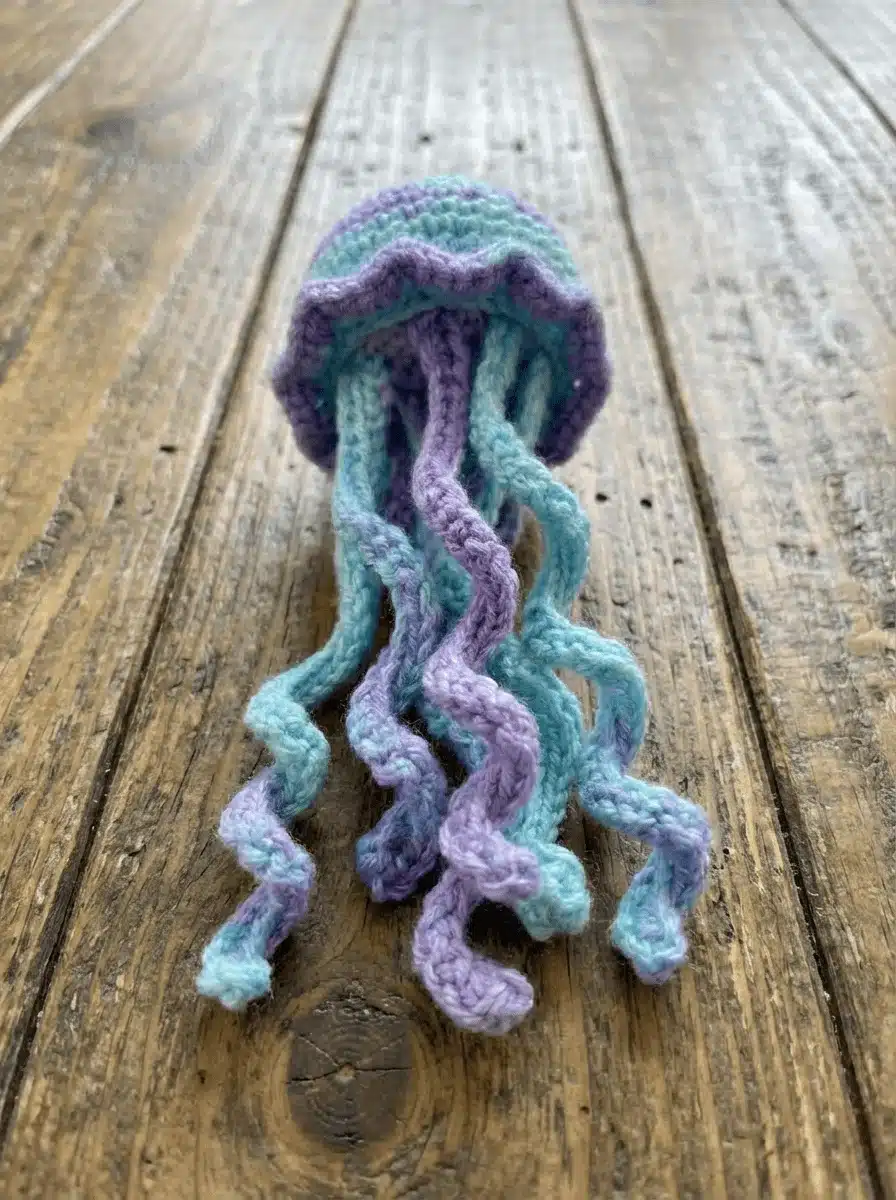
There’s something so mesmerizing about jellyfish. They drift through the ocean with a silent, graceful beauty, their tentacles trailing like ribbons. They are a must-have for any complete crochet aquarium, but the thought of sewing on all those little tentacles can be a real pain!
What if you could add a whole bloom of these stunning creatures to your handcrafted ocean with absolutely no sewing required?
Welcome to your new favorite project: the No-Sew Mini Jellyfish! This free crochet pattern is designed to be the quickest and most enjoyable way to populate your underwater world. By using some clever front-loop and back-loop techniques, we will construct the entire jellyfish—body, ruffles, and tentacles—with just a hook and yarn. There are no extra pieces to attach at the end!
This pattern is perfect for beginners looking to contribute to their aquarium without the hassle of assembly. It’s a wonderfully fast make, meaning you can create a whole family of jellyfish in an afternoon to make your aquarium look full and vibrant. It’s also a fantastic way to use up those colorful DK-weight yarn scraps.
So, grab your hook, pick a fun color, and let’s add a bloom of these adorable, hassle-free jellyfish to your growing crochet aquarium.
The Free No-Sew Mini Jellyfish Crochet Pattern
This pattern is designed to be worked in one continuous piece from the top down. Read through all the steps before you begin to understand how the “no-sew” construction works!
Materials & Abbreviations
Materials Required
- Yarn: Paintbox Yarns Cotton DK (100% Cotton, 125m/50g). A variegated or single color like Washed Teal (433) or Dusty Lilac (447) works beautifully.
- Hook: A hook slightly smaller than the yarn label recommends to ensure tight stitches.(A 3.5mm hook was used for the example).
- Stuffing: Polyester Fiberfill
- Stitch marker
- Scissors
- Optional: 6mm Safety Eyes & Black embroidery thread for a smile.
For children under 3 years old, embroider the eyes instead of using safety eyes.
Abbreviations (US Terms)
- Sc = single crochet
- Dc = Double crochet
- Inc = increase (2sc in same stitch)
- Dec = Decrease (invisible decrease recommended)
- FLO = Front loop only
- BLO = back loop only
- Slst = slip stitch
- Ch = Chain
- Hdc = half double crochet
The Pattern Instructions
Jellyfish Body (Top-Down)
Work in a continuous spiral.
R1: Magic ring 6 SC (6)
R2: Inc in each st around (12)
R3: [Inc, sc] x 6 (18)
R4: [1sc, inc, 1sc] x 6 (24)
R5: [Inc, 3sc] x 6 (30)
R6: [2sc, inc, 2sc] x 6 (36)
Rnds 7–13: sc in each st around (36)
R14: [Dec, 4sc] x 6 (30)
Do not fasten off. We will now work the frills directly onto this round.
Frills (No-Sew Method)
R15: In the Front Loops Only of the round you just completed: Work [6 dc in the first stitch, 6 hdc in the next stitch]. Repeat this pattern of 6dc and 6hdc in alternating stitches all the way around in the front loops. At the end, Sl st to the first frill stitch to join. Fasten off the frill yarn only.
Finishing the Body
R16: Find the first unworked back loop from Round 14. Pull up a loop with your yarn. In the Back Loops Only, sc in each stitch around. (30)
R17: [Dec, 3sc] x 6 (24)
R18: [Dec, 2sc] x 6 (18)
If using safety eyes, this is the time to add them.
R19: Stuff the body firmly.
R20: [Dec, 1sc] x 6 (12)
R21: Dec in each st around (6)
Do not close the hole completely; we will use the remaining gaps to create the tentacles.
Tentacles (No-Sew Method)
Work into the remaining stitches and gaps at the base opening of R21. You can insert your hook into any visible stitch or space around the opening. at the bottom of the jellyfish.
1. Insert your hook into a stitch gap, pull up a loop, and ch 25.
2. Starting in the second ch from the hook, slst into each chain back up to the top.
3. Sc into a nearby stitch gap to secure the tentacle.
4. Slst into another nearby stitch gap to start the next one.
5. Ch 32, and slst back up the chain. Sc into a nearby stitch to secure.
6. Ch 40, and repeat the process.
7. Continue this process, varying your chain lengths, until you are happy with the number of tentacles. A mix of 8-12 tentacles of different lengths looks great.
8. Once finished, fasten off and weave in the final end securely into the base of the jellyfish.
Optional Facial Features
Adding a face brings your jellyfish to life!
- Eyes: Before stuffing (after R18), insert 6mm safety eyes between R10 and R11 of the body. A good spacing is about 4 to 5 stitches visible between them.
- Smile: After the jellyfish is complete, use a strand of black embroidery thread and a needle to add a small, simple “V” or straight-line smile centered just below the eyes.
Tips for the Perfect No-Sew Jellyfish
You have the pattern, but let’s dive a little deeper. This section is designed to answer common questions and give you extra tips to ensure your jellyfish turns out perfectly every time.
What Does “No-Sew” Actually Mean for this Pattern?
This is the best part! In many amigurumi patterns, you have to crochet several different pieces and then spend a lot of time sewing them all together. This “no-sew” pattern avoids that finishing work with two clever techniques:
1. The Frills: Instead of making a separate ruffle and sewing it on, we work the frills directly into the Front Loops Only (FLO) of a body round. Then, we simply go back to the unworked Back Loops Only (BLO) of that same round to continue crocheting the body.
2. The Tentacles: Rather than making 10-12 individual tentacles and painstakingly sewing each one to the base, we create them directly on the finished body. By chaining down and slip-stitching back up, you anchor each tentacle as you go.
This means once you fasten off your final tentacle, you’re done! It’s a huge time-saver and perfect for anyone who dislikes the sewing part of crochet.
How Can I Make the Tentacles Curly?
The pattern as written creates lovely, straight, dangly tentacles. If you want the bouncier, more voluminous look of curly tentacles, the change is very simple!
When you are creating the tentacles, follow the same steps, but with one change: instead of slip stitching back up the chain, work 2 or 3 single crochet (sc) stitches into each chain. This forces the chain to twist and form a perfect spiral. It uses a bit more yarn, but the curly effect is fantastic!
Can I Use a Different Yarn Weight for a Bigger or Smaller Jellyfish?
Absolutely! This pattern is incredibly easy to adapt. The key is to match your hook size to your yarn weight.
– For a Tiny Keychain: Use crochet thread or fingering-weight yarn with a small hook (like 1.5mm – 2.0mm).
– For a Big, Cuddly Plushie: Use a bulky or super-bulky blanket yarn with a much larger hook (like 6.0mm – 8.0mm).
Just remember the golden rule of amigurumi: always use a hook that is a size or two smaller than the yarn label recommends. This will keep your stitches tight so no stuffing shows through.
My Ruffles Aren’t Defined Enough. What Can I Do?
The pattern creates a lovely, wavy ruffle by alternating double crochet and half double crochet. If you want even more dramatic, defined ruffles, the solution is to add more stitches.
For ultra-wavy ruffles, instead of the pattern in R15, try working 4 or 5 double crochet (dc) stitches into every single front loop stitch around. It will take a little more time, but the result is a beautifully full and frilly edge.
How Do I Turn a Jellyfish into a Keychain or Nursery Mobile?
This pattern is perfect for accessories and decor!
For a Keychain: After weaving in your final end, take a new 6-inch piece of yarn and a tapestry needle. Thread it through the very top of the jellyfish’s head (the center of your starting magic ring) and tie it securely to create a strong loop. Then, simply attach your keychain hardware to this loop.
For a Nursery Mobile: Create a “bloom” of 3 to 5 jellyfish, perhaps in different pastel colors. Use a long needle and invisible thread to pass the thread through the top of each jellyfish’s head. Tie them securely at different heights from a mobile hanger or a simple wooden embroidery hoop for a gorgeous handmade baby gift.
Build Your Crochet Aquarium: More Free Patterns
Your adorable no-sew jellyfish is complete, but why let it float alone? Building a full crochet aquarium is a wonderfully satisfying project, and I have a whole ocean of free patterns to help you create more friends for your new creation.
If you loved this quick and easy project, continue your underwater adventure with these other free patterns from my collection:
- Free Crochet Clownfish Pattern
- Amigurumi Blue Tang Free Crochet Pattern
- How to Crochet a Fish (Beginner Guide)
- Free Starfish Crochet Pattern
Conclusion: A Whole Bloom of Jellyfish Awaits!
Congratulations on finishing your No-Sew Mini Jellyfish! It’s amazing how quickly this project comes together without any tedious sewing at the end. Because it’s so fast and fun, you’ll find it’s hard to make just one. They look fantastic in a “bloom” of different colors, making them perfect for market stock, party favors, or just a vibrant collection hanging in a window.
I hope you’ve enjoyed this pattern and the “no-sew” technique. Happy crocheting!
I would be thrilled to see your finished jellyfish! If you make one (or a dozen!), please consider sharing a photo. For a friendly and welcoming place to share your projects, ask questions, and connect with other crocheters who love my patterns, please come and join my Facebook Group! We can’t wait to see you there.