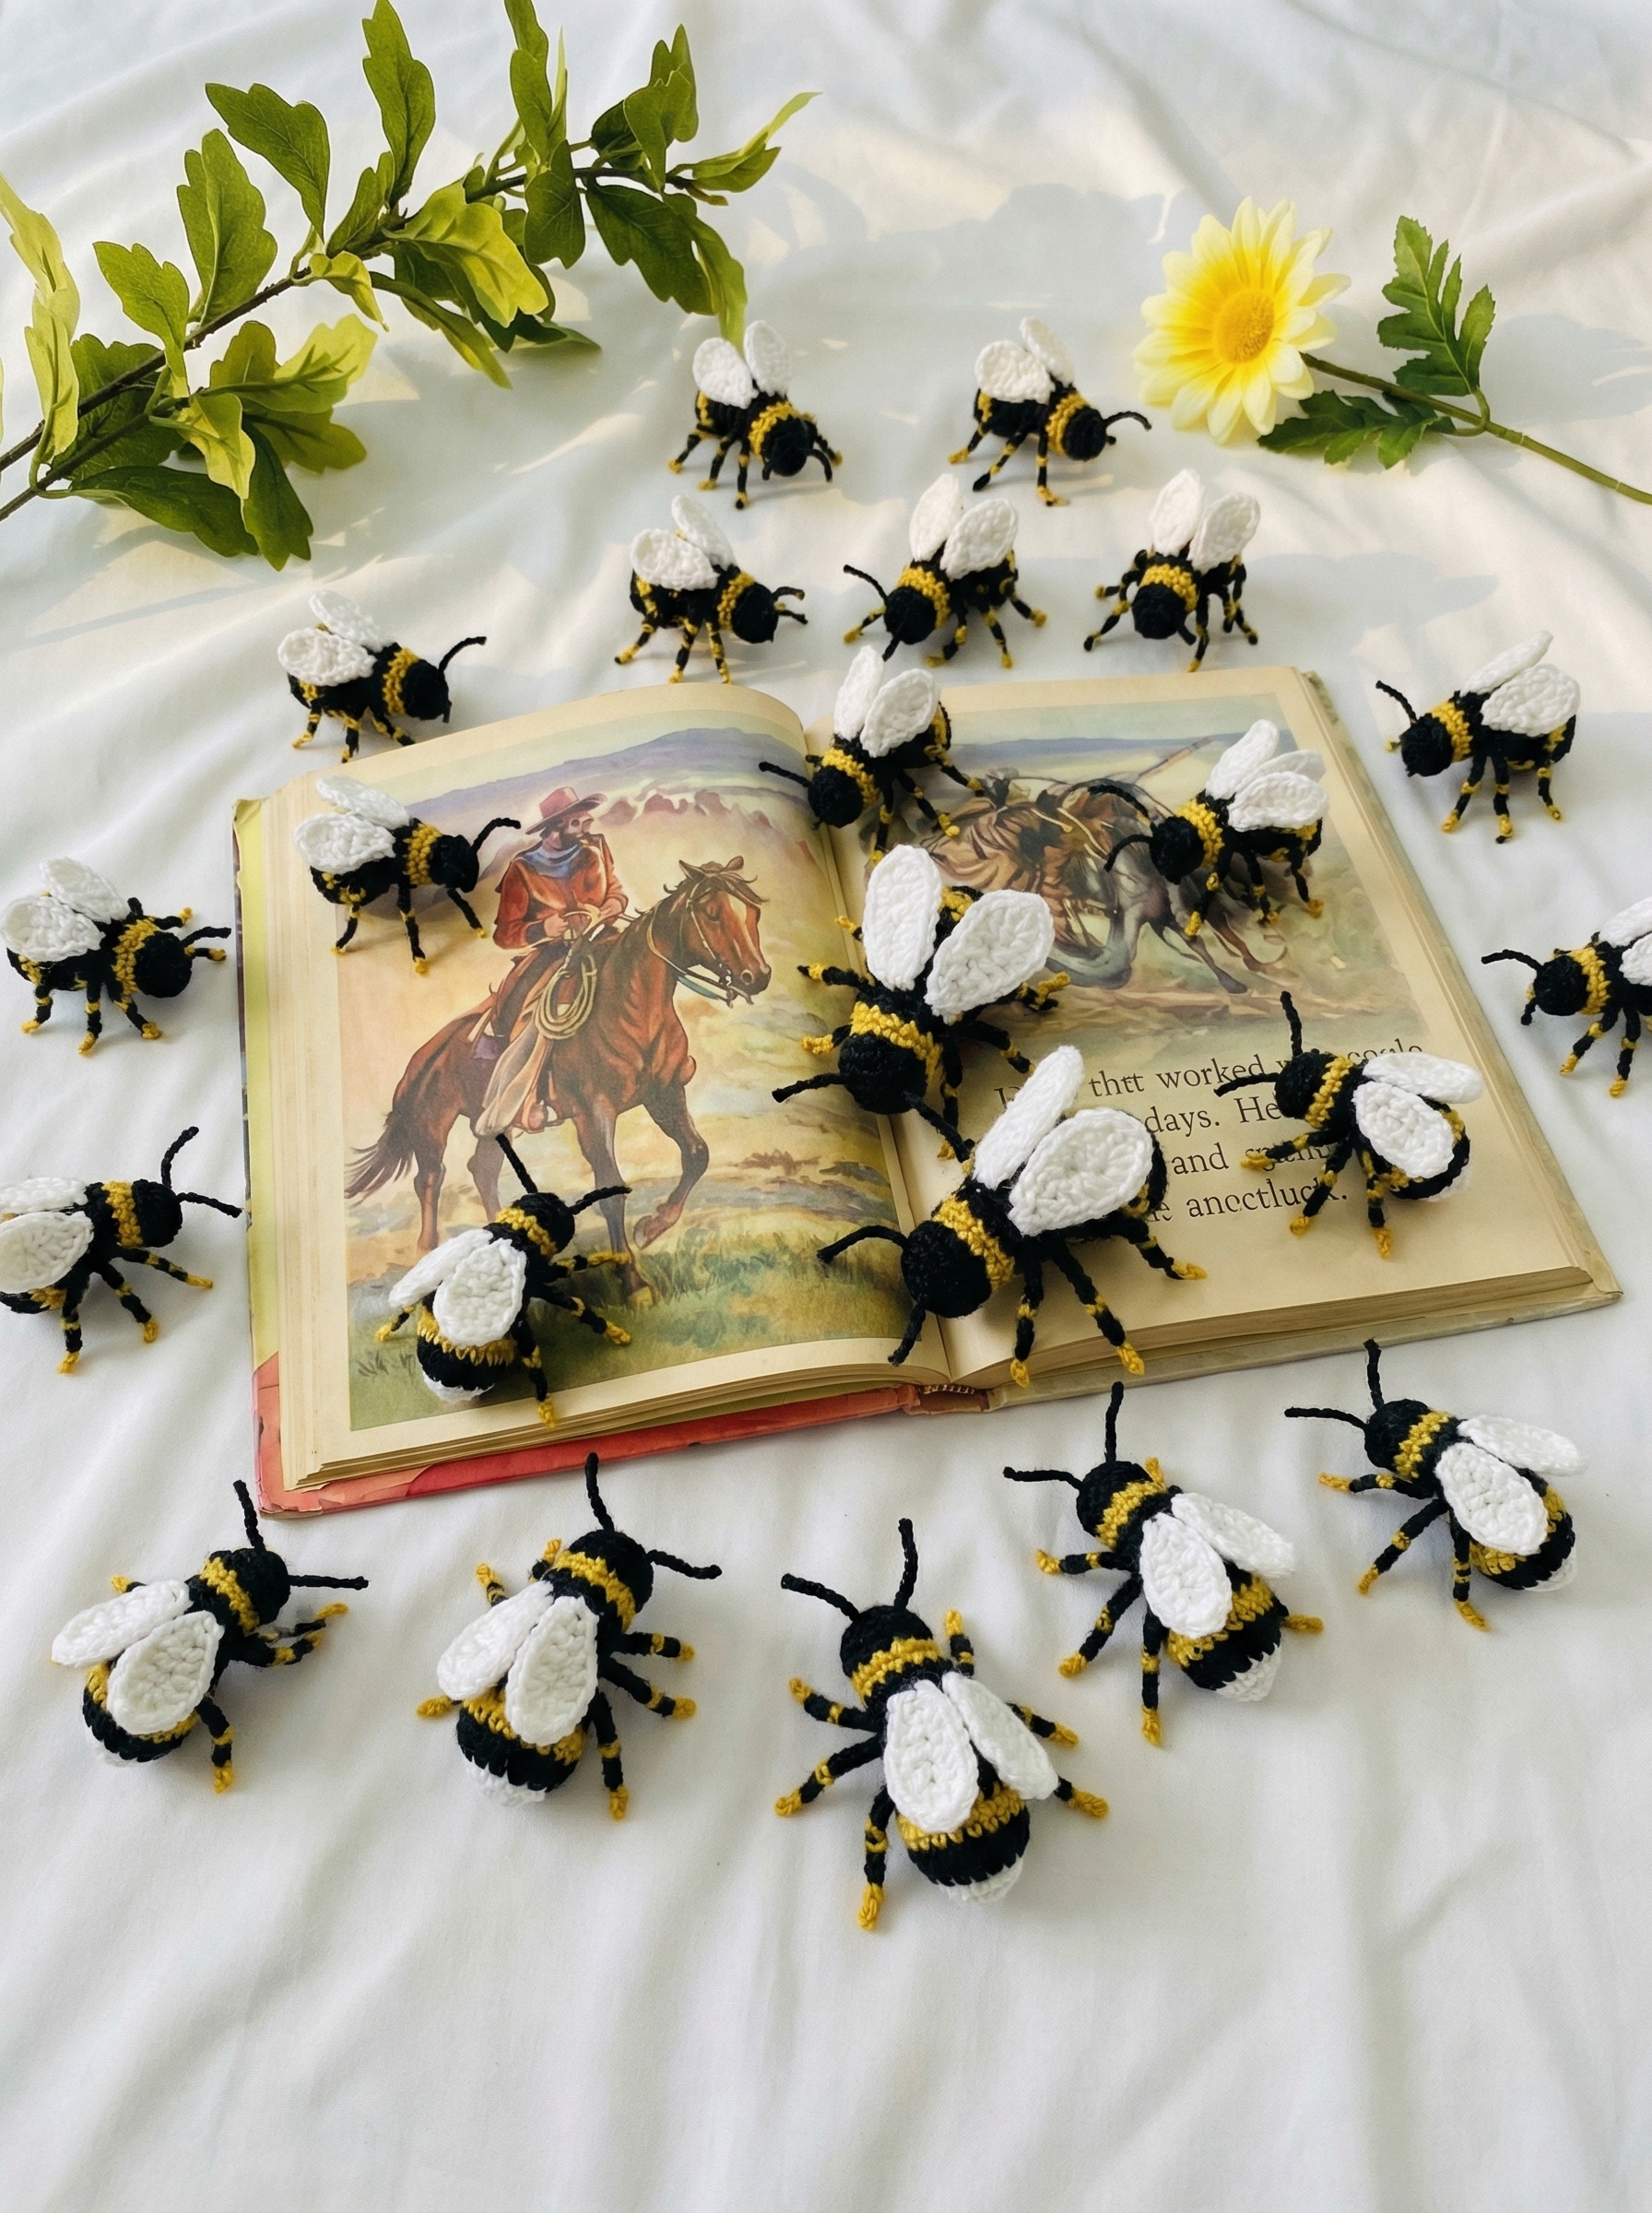
I was sitting in my garden last week, watching a tiny bee work its way across the lavender. It wasn’t just a yellow and black ball; it was incredibly complex. I noticed the soft fuzz on its body, the way its delicate, paper-thin wings caught the light, and the six impossibly thin legs moving with purpose. I knew right then that I wanted to try and capture that amazing, lifelike detail in crochet.
Most amigurumi bee patterns are cute and round, and I love them, but I wanted a challenge. I wanted to create a tiny piece of fiber art that looked like it could buzz right off your fingertip. This project is the result of that inspiration.
This free pattern will show you how to create a detailed, realistic crochet bee. Please know, this is an intermediate to advanced pattern. It involves working with very fine thread (micro crochet), careful color changes, and using wire to create posable legs and antennae for a truly lifelike finish. It’s a project that requires patience, but the result is a stunningly intricate creature that is so worth the effort.
So, if you’re ready to move beyond the simple cartoon bee and create something truly special, you’re in the right place. Let’s make something amazing together.
What is Micro Crochet? (A Quick-Start Guide for the Curious)
Before we get to the pattern, let’s talk about the magic that makes this bee so realistic: micro crochet. If you’ve never heard of it, don’t be intimidated! It’s simply the art of crocheting with very fine materials—like sewing thread instead of bulky yarn—and a tiny steel hook.
While it requires more precision than a standard amigurumi project, this technique is what allows us to create breathtakingly small and detailed pieces. You could never get the delicate shape of this bee’s legs or the intricate form of its body using regular yarn. Micro crochet opens up a whole new world of miniature, lifelike art.
If this is your first time trying a project this small, I want you to feel confident! Here are my top three tips for anyone starting their micro crochet journey:
- Good Lighting is Non-Negotiable. This is my most important tip. Working with thread this fine can be tough on the eyes. Make sure you are crocheting in a very well-lit space, either next to a bright window during the day or with a dedicated craft lamp pointed directly at your work. A lamp with a magnifier is even better!
- Go Slow and Be Patient with Yourself. You are not going to work at the same speed as you do with a chunky blanket, and that is perfectly okay! Take your time with each stitch. It’s also a good idea to take frequent breaks to rest your eyes and stretch your hands. This is a marathon, not a sprint.
- Trust Your Tiny Hook. That little steel hook might look delicate, but it’s specifically designed for this job. It’s strong and sharp enough to work into tight thread stitches. Focus on finding a comfortable grip that allows you to maintain tight, even tension on your thread.
Micro crochet is a skill that takes a little practice, but it is incredibly rewarding. With these tips in mind, you are ready to tackle this amazing project.
A Guide to Micro Crochet Supplies
Now that you’re ready to try micro crochet, let’s talk about supplies. Having the right tools is the key to making this process enjoyable and successful. Making a realistic crochet bee this small requires a few specialized items to get those incredible, tiny details.
Getting the right tools makes all the difference. Below is a quick guide to the types of supplies that are essential for success in micro crochet projects like this one.
My Recommended Tools for Micro Crochet
| Tool | Why It’s Essential for This Project | What to Look For |
|---|---|---|
| Fine Steel Crochet Hooks | Standard aluminum hooks often don’t come in sizes this small (under 2mm). Steel hooks are strong, sharp, and designed to work with fine thread without bending. | Look for brands like Tulip Etimo or Clover Amour in steel. A comfortable, ergonomic handle is a huge bonus for preventing hand cramps during long sessions. |
| Quality Crochet Thread | To get crisp, defined stitches on a miniature scale, you need thread, not yarn. It has a tight twist that shows off every detail without becoming fuzzy. | Size 10 crochet thread is a great starting point for micro crochet. Mercerized cotton threads (like Aunt Lydia’s) have a slight sheen that looks beautiful. |
| Craft Light with Magnifier | Honestly, this is a game-changer. It makes seeing your tiny stitches effortless, which prevents eye strain and helps you avoid mistakes. | An LED daylight lamp provides bright, clear light. Choose one on a flexible arm with a good quality, distortion-free magnifying lens for the best experience. |
Materials You Will Need for This Bee
For this specific pattern, here is the full list of what you will need to gather:
- Thread: Jeans sewing thread in black, yellow & white
- Bendable wires: Copper Wires
- Stuffings: Polyester fiberfill
- A crochet hook: 0.85 mm
- A thread clipper
- A stitch marker
- A needle
Safety Note: This pattern uses wire for legs/antennae and is not suitable for babies or children. For a child-safe version, skip the wires and use embroidered legs/antennae (see “No-Wire Option” below). Always secure and trim wire ends inside the body.
Free Crochet Bee Pattern
Now we get to the best part! Below you will find the complete instructions for creating your realistic crochet bee. Please read through the abbreviations and my special tips first, as they contain important information for getting the best result.
Abbreviations & Important Tips
- MR = Magic Ring
- sc = Single crochet
- inc = Increase
- dec = Decrease
- ch = Chain
- sl st = Slip stitch
- dc = Double crochet
- hdc = Half double crochet
- st/sts = Stitch/Stitches
- (st/sts) * x times = Work instructions within brackets as many times as directed
My Keys to a Realistic Bee
- Maintain Even Tension: For micro crochet, tight and even stitches are everything. As you work, be mindful of pulling the thread snugly. This creates a firm fabric that won’t let any stuffing show through.
- Use the “Yarn Under” Technique: For the neatest, most defined stitches, I use the “yarn under” (or “X-stitch”) method. Instead of yarning over your hook, grab the yarn from underneath. This creates tighter, crisper, X-shaped stitches that give micro amigurumi a beautiful, woven texture.
- Stuff Firmly: Don’t be shy with the stuffing! Pack the fiberfill in firmly and evenly as you go. The tight stitches will act as a strong container, and firm stuffing is what gives your bee its great shape.
- Work in Continuous Rounds: This pattern is worked in a spiral. Do not join at the end of each round. Always use a stitch marker to mark the first stitch of each round so you don’t lose your place.
Finished Size: Approx. 2–3 cm long using 0.85 mm hook + sewing thread (varies by tension).
Skill Level: Intermediate/Advanced (micro crochet + shaping + optional wire).
Pattern Instructions
Head & Body
(Worked as one continuous piece)
Rounds 1–4 (white)
Round 1:
With white yarn, 5 sc into MR. [5 sts]
Round 2:
Inc, sc 4. [6 sts]
Round 3:
Inc around. [12 sts]
Round 4:
(Inc, sc) × 6. [18 sts]
Rounds 5–7 (black)
Rounds 5–7:
With black yarn, sc around. [18 sts]
Rounds 8–10 (yellow)
Rounds 8–10:
With yellow yarn, sc around. [18 sts]
Rounds 11–15 (black)
Round 11:
(Inc, sc 8) × 2. [20 sts]
Round 12:
(Dec, sc 8) × 2. [18 sts]
Round 13:
(Dec, sc 7) × 2. [16 sts]
Round 14:
(Dec, sc 6) × 2. [14 sts]
Begin stuffing. Continue stuffing as work progresses.
Round 15:
(Dec, sc 5) × 2. [12 sts]
Rounds 16–19 (black)
Round 16:
(Inc, sc) × 6. [18 sts]
Round 17:
(Inc, sc 9) × 2. [20 sts]
Rounds 18–19:
Sc around. [20 sts]
Rounds 20–22 (yellow)
Round 20:
(Dec, sc 3) × 4. [16 sts]
Round 21:
(Dec, sc 2) × 4. [12 sts]
Round 22:
Sc around. [12 sts]
Rounds 23–27 (black)
Round 23:
Sc 3, inc × 6, sc 3. [18 sts]
Technique Spotlight: How to Read Round 24
This round creates the pointed stinger shape and can look confusing. Here’s a simple breakdown of the steps:
- Work Most of the Round: In black, sc into the first 13 stitches as normal.
- First Short Row: Chain 1 and physically turn your work as if you were working flat. Now, working back across the stitches you just made, sc into the next 9 stitches.
- Second Short Row: Chain 1 and turn your work again. Working back one more time, sc into those same 9 stitches.
- Finish the Main Round: Do not turn. Continue working in the original spiral direction, making a sc in the final 5 stitches of the main round.
This process builds up a small flap on one side, creating the unique stinger shape without any extra sewing!
Round 24 (stinger shaping):
Sc 13, ch 1 (does not count), turn, sc in next 9 sts, ch 1 (does not count), turn, sc in next 9 sts, then continue in the round and sc in the next 5 sts. (18)
Round 25:
Sc 3, dec, sc, dec, sc 2, dec, sc, dec, sc 3. [14 sts]
Round 26:
Sc 3, dec × 4, sc 3. [10 sts]
Round 27:
Sc 1, dec × 4, sc 1. [6 sts]
Fasten off, leave a long tail. Thread tail through the front loops of the final 6 sts and pull tight to close. Weave in securely.
Wings (Make 2 — White or Light Brown)
For the wings, a crisp white thread creates a beautiful, delicate look.
Get Creative! This is a great place to experiment. For a touch of magic, try using a sparkly or iridescent white thread to make your bee’s wings shimmer in the light!
(Worked in rows)
Row 1:
With white yarn, into MR: ch 3, dc 3. Close MR.
Ch 3, turn.
Row 2:
Dc in same st, dc next, inc dc in next st, dc in last st.
Ch 3, turn.
Row 3:
Dc in same st, dc in next 3 sts, inc dc in next st, dc in last st.
Ch 3, turn.
Row 4:
Dc2tog, dc in next 5 sts.
Ch 3, turn.
Row 5:
Dc in same st, inc dc in next st, dc next, hdc next, sc next, sl st in last st.
Fasten off. Leave a long tail for sewing.
Final Details: Eyes, Antennae, & Legs
Eyes
Using thin white yarn, embroider the eyes onto the head.
Place symmetrically on the white head section, adjusting position as desired.
Antennae
- Insert two pieces of copper wire into Round 25, spaced approximately 0.3 cm apart.
- Wrap each wire tightly with black yarn.
- Leave a long yarn tail to sew and secure the antennae firmly into the head.
Legs
- Insert copper wires into:
- Round 18
- Round 20
- Round 22
- Wrap each wire:
- Yellow yarn for approximately 0.3 cm
- Black yarn for approximately 0.4 cm
- Continue wrapping until each leg reaches the body.
- Leave long yarn tails and sew securely into the body.
No-Wire Option (Child-Safe Version)
- Antennae: Use 2 strands of black embroidery floss. Insert, knot close to head, trim.
- Legs: Use 3 strands of floss for each leg, knot at the end for a “foot,” trim evenly.
This version is not posable but is safer and still looks great.
Troubleshooting Your Tiny Bee: Common Problems & Solutions
Working on a micro-scale project is incredibly rewarding, but it can present a few unique challenges. If you run into a little trouble, don’t worry! It happens to everyone. Here are some common issues and my best advice for fixing them.
Problem 1: My thread keeps splitting while I work.
This is one of the most frequent frustrations with micro crochet. A splitting thread can make your stitches look messy and is a real pain to work with.
- Solution: The problem is usually caused by the tip of the hook catching only part of the thread. Slow down and pay close attention to how your hook enters the stitch. Make sure the “throat” of the hook has captured all of the strands before you pull it through. Using a high-quality, tightly wound mercerized cotton thread can also make a huge difference.
Problem 2: My stuffing is lumpy or visible through the stitches.
Lumpy stuffing can ruin the smooth shape of your bee, and visible stuffing (or “bearding”) is a sign your fabric isn’t dense enough.
- Solution for Lumps: Stuffing in very small, wispy bits is the key. Never try to push in a big clump. Use the back of your hook or a pair of forceps to gently tease tiny amounts of fiberfill into the bee, building up the shape slowly and evenly.
- Solution for Visible Stuffing: This means your tension is too loose. You may need to consciously pull your working thread tighter to create smaller, denser stitches. Also, make sure you are using the “yarn under” technique I recommended, as it creates a naturally tighter and less gappy fabric than the standard “yarn over” method.
Use in a well-ventilated area.
Problem 3: My wire legs and antennae won’t stay put, even after sewing.
If your wires are wiggling or feel like they could pull out, the anchor point isn’t secure enough.
- Solution: The secret is to add a small drop of fabric glue. After you’ve inserted the wire and sewn it down with the thread tail, use a toothpick to apply a tiny, precise amount of strong fabric or jewelry glue (like E6000 or Fabri-Tac) right where the wire enters the body. Press the sewn threads into the glue and let it dry completely. This creates a rock-solid, permanent bond that will keep your bee’s legs and antennae perfectly secure and posable.
Get Creative: Customization & Display Ideas
Now that you’ve mastered the realistic bee, you can use those skills to create all sorts of variations! This pattern is a wonderful starting point for your own creativity. Here are a few ideas to get you started.
Variation Idea: Make a Fluffy Bumblebee!
Want a bee that’s more fuzzy and round? It’s easy to adapt this pattern to create an adorable bumblebee.
- Choose a Fuzzy Thread: Instead of the smooth sewing thread, try using a very fine, fluffy thread like a brushed “mohair” style thread or a single ply of a fuzzy yarn. This will instantly give your bee a soft, plump look.
- Adjust the Shape: To get that classic round bumblebee body, you can simply omit some of the shaping. For example, you could make the abdomen section (Rounds 20-22) a little wider and skip the complicated “stinger shaping” in Round 24, instead opting for a simple, rounded decrease to close the body.
- Change the Colors: Bumblebees have wider, bolder stripes. Try making the yellow sections twice as long for a classic bumblebee look!
How to Display Your Tiny Bee
A creature this detailed deserves to be shown off! Here are a few beautiful ways to display your finished work:
- Create a “Specimen” Shadow Box: For a truly artistic display, mount your bee inside a small shadow box frame with a label underneath, just like a museum specimen. It looks incredibly professional and highlights the realistic nature of your work.
- Make a Permanent Blossom: Use a bit of strong glue to permanently attach your bee to the petal of a high-quality fake flower. You can place this on a bookshelf or desk for a little touch of everlasting nature.
- Turn it into a Brooch or Pin: By gluing a brooch back or pin finding to the underside of the bee, you can create a stunning and unique piece of wearable art. It’s a fantastic conversation starter!
- Design a Nursery Mobile: Imagine a few of these bees buzzing around other crocheted flowers or clouds on a baby mobile! (Safety Note: If you choose this option, it is crucial to make the “no-wire” version of the bee to ensure it is 100% child-safe).
Mastering the Miniature Bee (An Advanced FAQ)
This is a challenging pattern with some techniques you might not have seen before. Here are answers to a few common questions that will help you master these details for a perfect, realistic bee.
My stitches look loose. How do I keep them so tight with tiny thread?
This is the number one challenge in micro crochet! The key is a combination of two things: tension and the yarn-under technique.
- Tension: You need to apply much more tension than you would with regular yarn. Keep the working thread pulled taut with your non-hook hand at all times. It should feel slightly resistant as you pull each loop through.
- Yarn-Under (X-Stitch): As mentioned in the tips, making your stitches by grabbing the yarn from underneath physically locks the stitch tighter than a normal yarn-over. For a realistic, woven look with no gaps, this technique is essential.
My wire legs and antennae are floppy. How do I make them sturdy?
The pattern mentions leaving a long thread to “sew it into the Body to make it sturdy,” and this is the crucial step. Just inserting the wire isn’t enough. After you attach the wire and wrap it, use that leftover thread and a needle to make several small, tight stitches over the wire and into the body of the bee, right where the wire enters. Think of it as creating a tiny anchor. This prevents the wire from wiggling or pulling out.
Can I make this bee without the wires?
Absolutely! If you’re not comfortable with wire or want to make a softer version, you can create the legs and antennae with embroidery floss instead.
- For the legs: Cut several strands of black floss, insert your hook where a leg should be, and pull the strands halfway through. Tie a tight knot close to the body, then another knot near the end to simulate a “foot.” Trim the excess.
- For the antennae: Do the same on the head with two strands of black floss.
It won’t be posable, but it will still look fantastic!
Why is the end of the body (Round 24) so complicated?
That is a very advanced shaping technique used to create the realistic, pointed stinger section of the bee’s abdomen without having to sew on a separate piece. By chaining and turning your work for two short rows on just one side of the tube, you are building up a small “flap.” When you continue crocheting in the round after that, this flap forces the shape to become asymmetrical and pointed, perfectly mimicking the anatomy of a real bee. It’s tricky, but it’s the secret to getting that amazing, true-to-life shape!
Conclusion: Your Own Handmade Pollinator
Congratulations on finishing this incredible project! You didn’t just crochet a toy; you’ve created a tiny, intricate piece of fiber art. You took fine thread, a tiny hook, and a good deal of patience to replicate the amazing complexity of a real bee. The result is a stunningly realistic creation that is a testament to your skill and dedication.
Whether it’s sitting on your desk as a reminder of nature’s beauty or given as a truly unique and breathtaking gift, I hope you feel a huge sense of accomplishment.
I would be absolutely thrilled to see your finished bee! If you’ve brought one of these little creatures to life using this pattern, please share a photo. For a place to connect with other passionate crafters and find more inspiration, please come and join my Facebook Group! We’d love to have you.