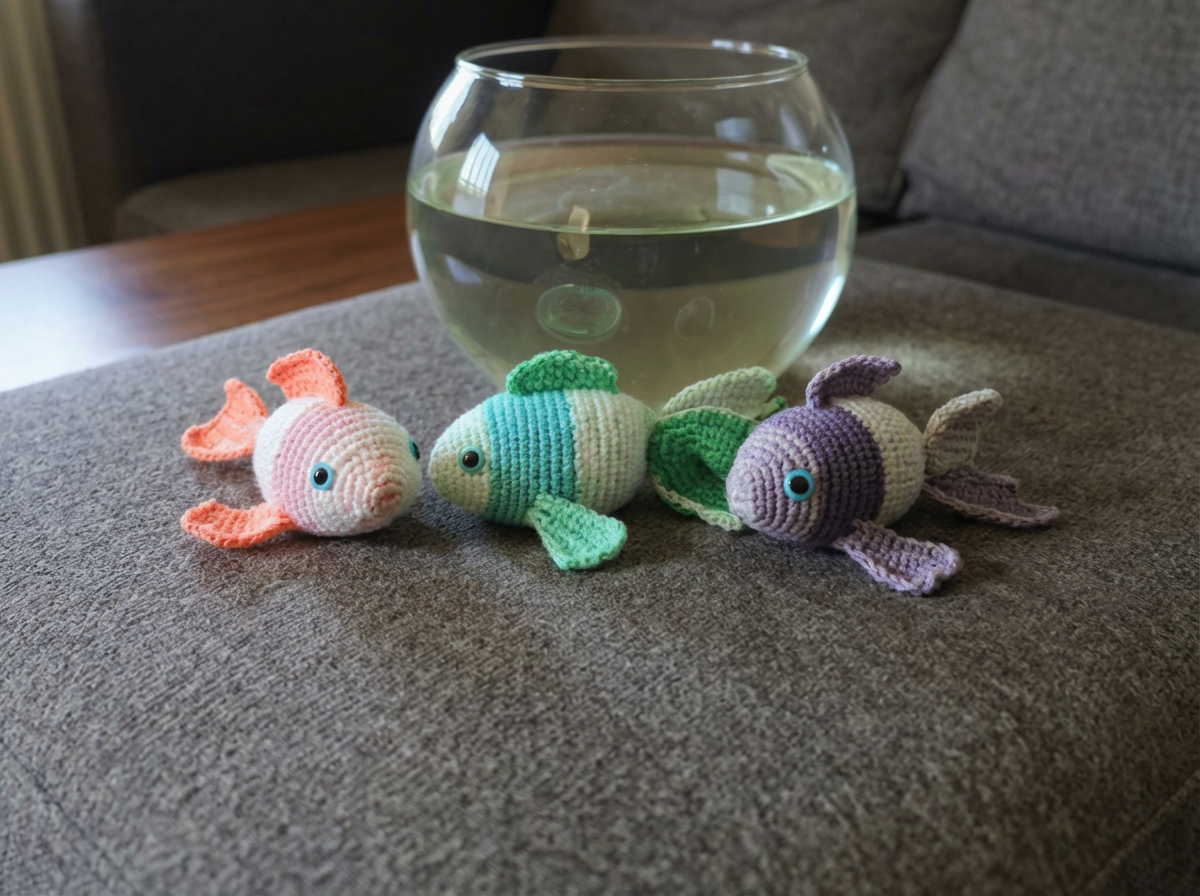
How to crochet a fish—I’m so excited to share this fun, beginner-friendly project that brings a splash of color to your crochet world! Growing up, my grandma and I loved watching fish swim in vibrant hues, and that inspired me to create this 9-inch crochet fish using Knit Picks Brava Stripe yarn. It’s a perfect way to learn how to crochet a fish while enjoying the beauty of striped yarn. Let’s dive into this colorful adventure together!
Before we start, check out my other sea-inspired patterns: Blue Tang, and Crochet Clownfish Pattern to expand your underwater collection!
Pattern Details: A Simple 9-Inch Fish
This how to crochet a fish tutorial is designed for beginners with an easy skill level, creating a plush crochet fish about 9 inches long. Worked in rounds for the body and flat for the fins, it’s a great project to practice basic stitches and enjoy the natural striping of yarn like Orchid. The fish features a vibrant, multicolored design with fins stitched directly onto the body, making it a standout piece for display.
Materials Needed: Gather Your Supplies
Here’s what you’ll need to learn how to crochet a fish and bring this project to life:
- Crochet Hook: 3.5 mm
- Yarn: Knit Picks Brava Stripe (#4 Medium Worsted, 100% premium acrylic, 218 yds per 100g ball; 2 balls ≈ 436 yds for 4–5 fish) in Orchid:
- Stripe sequence: Plum purple, medium purple, magenta, orchid pink, lilac purple, white
- Notions: Yarn needle, scissors, stitch marker
- Stuffing: Bamboo fiber stuffing (included in kits)
- Safety Eyes: 12 mm (or embroider eyes for a child-safe option)
Abbreviations: US Crochet Terms
I use standard US terminology for this how to crochet a fish tutorial, making it easy to follow:
- sc – single crochet
- hdc – half double crochet
- sl st – slip stitch
- dec – decrease (single crochet two stitches together)
- inc – increase (work two single crochet stitches into the same stitch)
Special Stitches
- Invisible Decrease: For a cleaner look with fewer gaps, insert your hook into the front loop only of two stitches. Yarn over and pull through, then yarn over and pull through again.
Crochet Pattern Instructions: Step-by-Step Creation
Follow these steps to learn how to crochet a fish. Use a stitch marker to track rounds, and work the body in rounds and fins flat. An adjustable ring (magic ring) is recommended for a tight start.
Body
- Rnd. 1: 6 sc in an adjustable ring [6]
- Rnd. 2: sc 2x in each stitch [12]
- Rnd. 3: *sc 1x, inc* 6x [18]
- Rnd. 4: *sc 2x, inc* 6x [24]
- Rnd. 5: sc in each stitch [24]
- Rnd. 6: *sc 3x, inc* 6x [30]
- Rnd. 7: sc in each stitch [30]
- Rnd. 8: *sc 4x, inc* 6x [36]
- Rnd. 9: sc in each stitch [36]
- Rnd. 10: *sc 5x, inc* 6x [42]
- Rnd. 11: sc in each stitch [42]
- Rnd. 12: *sc 6x, inc* 6x [48]
- Insert Eyes: Place 12 mm safety eyes between Rnds. 6 and 7, 12 stitches apart.
- Rnd. 13-23: sc in each stitch [48]
- Rnd. 24: *sc 6x, dec* 6x [42]
- Rnd. 25: sc in each stitch [42]
- Rnd. 26: *sc 5x, dec* 6x [36]
- Rnd. 27: sc in each stitch [36]
- Rnd. 28: *sc 4x, dec* 6x [30]
- Rnd. 29: *sc 3x, dec* 6x [24]
- Rnd. 30: *sc 2x, dec* 6x [18]
- Rnd. 31: sc in each stitch [18]
- Finish off and stuff firmly with bamboo fiber stuffing.
Caudal Fins (Tail) – Make 3
Worked flat:
- Ch 37, begin in 2nd ch from hook
- Row. 1: hdc 14x, hdc dec 4x, hdc 14x, ch 4, turn [36]
- Row. 2: begin in 2nd ch from hook, hdc 14x, hdc dec 4x, hdc 13x, ch 4, turn [35]
- Row. 3: begin in 2nd ch from hook, hdc 13x, dec 4x, hdc 10x, ch 1, turn [28]
- Row. 4: begin in 2nd ch from hook, hdc 8x, dec 4x, hdc 9x [21]
- Finish off.
Dorsal Fin (Top)
Worked flat:
- Ch 4, begin in 2nd ch from hook
- Row. 1: hdc 3x, turn [3]
- Row. 2: ch 1, hdc 2x, hdc inc, turn [4]
- Row. 3-5: ch 1, hdc 4x, turn [4]
- Row. 6: ch 1, hdc 2x, hdc dec, turn [3]
- Row. 7: ch 1, hdc 1x, hdc dec [2]
- Finish off.
Pectoral Fins (Sides) – Make 2
Worked flat:
- Ch 9, begin in 2nd ch from hook
- Row. 1: hdc 3x, sc 3x, sl st 2x, turn [8]
- Row. 2: ch 1, sl st 2x, sc 3x, hdc 3x, turn [8]
- Row. 3: ch 1, hdc 3x, sc 3x, sl st 2x, turn [8]
- Row. 4: ch 1, sl st 2x, sc 3x, hdc 3x [8]
- Finish off.
Assembly: Bringing Your Fish to Life
Now that you’ve learned how to crochet a fish, let’s assemble your crochet fish! Stack the three caudal fins and stitch them together at the center. Pinch the back opening of the body shut vertically, align the fin point with the opening, sandwich the fins between the layers, and stitch through all layers to secure. Attach the dorsal fin to the top, with the shorter end facing forward, and stitch the pectoral fins to the sides, aligning with the dorsal fin and below the eyes. Stuff the body firmly before closing, and weave in all ends for a neat finish.
Tips & Tricks: Make Crocheting Easier
Here are some tips I found helpful while learning how to crochet a fish to make your crochet fish project smoother:
- Use a stitch marker to track rounds, moving it up after each round for accuracy.
- Practice the invisible decrease on a swatch for a seamless look with fewer gaps.
- Test your gauge with a 4×4 inch (10×10 cm) square—it should be about 16 stitches wide and 20 rows tall. Adjust your hook if needed.
- Stuff gradually with bamboo fiber stuffing to keep the shape without overstretching.
- Pin fins in place before sewing to ensure even placement.
- Embrace the natural striping of Orchid yarn—let the colors guide your creativity!
I’m thrilled to have shown you how to crochet a fish—this 9-inch amigurumi with its stunning Orchid stripes is a joy to make! Share your colorful creation in my Facebook group.
Explore more sea-inspired patterns to grow your aquarium-themed collection:
Can’t wait to see your underwater creations!
Frequently Asked Questions
What yarn is best for this how to crochet a fish tutorial?
I recommend Knit Picks Brava (~90 yards per fish) for its vibrant striping effect. Alternatively, any #4 medium weight yarn, like Yarn Bee Lil’ Dollop yarn or Lion Brand Vanna’s Choice, works well.
How do I do an invisible decrease in this how to crochet a fish pattern?
Insert your hook into the front loop only of two stitches, yarn over, pull through, then yarn over and pull through again. This method reduces gaps for a polished crochet fish, as shown in the special stitches section.
Can I use a different hook size for this how to crochet a fish project?
Yes, but it will affect the size. I used a 3.5 mm hook for a 9-inch fish. A larger hook (e.g., 4.0 mm) will make it bigger; a smaller hook (e.g., 3.0 mm) will make it smaller. Test your gauge to match the desired size.
How do I handle the striped yarn in this crochet fish pattern?
Let the natural striping of Brava Stripe yarn flow as you crochet and enjoy the color changes without cutting yarn between rounds.
Is this how to crochet a fish pattern safe for kids?
Yes, if you embroider the eyes with yarn instead of using 12 mm safety eyes, making it child-safe. Always supervise young children with handmade toys.