Have you ever found yourself mesmerized by the silent, graceful dance of fish in a vibrant aquarium? The flash of brilliant orange, the deep, royal blue, the gentle sway of sea plants—it’s a living work of art. But then, reality sets in. The constant water changes, the algae scrubbing, the delicate pH balances, and the worry of keeping those fragile lives healthy can feel more like a chore than a joy.
What if you could capture all that underwater magic, all that stunning color and life, without a single drop of water?
Welcome to the enchanting world of the crochet aquarium! Imagine a stunning, handcrafted underwater scene, filled with charming amigurumi sea creatures, that asks for nothing but your admiration. It’s a vibrant, whimsical, and deeply personal project that combines the cozy art of crochet with the beauty of the ocean. This is the ultimate DIY aquarium—all the beauty, none of the biology.
In this article, I’m going to take you on a journey to create your very own crocheted masterpiece. We’ll cover everything:
- My personal story of how this project came to life.
- The hilarious (and slightly tragic) story of the day my aquarium “broke.”
- A complete step-by-step guide with all the materials you’ll need.
- And, to get you started right away, links to my free crochet patterns for a clownfish and a blue tang!
So, grab a comfy chair and your favorite cup of tea. It’s time to trade the fish tank for the yarn basket and create an ocean of your own.
My Journey Beneath the Waves: From a Single Stitch to a Full Reef
Every big project starts with a tiny spark of inspiration, and my crochet aquarium was no different. It all began with a movie night and a familiar, finned character. As I watched the vibrant underwater world of Finding Nemo, I was struck by an idea: could I capture that magic with yarn? I had to try. My first goal was simple: crochet a clownfish.
I grabbed my brightest orange, white, and black yarn, and got to work. Stitch by stitch, a tiny personality began to emerge. The satisfaction of seeing those perfect stripes and tiny fins take shape was immense. But once he was finished, my little clownfish looked a bit lonely sitting on my desk. He needed a friend.
Of course, who better to join him than a cheerful, forgetful blue tang? The second crochet fish was even more fun to create, with its bright yellow tail and big, curious eyes. Suddenly, I didn’t just have two amigurumi sea creatures; I had the start of a story.
And that’s when the obsession truly took hold.
My little duo needed a home. They needed a world to explore. I started imagining a complete underwater ecosystem. What about some graceful jellyfish, with long, trailing tentacles? A lazy starfish clinging to a rock? And no ocean is complete without a vibrant reef, so I began crocheting colorful coral formations. Before I knew it, my desk was overflowing with a whole cast of yarny sea life. My simple crafting idea had blossomed into a full-blown passion project: to build a complete, thriving, and wonderfully soft crochet aquarium. It was a perfect, pristine little world… until, one day, it wasn’t.
The Great Yarn Disaster: The Day My Aquarium “Broke”
I was so close. All my little amigurumi sea creatures were finished, a vibrant menagerie ready for their final home. I had them proudly arranged on my craft table, a colorful school of fish, a graceful bloom of jellyfish, and a charming starfish, all waiting to be permanently placed in their shadow box. I stepped away to grab a cup of coffee, beaming with pride at my nearly-complete crochet aquarium.
That was my first mistake.
When I returned, I was greeted with a scene of absolute chaos. My notoriously curious cat, who had previously shown zero interest in my crafting, had decided this new, colorful world was a playground built just for her. The clownfish had been abducted from the table and was now lying under the sofa, missing a safety eye. The jellyfish, once so elegant, looked like they had a fight with a vacuum cleaner—their tentacles were a tangled, slobbery mess. The poor starfish had been batted clear across the room.
 1")
For a moment, my heart sank. My perfect, pristine little ocean was in ruins. All that time, all those tiny stitches… destroyed by a fluffy menace in under five minutes. It felt like my aquarium had truly “broken.”
But as I started to rescue my yarny victims, frustration turned into a strange kind of amusement. I wasn’t dealing with a shattered glass tank and a flooded floor. I was dealing with yarn. And yarn is forgiving. I fished the safety eye out from under the couch, untangled the jellyfish tentacles with a bit of patience, and gave the starfish a gentle dusting off.
This little disaster taught me a valuable lesson: the beauty of a crochet aquarium is its resilience. Unlike a real one, it can be “broken” and put back together again. It taught me the importance of storing a work-in-progress safely away from curious paws, but more importantly, it reminded me that crafting isn’t about perfection. It’s about creation, patience, and sometimes, a little bit of repair.
And that’s why, in the guide that follows, I’m sharing everything—not just how to make these creatures, but how to assemble your aquarium so it’s sturdy, beautiful, and hopefully, cat-proof.
Your Guide to Creating a Crocheted Underwater World
Now for the best part: building your very own underwater world! I’ll walk you through everything, from the yarn you’ll need to the final assembly. Don’t worry, it’s easier than you think, and the result is pure magic.
Gathering Your Tools and Materials (The Diver’s Checklist)
Before you can dive in, you need to gear up. Having everything ready to go makes the creative process smooth and enjoyable. Here’s a complete checklist of what I used for my crochet aquarium.
- Yarn: This is what brings the color! I recommend using 100% cotton yarn in a DK or worsted weight, as it holds its shape wonderfully for amigurumi sea creatures.
- For the Fish: Bright Orange, White, Black, Royal Blue, and Sunny Yellow.
- For the Coral & Plants: A mix of vibrant Pinks, Purples, Reds, and various shades of Green.
- For other Creatures: Get creative! I used soft whites for jellyfish and sandy beige for my starfish.
- Crochet Hooks: The size of your hook will depend on your yarn weight. For amigurumi, you want to use a slightly smaller hook than the yarn calls for to create a tight fabric so the stuffing doesn’t show through. I used a 2.75mm (C) hook for most of my project.
- Toy Stuffing: You’ll need a good amount of Polyester Fiberfill to give your creatures their plump, cuddly shape.
- Eyes: You have two great options here:
- Plastic Safety Eyes: These give a clean, professional look. I used 6mm to 8mm eyes for most of my creatures.
- Black Embroidery Thread: If you prefer, or if the aquarium will be around small children, you can easily embroider the eyes on for a softer, completely handmade look.
- Darning Needle: An absolute must-have. You’ll use this to sew all the different parts of your creatures together (like attaching fins) and to weave in your ends.
- Scissors: Any pair of sharp scissors will do!
- The “Tank” – Your Display Case: This is where you’ll build your scene.
- Shadow Box or Deep Picture Frame: This is my top recommendation. It keeps your work dust-free and looks like a beautiful piece of wall art.
- Large Glass Bowl or Vase: This can also create a stunning, 360-degree view of your aquarium.
- Assembly & Mounting Supplies:
- Blue Felt or Craft Paint: To create the watery background inside your display case.
- Hot Glue Gun or Strong Craft Glue: For securing the coral and non-swimming creatures in place.
- Invisible Thread (or fishing line): This is the secret to making your fish look like they are actually swimming! You’ll use it to hang them from the top of your shadow box.
Crocheting Your First Inhabitants (Free Patterns!)
With all your materials gathered, it’s time for the most exciting step: bringing your first amigurumi sea creatures to life! The foundation of my aquarium started with two of the most iconic and colorful reef fish, and I’m sharing the exact patterns with you. These patterns are designed to be clear and easy to follow, making them the perfect entry point into the world of amigurumi.
The Classic Clownfish
You can’t have a reef without this little star. With its iconic bright orange body and bold white stripes, the clownfish is a joy to create. Its simple, round shape makes it a fantastic project for those getting comfortable with amigurumi techniques.
You can find the full step-by-step Crochet Clownfish Pattern here
The Brilliant Blue Tang
To keep the clownfish company, a vibrant blue tang is a must! The striking contrast of its royal blue body and sunny yellow tail adds an incredible splash of color to the aquarium. This crochet fish has a slightly different body shape, which is a great way to practice your skills after completing the clownfish.
Find the full pattern below: You can find the free Amigurumi Blue Tang Pattern right here!
Creating these two fish will give you a wonderful sense of accomplishment and form the foundation of your entire DIY aquarium.
Bringing Your Aquarium to Life (Assembly and Arrangement)
You’ve crocheted a beautiful collection of amigurumi sea creatures, and now it’s time to build their world. This is where your artistic eye comes into play! Here’s a step-by-step guide to creating a dynamic and visually stunning scene.
Step 1: Prepare Your “Tank”
First, let’s set the stage. Take your shadow box or deep frame and create the watery backdrop. You can cut blue felt to size or, as I’ve done here, paint the back panel. Blending a few shades of blue creates a beautiful illusion of depth.
 2")
Step 2: Build the Environment
Before you add the fish, you need to create their habitat. Arrange and glue down your crocheted coral, seaweed, and rocks first. Start with the largest pieces and create layers to add depth. This will create a stable foundation for everything else.
 3")
Step 3: Position Your Sea Creatures
Now, invite your inhabitants to their new home! Glue down bottom-dwellers like starfish. For the “swimmers” like fish and jellyfish, use invisible thread. Simply pass the thread through the top of the creature and secure the other end to the inside top of the shadow box to create a magical floating effect.
 4")
Step 4: The Final Review
Step back and take a look at your crochet aquarium. Make any final adjustments, and once you’re happy with it, seal it up! You’ve done it. You now have a stunning, handcrafted piece of art that’s full of life and personality—and best of all, it’s completely cat-proof!
 5")
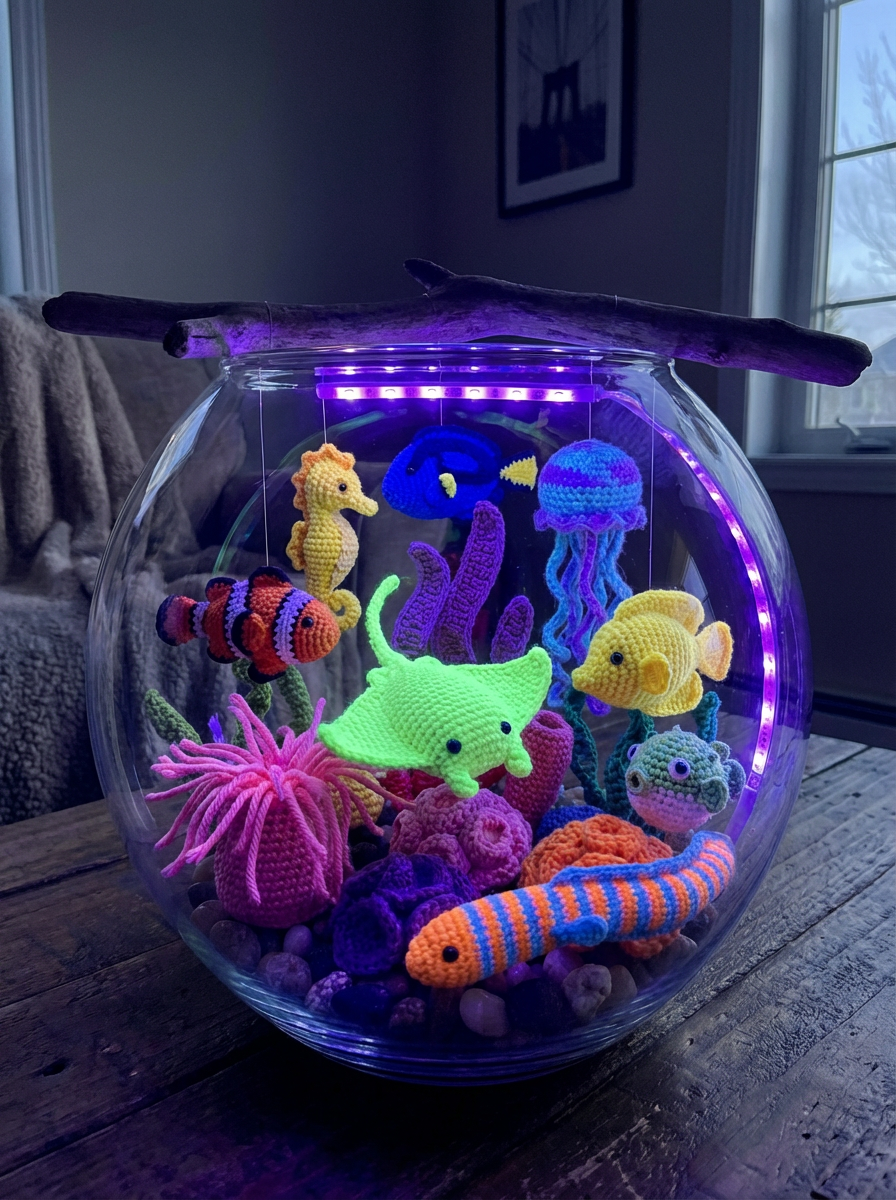
The stunning final result! Your handcrafted crochet aquarium is now a complete piece of art, ready to be proudly displayed.
The Reef is Growing! (A Peek at What’s Next)
A clownfish and a blue tang are the perfect start to any crochet aquarium, but a reef is a bustling community! As my own project grew, I couldn’t resist adding more and more amigurumi sea creatures to the scene, each one bringing its own unique charm.
 6")
My full collection of amigurumi sea creatures, just waiting to swim into your own crochet aquarium! Patterns for the jellyfish, starfish, seahorse, and more are coming soon.
The photos you see here showcase the full underwater world I created, and I want you to be able to make it all, too!
I am currently hard at work writing up the patterns for all the other inhabitants of my aquarium, including:
- The Graceful Jellyfish, with their elegant, trailing tentacles.
- The patient, colorful Starfish clinging to the rocks.
- A shy little Seahorse hiding among the coral.
- And a whole school of other unique crochet fish to make your aquarium feel truly alive!
These patterns will be released right here on the blog in the coming weeks. Be sure to subscribe to my newsletter or follow me on social media so you don’t miss out when they drop. Your crocheted ocean is about to get a whole lot bigger!
If you’d like to expand your underwater scene even further, here’s a complete original pattern you can crochet right now. This sea urchin adds realistic reef texture and helps transform your aquarium from decorative to immersive.
Bonus Free Pattern: Crochet Sea Urchin (Aquarium Decor)
To make your crochet aquarium feel like a real reef ecosystem, here’s a free Sea Urchin pattern you can crochet in under an hour. It’s the perfect filler piece to add depth and texture to your underwater scene.
 7")
This design creates a soft, rounded shell with raised French knot texture for a realistic sea-floor look.
Skill Level
Advanced Beginner
Finished Size
Approximately 4–5 inches in diameter
(Based on worsted weight yarn and a 4.0 mm / G-6 hook)
Materials
- Worsted weight (#4 Medium) acrylic yarn – main shell color
- Small amount of contrasting worsted weight yarn – for French knots
- 4.0 mm (US G-6) crochet hook
- Tapestry needle
- Stitch marker
- Scissors
- Polyester fiberfill stuffing
Yarn Recommendation
Medium (#4) acrylic yarn works best because it:
- Holds structure beautifully for 3D shapes
- Provides excellent stitch definition
- Maintains shape after stuffing
- Is durable and easy to care for
Cotton yarn may be substituted but will produce a slightly firmer, less elastic shell.
Gauge
Gauge is not critical for this project.
Work stitches tightly enough that stuffing does not show through.
Abbreviations (US Terms)
- ch – chain
- sc – single crochet
- ss – slip stitch
- inc – increase (2 sc in same stitch)
- dec – invisible decrease
- st(s) – stitch(es)
Construction Notes
- The shell is worked in continuous rounds (spiral).
- Do not join at the end of rounds unless instructed.
- Use a stitch marker to mark the first stitch of each round.
- Stuff firmly before the final decrease round.
Sea Urchin Shell Pattern Instructions
Round 1
Ch 10. Ss in first ch to form a ring.
Round 2
Inc in each st around.
(20 sts)
Round 3
Sc in next st, inc in next st — repeat around.
(30 sts)
Rounds 4–6
Sc in each st around.
(30 sts each round)
Round 7
Sc in next st, dec — repeat around.
(20 sts)
Round 8
Dec around.
(10 sts)
Stuff firmly at this stage.
Round 9
Ss in each st around.
Fasten off, leaving a long tail.
Using a tapestry needle, weave the tail through the front loops of the remaining stitches and pull tight to close the opening. Secure and weave in ends.
Gently shape into a smooth dome.
Adding the French Knot Texture
Now it’s time to create the signature sea urchin texture.
Using your accent yarn and tapestry needle:
- Add French knots evenly across the surface.
- Arrange knots with loose five-point symmetry around the center opening.
- Concentrate knots near the center and scatter outward.
- Use the cleaner side of the shell as the top.
How to Make a French Knot
- Bring the needle up through the fabric.
- Wrap yarn around the needle 2–3 times.
- Insert the needle back into the fabric close to the entry point (not the exact same hole).
- Gently pull through while holding the wraps in place.
Wrap Guide:
- 2 wraps = small knot
- 3 wraps = medium knot
- 4–5 wraps = bold, raised texture
Secure yarn ends inside the shell.
Finishing Tips
- Adjust stuffing before fully closing if needed.
- Shape gently with your hands to create a rounded shell.
- Keep knot placement organic — avoid making it overly symmetrical.
Natural sea urchins are imperfect — and that’s what makes them beautiful.
Conclusion: Your Ocean Awaits
From a simple ball of yarn to a breathtaking underwater world, the journey of creating a crochet aquarium is one of pure creative joy. You get to be the designer, the artist, and the marine biologist of a vibrant world that fits right on your wall. It’s a project that combines the mindful, relaxing practice of crochet with the endless beauty of the ocean, resulting in a unique piece of home decor that is guaranteed to be a conversation starter.
You don’t need a filter, a heater, or any complicated equipment. All you need is a hook, some colorful yarn, and a little bit of imagination. The ocean you create will always be bright, your fish will always be happy, and the only maintenance required is a gentle dusting now and then.
Are you ready to dive in and create your own maintenance-free masterpiece? Grab your free patterns, pick your favorite colors, and let’s start stitching! I can’t wait to see the incredible underwater worlds you bring to life. Be sure to tag me on social media to share your finished projects!
FAQ Section
I’ve gathered a few common questions to help you on your journey.
Is this project good for beginners?
Absolutely! While the full aquarium looks complex, it’s made up of individual, smaller projects. The free crochet patterns for the clownfish and blue tang are perfect for beginners who are familiar with basic amigurumi stitches like the magic ring, single crochet, and simple increases/decreases.
What’s the best yarn for amigurumi sea creatures?
I highly recommend 100% cotton yarn. It doesn’t stretch as much as acrylic, which means your creatures will hold their shape firmly, and it gives a beautiful, clean stitch definition. However, a good quality acrylic yarn will also work just fine.
How do I clean my crochet aquarium?
Since it’s enclosed in a shadow box, it should stay quite clean! If it does get dusty, avoid washing it. Instead, you can gently dust the outside of the frame. If the inside needs attention, use a can of compressed air (like you’d use for a keyboard) on a low setting or a very soft, dry paintbrush to gently wipe away any dust.
How long does it take to crochet one fish?
This can vary depending on your skill level. For an experienced crocheter, one fish might take an hour or two. If you’re a beginner, it might take a few hours as you get used to the pattern and techniques. The best part is, it’s a small, satisfying project that you can easily finish in one crafting session!