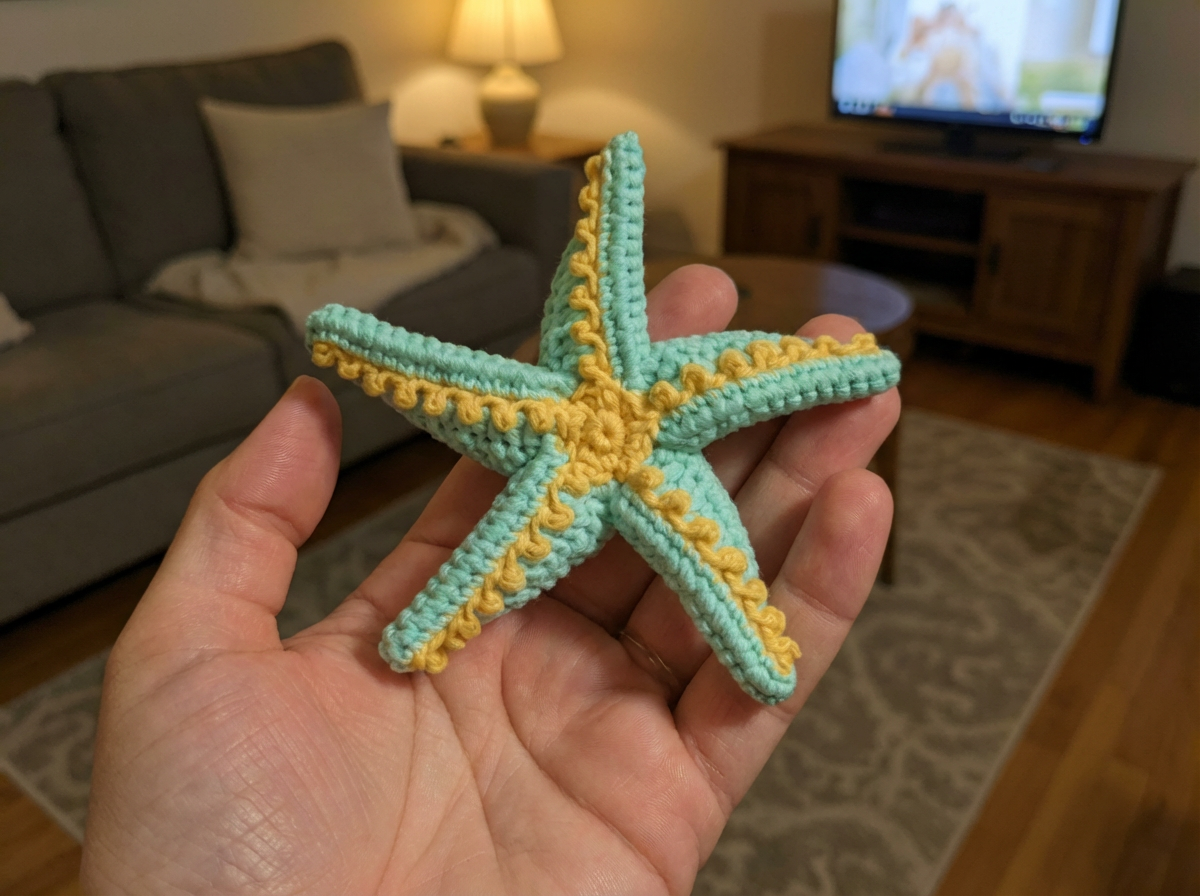
Starfish crochet pattern—I’m thrilled to share this delightful project that brings a piece of the ocean to life! Growing up, I spent countless summer days at the beach with my grandma, collecting seashells and marveling at starfish in tide pools. Those memories inspired me to create this charming starfish crochet pattern, a perfect addition to my aquarium-themed collection alongside my Free Crochet Octopus Pattern, Amigurumi Blue Tang, and Crochet Clownfish. With its soft pastel colors—Soft Apricot, Light Blue, and Mint—this beginner-friendly pattern is a fun way to practice special stitches like picot and standing stitch. Whether you’re decorating a nursery or crafting a gift, let’s dive into this sea-inspired adventure!
Pattern Details: A Beginner-Friendly Sea Star
This starfish crochet pattern is designed for beginners and intermediate crocheters, creating a plush starfish approximately 6 inches (15 cm) in diameter. Worked in rounds with single crochet and special stitches, it’s a great project to practice color changes and textured techniques. The starfish features a layered design with a Soft Apricot bottom, Light Blue top, and Mint accents, giving it a vibrant, three-dimensional look perfect for an aquarium-themed collection.
Materials Needed: Gather Your Supplies
Here’s what you’ll need to bring this starfish to life, just like I did for my ocean-inspired display:
- Crochet Hook: Size 2.5 mm
- Yarn: Sport weight yarn in three colors:
- Soft Apricot (Color A)
- Light Blue (Color B)
- Mint (Color C)
- Notions: Tapestry needle, stitch markers
- Optional: Small amount of fiberfill for light stuffing
Abbreviations: US Crochet Terms
I use standard US terminology for this starfish crochet pattern, making it easy to follow as you craft your sea star:
- rnd – round
- st – stitch
- ch – chain
- MR – magic ring
- slst – slip stitch
- sc – single crochet
- hdc – half double crochet
- dc – double crochet
- tr – treble crochet
- BLO – in back loop only
- *…* – repeat from * to * x times
Special Stitches
- Picot: ch 2, slst in back bump of first ch
- Standing Stitch: Attach the new yarn to the hook with a slip knot and then work the first stitch as usual
- Invisible Join: Break yarn and pull the yarn tail all the way through the stitch. Thread the yarn tail onto a needle, pull the yarn through both loops of the indicated stitch, then insert the needle into the back loop of the last stitch and pull the yarn through. Weave in the end.
Crochet Pattern Instructions: Step-by-Step Creation
Follow these steps to create your starfish with this starfish crochet pattern. It’s worked in rounds, so keep a stitch marker handy to track your progress!
Bottom (Soft Apricot)
Rnd 1: 10 sc in magic ring (tighten it) (10)
Rnd 2: Repeat the following sequence 5 times to form the arms:
- sc in next sc
- ch 15
- slst BLO in 2nd ch from hook
- picot
- slst BLO in next ch
- (slst BLO in next ch, picot, slst BLO in next ch) × 6
- sc in the same sc
- 2 sc in next sc
(5 arms)
Rnd 3:
sc in next sc, change to Light Blue, then repeat the following 5 times:
- sc in next 13 ch
- 2 sc in next ch
- skip next ch (turning chain)
- 2 sc BLO in next slst
- skip picot
- sc BLO in next 2 slst
- skip picot
- sc BLO in next 2 slst
- skip picot
- hdc BLO in next 2 slst
- skip picot
- hdc BLO in next 2 slst
- skip picot
- sc in next sc
(5 arms)
Note: When skipping a picot, hold the hook behind it and gently pull it outward to maintain the starfish’s shape.
Top (Light Blue)
Note: Insert your hook between the front loop and back loop, picking up the back loop and back bump for this section. (This creates a neat ridge for joining later.)
- Rnd 1: 10 sc in magic ring (tighten it) [10]
- Rnd 2: *sc in next sc, ch 15, (start in 2nd ch from hook) sc in next 14 ch, sc in same sc, 2 sc in next sc* 5x [5 arms]
- Rnd 3: sc in next sc, slst in next ch, ch 4 (counts as tr), tr in next 2 ch, dc in next 4 ch, hdc in next 2 ch, sc in next 4 ch, 2 sc in next ch, (turning ch is skipped) 2 sc in next sc, sc in next 13 sc, slst (work it very tight) in next sc, skip next 3 sc, *tr in next 3 ch, dc in next 4 ch, hdc in next 2 ch, sc in next 4 ch, 2 sc in next ch, (turning ch is skipped) 2 sc in next sc, sc in next 13 sc, slst (work it very tight) in next sc, skip next 3 sc* 3x, tr in next 3 ch, dc in next 4 ch, hdc in next 2 ch, sc in next 4 ch, 2 sc in next ch, (turning ch is skipped) 2 sc in next sc, sc in next 13 sc, slst in next sc and 4th ch of initial ch 4 together, fasten off

Finishing (Mint)
Place the bottom and top pieces together with wrong sides facing.
Using Mint yarn, begin joining the pieces by crocheting through both layers.
Start with a standing stitch in the first treble crochet (tr) of any arm. When working through both layers, you will have 4 loops on your hook—this is correct.
Joining Round:
- sc in next 14 sts
- 2 sc in next 2 sts
- sc in next 14 sts
- skip slst
Repeat from * to * 5 times.
Fasten off using an invisible join into the second single crochet.
Note:
If you notice small gaps between the initial treble crochets and the stitches from Round 2, use a tapestry needle to stitch them closed neatly. This helps maintain a clean, even edge.
Assembly: Bringing Your Starfish to Life
Once the bottom and top pieces are joined, your starfish is nearly complete.
Make sure the picot-textured side faces outward. If you’d like a more three-dimensional effect, lightly stuff the starfish with fiberfill before completing the final stitches.
Weave in all yarn ends securely and shape the starfish gently with your hands to finish.
Tips & Tricks: Make Crocheting Easier
Here are some tips I found helpful while working on this starfish crochet pattern, making the process smoother for you:
- Use stitch markers to track the start of each round, especially when switching colors.
- When skipping a picot, hold the hook behind it and pull it out slightly to maintain the starfish’s shape.
- Test your gauge with a 4×4 inch (10×10 cm) square—it should be approximately 20 stitches wide and 24 rows tall. Adjust your hook if needed.
- Lightly stuff the starfish before joining for a plush, three-dimensional effect.
- Practice the picot stitch on a swatch to perfect the texture before starting the pattern.
- Keep this free starfish crochet pattern sheet nearby to quickly check abbreviations and special stitches.
I’m so excited to have shared this starfish crochet pattern with you—it’s a charming project that captures the beauty of the ocean! I’d love to see your finished starfish, so share it in MY GROUP. Explore more sea-inspired patterns in my collection to grow your aquarium-themed collection!
Frequently Asked Questions
What yarn is best for this starfish crochet pattern?
I recommend sport weight yarn for its balance of drape and structure. Soft Apricot, Light Blue, and Mint create a beautiful ombre effect, but you can use any sport weight yarn for similar results.
How do I make the picot stitches for the starfish?
To create a picot, chain 2 and slip stitch into the back bump of the first chain. This forms a small loop that adds texture to the starfish’s arms, as detailed in this starfish crochet pattern.
Can I use a different hook size for this starfish crochet pattern?
Yes, but it will affect the size. I used a 2.5 mm hook for a 6-inch starfish. A larger hook (e.g., 3.0 mm) will make a bigger starfish; a smaller hook (e.g., 2.0 mm) will make it smaller. Test your gauge to ensure the desired size.
How do I join the bottom and top parts of the starfish?
Place the bottom and top pieces together, wrong sides facing, and use Mint yarn to crochet through both layers with single crochet stitches, as outlined in the finishing section of this starfish crochet pattern.
What is the best way to block a crochet starfish?
Lightly steam your starfish only if you are using cotton or wool yarn, keeping the iron on a low setting and hovering just above the surface—do not touch the yarn directly.
Alternatively, wet block the starfish by soaking it in water, gently squeezing out excess moisture, and shaping it flat while it dries. This method is safe for all yarn types and helps enhance the starfish’s shape and texture.
Note: If you are using acrylic yarn, avoid heat and use wet blocking only to prevent melting.