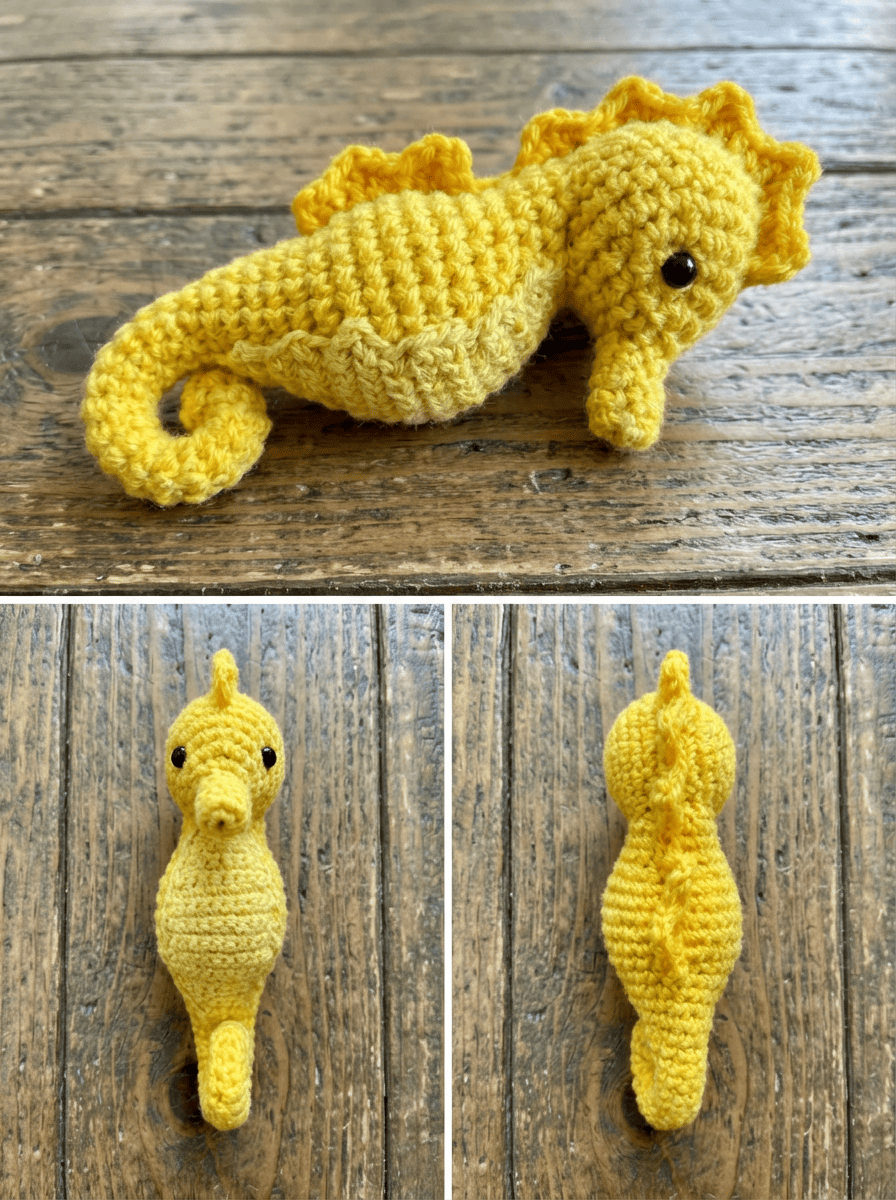
There is something truly magical about seahorses. With their gentle, curling tails, horse-like heads, and the graceful way they drift through the water, they seem like creatures straight out of a fairytale. Capturing that unique elegance in crochet is a wonderfully rewarding project, resulting in a charming amigurumi friend that brings a touch of ocean magic to any room or collection.
If you’ve been searching for the perfect crochet seahorse pattern, you’ve come to the right place. Today, I am so excited to share my complete, free pattern for this adorable amigurumi seahorse. This is one of my favorite designs, and I’ve packed it with details to help you create a stunning and professional-looking finished toy.
This intermediate-level pattern is a joy to create, featuring a unique construction that works from the tip of the tail all the way to the head in one continuous piece. We’ll even use a pipe cleaner to give that iconic tail its perfect, sturdy curl, making your seahorse wonderfully posable.
Whether you’re adding it to your crochet aquarium collection or making it as a special gift, this pattern will guide you every step of the way. So, let’s dive in!
The Free Amigurumi Seahorse Pattern
Here is the complete, detailed pattern to create your very own crochet seahorse. I’ve structured it in clear sections to make the process as easy and enjoyable as possible. First, let’s go over everything you’ll need.
Pattern Overview & Supplies
- Crochet Level: Intermediate
- Language: US Terms
- Construction: Worked in continuous spiral rounds, starting from the tail and ending at the head.
Supplies You’ll Need
- Yarn:
- Color A (Body): Paintbox Cotton Aran – Buttercup Yellow (623)
- Color B (Snout & Belly): Paintbox Cotton Aran – Mustard Yellow (624)
- Hooks:
- F / 3.75 mm crochet hook – for the main body
- D / 3.25 mm crochet hook – for the snout, belly panel, fins, and crest
- Notions:
- 6mm safety eyes
- Black embroidery thread – for the smile
- Scissors
- Yarn needle
- Stuffing (polyfill)
- 3″ pipe cleaner (ends folded inward for safety)
Abbreviations
This pattern uses standard US crochet terms. Here is a quick reference for all the abbreviations used.
| Term | Meaning |
|---|---|
| st(s) | stitch(es) |
| sc | single crochet |
| inc | increase (2 sc in same stitch) |
| dec | decrease (sc 2 together) |
| ch | chain |
| sl st | slip stitch |
| hdc | half double crochet |
| FLO | front loop only |
| BLO | back loop only |
| […] x n | repeat sequence inside brackets n times |
Pattern Instructions
Body & Tail (Color A – Buttercup Yellow)
Use your 3.75 mm hook and work in continuous rounds, starting from the tip of the tail.
R1: 6 sc in magic ring (6)
R2: [inc, sc] x3 (9)
R3: sc around (9)
R4: [inc, 2 sc] x3 (12)
R5: sc around (12) — Insert the folded pipe cleaner now.
R6: [inc, 3 sc] x3 (15)
R7: [inc, 4 sc] x3 (18)
R8: sc around (18)
R9: [inc, 5 sc] x3 (21)
R10–11: sc around (21)
R12: [dec, 5 sc] x3 (18)
R13: [dec, 4 sc] x3 (15)
R14: sc around (15)
R15: [dec, 3 sc] x3 (12)
R16: sc around (12)
Start increasing for the belly:
R17: [inc, sc] x6 (18)
R18: [inc, 2 sc] x6 (24)
R19: [inc, 3 sc] x6 (30)
R20–21: sc around (30)
R22: [3 sc, inc] x6 (36)
R23–25: sc around (36)
Belly Panel (Color B – Mustard Yellow)
Use your 3.25 mm hook and work flat to create the ribbed texture.
Row 1: ch 14, join with a sl st to form a ring.
Row 2: Ch 1, 14 sc around. Join with a sl st. (14)
Row 3-5: Ch 1, sc in BLO around. Join with a sl st. (14)
Fasten off, leaving a long tail for sewing.
Continue Body into Neck / Head (Color A)
Return to your main piece. Stuff the tail and lower body firmly before continuing.
R26: [inc, 4 sc] x6 (42)
R27–29: sc around (42)
R30: [4 sc, dec] x6 (36)
R31: [3 sc, dec] x6 (30)
R32: [2 sc, dec] x6 (24)
R33: [sc, dec] x6 (18)
R34: [dec] x6 (12) — This shapes the neck.
R35: sc around (12)
Head (Color A)
Continue from the neck.
R36: [inc, sc] x6 (18)
R37: [inc, 2 sc] x6 (24)
R38: [inc, 3 sc] x6 (30)
R39–41: sc around (30)
➤ Place 6mm safety eyes between R39–R40, approximately 6–7 sts apart.
R42: [3 sc, dec] x6 (24)
R43: [2 sc, dec] x6 (18)
R44: [sc, dec] x6 (12) — Lightly stuff the neck and head now.
Do not fasten off. Leave the hole open for attaching the snout.
Snout (Color B – Mustard Yellow)
Use your 3.25 mm hook and work in joined rounds.
R1: 6 sc in magic ring (6)
R2–4: sc around (6)
Stuff lightly and fasten off with a long tail.
Back Crest / Dorsal Fin (Color A)
Use your 3.25 mm hook and work in rows.
Row 1: ch 15.
Row 2: Starting in the 3rd ch from the hook, work [5 hdc in the same st, sk 1, sl st]. Repeat this sequence to the end of the chain.
Fasten off, leaving a long tail.
Side Fins (Make 2 – Color A)
Use your 3.25 mm hook.
Row 1: ch 5.
Row 2: In the 3rd ch from the hook, work 5 hdc. Skip the next ch, sl st in the last ch.
Fasten off, leaving a long tail.
Assembly & Finishing
This is where your seahorse truly comes to life! Follow these steps carefully to assemble all the pieces into a beautiful, finished amigurumi.
- Sew the Belly Panel: Using the long tail from the panel, position it centered under the main body. Sew it on securely, running from the base of the tail (around R16) up to the lower neck (just under R25).
- Attach the Snout: Take the finished snout and sew it onto the front of the head. Use the open hole from the head to help you center it perfectly between the safety eyes.
- Attach the Dorsal Crest: Position the wavy crest along the back of the seahorse, running from the back of the head down towards the middle of the tail. Sew it on carefully so that it stands upright.
- Attach the Side Fins: Sew one fin on each side of the body. A good placement is around rounds R22–R24.
- Shape the Tail: Now, gently but firmly bend the tail around the internal pipe cleaner to create that classic, elegant seahorse curl.
- Add a Smile: Using a small piece of black embroidery thread, embroider a tiny, simple smile just under the snout. This step is optional but adds a lot of personality!
- Final Touches: Weave in any remaining ends securely and trim them. Your amigurumi seahorse is now complete!
Crochet Seahorse Tips & Tricks
You’ve got the pattern, but you might have a few more questions. This section is designed to be a deep dive into the common queries that can come up during an amigurumi project. Let’s get you all the answers you need to make your seahorse absolutely perfect.
How Much Yarn Do You Need to Crochet a Seahorse?
For an amigurumi project of this size, you generally won’t need a huge amount of yarn, which is great news for your yarn stash! As a safe estimate, one 50g skein of each color is more than enough.
You will use more of the main body color (Color A) than the accent color (Color B), but you’ll still have plenty left over for other small projects or to add another creature to your ocean collection. Cotton aran yarn is dense, so a little goes a long way.
What Are the Best Yarn Colors for Ocean-Themed Amigurumi?
While I used bright and mustard yellows for a sunny, cheerful look, seahorses are nature’s chameleons and come in every color of the rainbow! Don’t feel limited. Consider these stunning ocean-themed palettes for your projects:
– Cool & Calming Tones: A beautiful mix of seafoam green, turquoise, and deep navy blue can create a very serene and realistic look.
– Warm & Tropical Tones: Think of a coral reef. Use coral pink, sandy beige, and a pop of bright orange or red for a vibrant, tropical feel.
– Realistic & Natural Tones: For a more naturalistic seahorse, use earthy browns, muted tans, and off-whites. You can even use a variegated brown yarn to mimic natural camouflage.
Safety Eyes vs. Embroidery — Which Is Better for Seahorses?
This is an important question that comes down to one thing: safety.
Safety Eyes are my top choice for amigurumi that will be used for decoration or given to children over the age of three. They provide a clean, professional, and shiny look that really brings the creature to life.
Embroidery is the only safe option for babies and toddlers. Since safety eyes can be a choking hazard, you should always embroider the eyes with black thread if the toy is for a young child. It also gives the seahorse a wonderfully rustic, completely handmade charm.
How Do You Make Your Seahorse Stand Up and Be Sturdy?
A floppy seahorse is no fun! The key to a sturdy, posable seahorse lies in two crucial steps already built into the pattern:
The Pipe Cleaner: This is the secret weapon! By inserting the folded pipe cleaner into the tail as you crochet, you create an internal armature. This allows you to bend the tail into that perfect, elegant curl, which then acts as a stable base for the seahorse to stand on.
Firm Stuffing: Don’t be shy with the polyfill! A firmly stuffed body, especially at the base of the tail and in the neck, prevents it from ecoming floppy and helps it hold its shape beautifully.
How Can You Turn Your Seahorse Into a Keychain, Mobile, or Bag Charm?
This is a fantastic idea for turning your creation into a gift or accessory! To adapt the pattern for a smaller size, the key is to use a much lighter yarn and a smaller hook.
For a Keychain/Charm: Try using a fingering or sport-weight yarn with a correspondingly tiny hook (e.g., 1.75mm – 2.25mm). This will create a perfect miniature version. Once finished, simply attach a keychain ring to the top of its head or back crest.
For a Nursery Mobile: Make several seahorses in different pastel colors. Use invisible thread and a darning needle to loop a long strand through the top of each one’s back crest. Tie them at varying heights to a mobile hanger or a simple wooden embroidery hoop for a beautiful, handmade baby gift.
What Are the Best Hooks for Amigurumi? A Beginner Guide
The most important rule for amigurumi is to use a hook that is one or two sizes smaller than your yarn label recommends. For this pattern, we use a 3.75mm hook for an aran weight yarn, which would normally suggest a 5mm hook. Why? This creates a very tight fabric with no holes, so the white stuffing doesn’t show through.
For Beginners: Simple, affordable aluminum hooks (like those from Boye or Susan Bates) are a perfect starting point.
For Comfort: If you plan on crocheting for long sessions, consider investing in ergonomic hooks with soft, built-up handles (from brands like Clover Amour or Tulip Etimo). They can significantly reduce hand strain.
Dive Deeper: More Free Ocean Crochet Patterns
If you loved making this seahorse, why not create a whole ocean of friends to join him? Building a complete crochet aquarium is a wonderfully satisfying long-term project. I am dedicated to creating patterns for all my sea creatures so you can expand your collection.
Continue your underwater adventure today with more of my free patterns:
- Free Crochet Clownfish Pattern
- Amigurumi Blue Tang Free Crochet Pattern
- How to Crochet a Fish (Beginner Guide)
- Free Starfish Crochet Pattern
Conclusion: Your Underwater Friend Awaits
There is a unique sense of accomplishment that comes from turning a simple skein of yarn into a three-dimensional creature with so much personality. This crochet seahorse, with its elegant posture and charming details, is more than just a toy—it’s a small piece of art that you brought to life with your own hands. I hope you’ve enjoyed this pattern and feel inspired to continue your amigurumi journey.
Now that you have all the steps, your own beautiful, handcrafted seahorse is just a few stitches away. Happy crocheting!
I would absolutely love to see your finished creation! If you’ve made a seahorse from this pattern, please consider sharing a photo. And if you’re looking for a friendly, welcoming place to share your projects, ask questions, and connect with other crocheters, please come and join my Facebook Group! We’d be thrilled to have you.