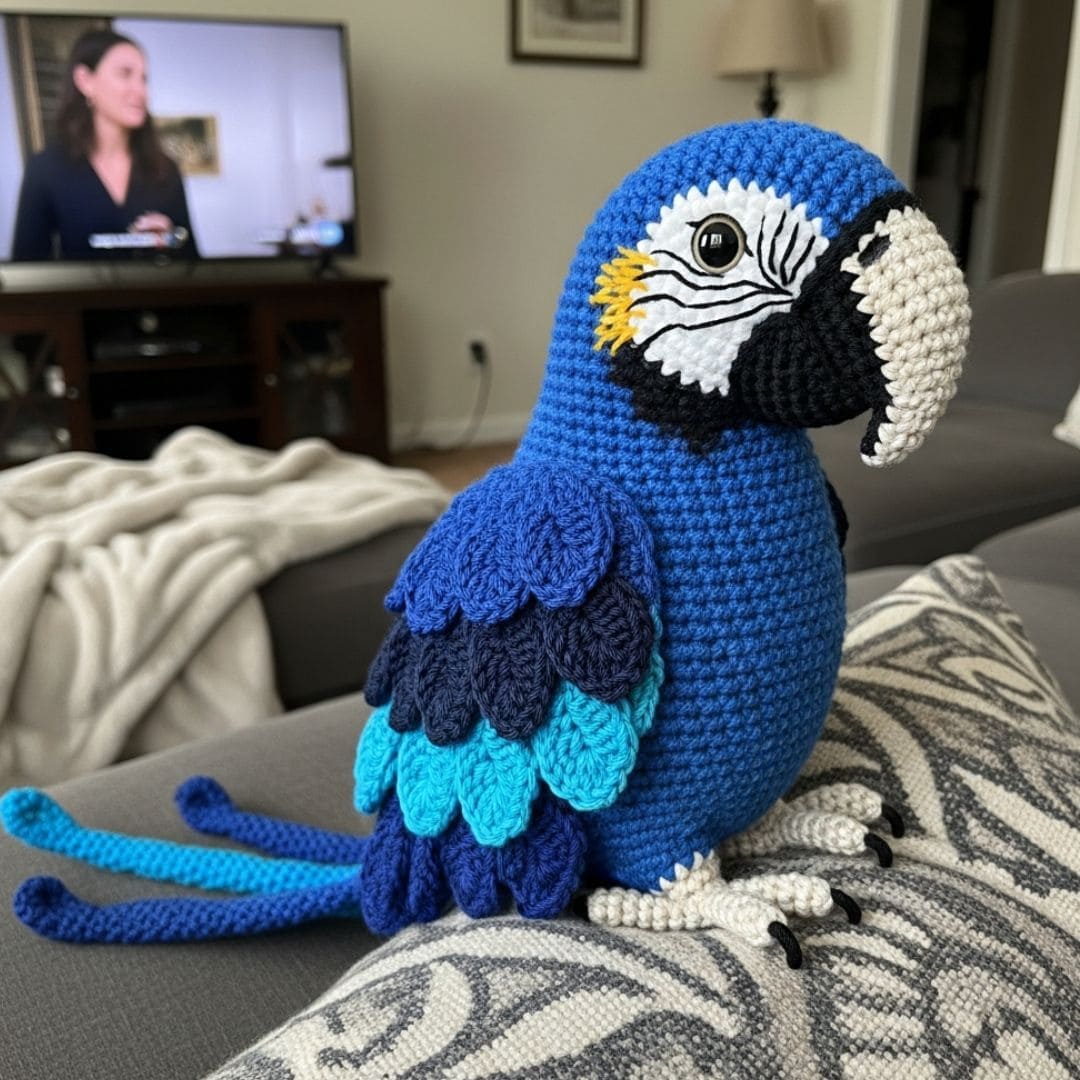
There’s something magical about crafting with yarn. And when your hook turns strands of blue and teal into a vibrant parrot plush that looks ready to squawk hello—that’s crochet joy at its finest.
This crochet parrot pattern captures the stunning beauty of a real Blue Macaw, with lifelike shaping, layered feathers, and charming details. Whether you’re a bird lover, searching for a playful handmade gift, or adding a bold piece to your amigurumi collection, this project is a true show-stopper full of personality and charm.
Perfect for intermediate crocheters (or confident beginners), this pattern lets you explore shaping, color changes, and simple embroidery techniques. Using cozy bulky yarn and a bit of stuffing, you’ll bring this tropical treasure to life—a plush that’s just as fun to make as it is to cuddle.
This macaw makes a beautiful handmade gift, cheerful nursery décor, or a colorful shelf companion. While the original design uses classic, parrot-inspired colors, you’re always welcome to experiment and create your own bird-inspired masterpiece.
Materials Used
Here’s everything you’ll need to create your own Blue Macaw:
Yarn: Bulky weight (category 5 or 6), solid colors only
- Bright Blue – body
- Dark Navy Blue – top wing feathers
- Medium Teal – middle wing feathers
- Light Aqua – lower wing feathers
- Royal Blue – tail feathers
- White – facial patch & part of beak base
- Black – beak, eye details, claw tips
- Yellow – eye accents
- Light Cream / Off‑White – beak base & feet
Hook: 6.5 mm (K‑10.5)
Stuffing: Polyester fiberfill
Safety Eyes: 18 mm black with white highlight (or embroidered eyes)
Always supervise children under 3 when using handmade toys.
Tapestry Needle (for sewing/embroidery)
Stitch Markers
🧡 Feel free to substitute yarn brands or shades — use your favorite bulky yarns as long as the weight is consistent.
Size & Gauge
- Finished Size: ~ 16–18 inches (40–46 cm) tall
- Gauge: 8 sc × 9 rows = 4″ in single crochet (tight tension), using 6.5 mm hook
Skill Level
Intermediate — but approachable for confident beginners who are comfortable working basic stitches in rounds and following shaping instructions.
Main Stitches & Abbreviations Used
This pattern uses basic stitches and standard amigurumi shaping techniques. Below are the stitches/terms and their abbreviations (US terminology):
| Abbreviation | Stitch / Term |
|---|---|
| MR | Magic Ring (Magic Circle) |
| sc | Single Crochet |
| inc | Increase — 2 sc in the same stitch |
| dec | Decrease — sc2tog (single crochet two together) |
| st / sts | Stitch / Stitches |
| sl st | Slip Stitch |
| ch | Chain |
| ch(s) | Chains (plural) |
| FO | Fasten Off (finish work) |
| rnd / rnds | Round / Rounds |
Complete Crochet Pattern – Blue Macaw Parrot Plush
Pattern Name: Blue Macaw Parrot Plush
Finished Size: Approx. 16–18 inches tall (40–46 cm) when made with bulky yarn
1. Head & Body (one piece)
With Bright Blue:
Work in continuous rounds. Use a stitch marker to mark the beginning of each round.
- Rnd 1: MR, 6 sc (6)
- Rnd 2: inc in each st around (12)
- Rnd 3: (sc, inc) around (18)
- Rnd 4: (2 sc, inc) around (24)
- Rnd 5: (3 sc, inc) around (30)
- Rnd 6: (4 sc, inc) around (36)
- Rnd 7: (5 sc, inc) around (42)
- Rnds 8–18: sc around (42)
Begin decreasing:
- Rnd 19: (5 sc, dec) around (36)
- Rnds 20–21: sc around (36)
- Rnd 22: (4 sc, dec) around (30)
- Rnds 23–24: sc around (30)
- Rnd 25: (3 sc, dec) around (24)
- Rnds 26–27: sc around (24)
- Rnd 28: (2 sc, dec) around (18)
- Rnd 29: (1 sc, dec) around (12)
- Rnd 30: dec around (6)
Finish:
Fasten off. Stuff firmly. Close the opening and weave in ends securely.
2. Beak (2 parts)
Upper Beak (Black)
- Rnd 1: MR, 6 sc (6)
- Rnd 2: (sc, inc) around (9)
- Rnd 3: sc around (9)
- Rnd 4: 2 sc, dec, dec, 1 sc (7)
- Rnd 5: sc around (7)
Finish:
Fasten off, leaving a long tail for sewing.
Lower Beak (Light Cream)
- Rnd 1: MR, 6 sc (6)
- Rnd 2: (sc, inc) around (9)
- Rnd 3: sc around (9)
Finish:
Fasten off. Sew the lower beak directly beneath the upper beak.
3. Face Patch & Eyes
- Cut two oval patches from white felt and attach them to the face.
- Embroider thin black lines across each patch to mimic parrot facial striping.
- Insert safety eyes at the center of each patch (or embroider black eyes with a small white highlight).
- Add small yellow accent stitches near the eyes using surface embroidery.
4. Wings (make 2, worked from top to tip)
Colors: Dark Navy Blue → Medium Teal → Light Aqua
Work in continuous rounds.
- Rnd 1: MR, 6 sc (6)
- Rnd 2: (sc, inc) around (9)
- Rnd 3: (2 sc, inc) around (12)
- Rnds 4–5: sc around (12)
Switch to Medium Teal
- Rnds 6–8: sc around (12)
Switch to Light Aqua
- Rnds 9–11: sc around (12)
Finish:
Flatten the wing. Slip stitch across the opening to close.
Fasten off, leaving a long tail for sewing.
5. Tail Feathers (make 3)
Color: Royal Blue
Worked flat in rows.
- Foundation: ch 13
- Row 1: sc in 2nd ch from hook and across (12)
- Rows 2–9: sc across (12)
Finish:
Fasten off. Gently shape the tip to taper slightly.
Sew the three feathers to the back of the body in a fan arrangement.
6. Legs & Feet (make 2)
Start with Light Cream
- Rnd 1: MR, 6 sc (6)
- Rnd 2: (sc, inc) around (9)
- Rnds 3–5: sc around (9)
Switch to Black (Claw Tips)
- Rnds 6–9: sc around (9)
Finish:
Flatten the piece and slip stitch to close.
Fasten off, leaving a tail for sewing.
Sew the legs to the underside of the body.
7. Assembly Instructions
- Attach beak to front of face, upper over lower.
- Sew face patches and embroider facial lines.
- Insert and secure safety eyes.
- Sew wings to sides, feathers downward.
- Attach tail feathers evenly to back.
- Sew legs under body.
- Add final shaping by stuffing lightly and shaping parts.
8. Finishing Touches
- Use a soft brush to fluff yarn for a feathery effect.
- Lightly steam or pin tail and wings for a natural curve.
- Embroider any missing color touches or details.
Customization Tips
- Swap color palette to mimic other birds — cockatoos, parrots, fantasy birds.
- Use soft-brushed yarn or fluff the finished plush for texture.
- Substitute embroidered eyes for safety eyes.
- Adjust size using different hook/yarn.
- Add armature (wire) for advanced poseability.
Once you’ve completed your macaw — whether in original or custom colors — we’d love to see it!
Frequently Asked Questions
Where can I find the best crochet parrot pattern?
You’ll find some of the best crochet parrot patterns from indie designers on Etsy, Ravelry, and Pinterest. But if you’re looking for something realistic, detailed, and free — this Blue Macaw Parrot Plush pattern is a standout!
Are there free crochet parrot patterns available?
Yes! This blog features a free crochet parrot pattern for a stunning Blue Macaw plushie. It’s perfect for intermediate crocheters who want a bold, eye-catching project without paying a cent.
What is the best crochet parrot kit?
The best kits include bulky yarn in the correct colors, a 6.5 mm hook, safety eyes, stuffing, and a printed pattern. While this project doesn’t come in a ready-made kit, you can easily create your own kit by gathering the materials listed above.
Can beginners crochet a parrot?
Yes, confident beginners can absolutely follow this crochet parrot pattern — just be comfortable with basic stitches like single crochet, increasing, decreasing, and working in the round. Patience and color changes are key!