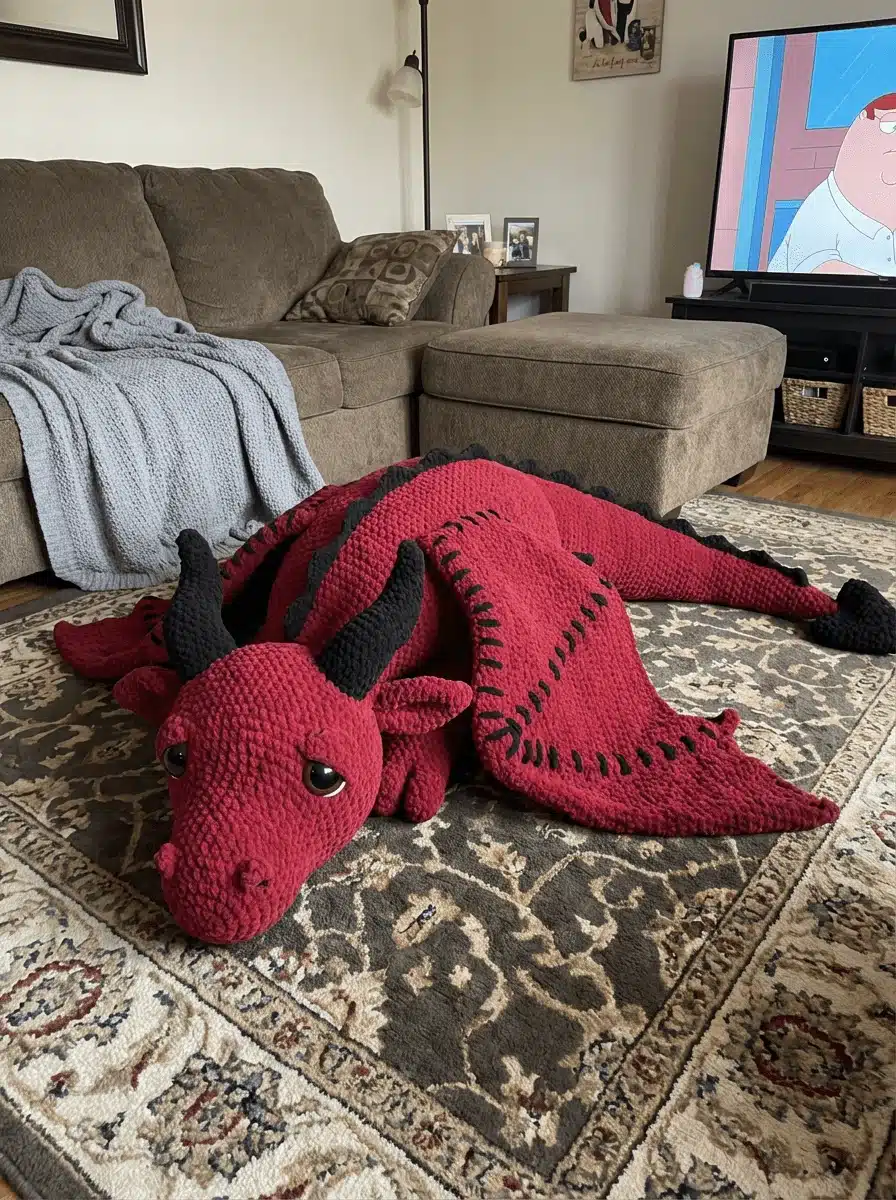
I’ve always found something special about sleeping creatures, especially mythical ones. It’s a peaceful, unguarded moment, and I wanted to capture that feeling in yarn. That’s how this pattern was born: a sweet, curled-up crochet baby dragon, lost in sweet dreams.
Today, I’m so excited to share my free pattern for this little friend with you. We’re going to make this adorable amigurumi together, step by step. What I really love about this design is that the head, body, and tail are all worked in one continuous piece. This means much less sewing at the end, which is always a bonus in my book.
I’ve rated this pattern as intermediate because it has some fun shaping techniques and several small parts to attach. The real magic comes together in the final steps, when we curl the tail and stitch it in place to create that perfect, sleepy pose.
So, if you’re ready, grab your yarn in your favorite dragon colors. Let’s get started on this sweet, dreaming creature.
The Free Sleeping Baby Dragon Crochet Pattern
Here is the complete pattern to make your own sleeping baby dragon. I’ve written it out with all my notes to guide you. It’s an intermediate pattern, so take your time and enjoy the process!
Pattern Overview & Materials
Finished Size
Your dragon will be approximately 10–12 cm (4–5 in) long when it’s curled up, but this can vary depending on the yarn you pick and how tightly you crochet.
Skill Level
Intermediate. This pattern assumes you’re already comfortable with amigurumi basics. You’ll need to feel good about shaping, sewing small parts, and doing a bit of embroidery.
Materials
- 8-ply / DK yarn:
- Main Color (MC): Orange (for the body)
- Contrast Color 1 (CC1): Cream (for feet, horns, and the belly patch)
- Contrast Color 2 (CC2): Yellow (for spikes, tail tip, and side horns)
- A small amount of black yarn for embroidering the eyes and nose
- Crochet hook: 3.5 mm
- Polyester fiberfill stuffing
- Stitch marker
- Tapestry needle
- Scissors
- Straight pins (I always recommend these for placing parts before you sew them)
If this dragon is intended for a child under 3 years old, avoid safety eyes and use embroidery only.
Finding the Best Yarn for Your Baby Dragon
Picking the right yarn is a fun part of any project. For a soft but sturdy toy like this baby dragon, a good DK weight cotton or cotton-blend is my top choice, as that’s what the pattern is designed for. However, you can change the yarn weight to make your dragon bigger or smaller!
Here’s a comparison of some great yarn options, including DK weights and other popular choices.
| Yarn | Fiber Content | Feel & Performance | Best For… |
|---|---|---|---|
| Paintbox Yarns Cotton DK | 100% Cotton | Smooth, great stitch definition, huge color selection. Very durable. | Getting the exact colors you want for a classic amigurumi look. |
| Scheepjes Softfun | 60% Cotton, 40% Acrylic | Very soft with a slight fuzz, but still sturdy and smooth to work with. | A dragon that is both soft to the touch and durable enough for gentle play. |
| Lion Brand Coboo | 50% Cotton, 50% Bamboo | Very soft with a slight drape and a nice sheen. Feels a bit “plush” to the touch. | A cuddlier dragon or if you prefer a yarn with a lovely drape. |
| Spotlight 8-Ply Yarns (e.g., Moda Vera) | Varies (Acrylic or Cotton Blends) | A reliable and very budget-friendly choice often found in Australia/NZ. Great color range. | An accessible option, perfect for practicing the pattern or making many dragons. |
| Lion Brand Vanna’s Choice (Worsted) | 100% Acrylic | Soft, durable, and easy to find. Machine washable, making it practical. | A slightly larger, very durable dragon that can hold up to more handling. |
| Bernat Blanket Yarn (Super Bulky) | 100% Polyester | Extremely soft and plush, works up incredibly fast with a large hook. | A giant, super cuddly baby dragon that’s perfect for snuggling. |
Abbreviations & Notes
Abbreviations (US Terms)
I write all my patterns using standard US crochet terms. Here is a quick reference:
- MR = Magic Ring
- sc = Single Crochet
- inc = Increase (work 2 sc in the same stitch)
- dec = Invisible Decrease
- ch = Chain
- sl st = Slip Stitch
- st(s) = Stitch(es)
Important Notes
- I work in continuous rounds for this pattern, which means you do not join at the end of each round.
- Always use a stitch marker to mark the first stitch of each round. This really helps keep you on track.
- Stuff firmly, but do not overstretch stitches. You want your dragon to be nice and plump, but you don’t want the stuffing showing through.
- Stuff the tail lightly so it remains flexible for curling. This is key for getting that perfect sleeping pose later on.
The Pattern Instructions
Now we get to the fun part! We’ll start with the main piece, which is the head, body, and tail all worked together.
MAIN BODY (HEAD → BODY → LONG TAIL)
Worked in one continuous piece, starting at the head with your Main Color (MC).
Head (MC – Orange)
Rnd 1: 6 sc in MR (6)
Rnd 2: inc × 6 (12)
Rnd 3: (sc, inc) × 6 (18)
Rnd 4: (2 sc, inc) × 6 (24)
Rnd 5: (3 sc, inc) × 6 (30)
Rnd 6: sc around (30)
Rnd 7: (4 sc, inc) × 6 (36)
Rnd 8–9: sc around (36)
Rnd 10: (10 sc, dec) × 3 (33)
Rnd 11: sc around (33)
Rnd 12: (9 sc, dec) × 3 (30)
Begin stuffing the head firmly.
Rnd 13: (3 sc, dec) × 6 (24)
Rnd 14: (2 sc, dec) × 6 (18)
Rnd 15: sc around (18)
Body (continue in MC)
Rnd 16: (2 sc, inc) × 6 (24)
Rnd 17: sc around (24)
Rnd 18: (3 sc, inc) × 6 (30)
Rnd 19: sc around (30)
Rnd 20: (4 sc, inc) × 6 (36)
Rnd 21–22: sc around (36)
Begin stuffing the body (aim for a firm back, but a slightly softer belly).
Body Taper
Rnd 23: (5 sc, inc) × 6 (42)
Rnd 24: sc around (42)
Rnd 25: (5 sc, dec) × 6 (36)
Rnd 26: sc around (36)
Rnd 27: (4 sc, dec) × 6 (30)
Rnd 28: sc around (30)
Rnd 29: (3 sc, dec) × 6 (24)
Long Tail
Stuff lightly from here on.
Keep the tail flexible so it can curl naturally later.
Rnd 30: sc around (24)
Rnd 31: (2 sc, dec) × 6 (18)
Rnd 32: sc around (18)
Rnd 33: (sc, dec) × 6 (12)
Rnd 34–35: sc around (12)
Continue tapering evenly:
Rnd 36: (2 sc, dec) × 3 (9)
Rnd 37: sc around (9)
Rnd 38: (sc, dec) × 3 (6)
Rnd 39–40: sc around (6)
Change to Yellow (CC2).
Rnd 41–43: sc around (6)
Fasten off.
Close the opening by threading the yarn through the front loops of the final round and pulling tight. Weave in the end securely.
HIND LEGS (Make 2)
Upper Thigh (MC)
Rnd 1: 6 sc in MR (6)
Rnd 2: inc × 6 (12)
Rnd 3: (2 sc, inc) × 4 (16)
Rnd 4: sc around (16)
Lightly stuff. Attach the back half of each thigh to the body near the tail base.
Lower Leg (CC1 → MC)
Start with Cream (CC1).
Rnd 1: 6 sc in MR (6)
Rnd 2–3: sc around (6)
Change to MC.
Rnd 4–7: sc around (6)
Lightly stuff. Sew to the front underside of each thigh.
FRONT LEGS (Make 2)
Start with Cream (CC1).
Rnd 1: 5 sc in MR (5)
Rnd 2: inc × 5 (10)
Rnd 3: sc around (10)
Rnd 4: (3 sc, dec) × 2 (8)
Change to MC.
Rnd 5: sc around (8)
Rnd 6: (2 sc, dec) × 2 (6)
Rnd 7–11: sc around (6)
Lightly stuff lower half only. Sew near the head, angled inward.
HORNS & HEAD DETAILS
Top Horns (Make 2 – Cream)
Rnd 1: 5 sc in MR (5)
Rnd 2: (sc, inc) × 2, sc (7)
Rnd 3: sc around (7)
Fasten off, do not stuff. Sew on top of the head, angled back.
Side Horns – Large (Make 2 – Yellow)
Rnd 1: 5 sc in MR (5)
Rnd 2–3: sc around (5)
Fasten off, leave long tail.
Side Horns – Small (Make 2 – Yellow)
Rnd 1: 4 sc in MR (4)
Rnd 2: sc around (4)
Fasten off, leave long tail.
SPINE SPIKES (Make 5 – Yellow)
Rnd 1: 5 sc in MR (5)
Rnd 2: (sc, inc) × 2, sc (7)
sl st to the next st, then fasten off, leaving a long tail.
BELLY PATCH (Make 1 – Cream)
Work in continuous rounds around a foundation chain.
Ch 5
Rnd 1:
Sc in 2nd ch from hook, sc in next 2 ch, 3 sc in last ch;
working on the opposite side of the chain: sc in next 2 ch, 2 sc in last ch (10)
Rnd 2:
Inc in first st,
sc in next 2 sts,
inc in next 3 sts (work 2 sc in each of the next 3 sts),
sc in next 2 sts,
inc in last 2 sts (16)
Sl st to first st to finish round.
Fasten off, leaving a long tail for sewing.
Assembly and Finishing
This is where your little dragon’s personality truly comes to life. Take your time with these steps. I always recommend using straight pins to place all the parts before you sew them on. This lets you check the symmetry and positioning from all angles.
Curl Locking (Creating the Pose)
This is the most important step for achieving that sweet, sleepy look.
- Curve the long tail forward so it rests along the dragon’s belly, creating a natural curl.
- Position the tail tip to the upper chest of the main body, finding a spot where it looks perfectly nestled.
- Pin the tail tip in place. Add 2–3 small support stitches along the belly underside where the tail lays for added stability.
- Sew gently using small whip stitches. Do not pull too tight, as this can distort the body. You want it to look natural and soft. Secure your yarn and weave in the ends.
Face Embroidery
Using your black yarn and a tapestry needle:
- Eyes: Create each eye using two short, angled stitches that meet to form a gentle curve. Place them where you imagine sleepy eyelids would be, a few rounds above the snout.
- Nose: Add two tiny angled stitches on the front of the snout area to suggest nostrils.
- Secure your yarn inside the head and hide the ends.
Attaching the Legs
- Hind Legs: First, sew the lower leg piece to the front underside of each upper thigh piece to complete the hind legs. Then, attach the back half of each completed hind leg to the main body near the tail base. Make sure they are symmetrical when the dragon is curled.
- Front Legs: Sew the front legs to the body just below and slightly behind the head. I like to angle them inward slightly, as if the dragon is hugging itself in its sleep.
Attaching Horns and Spikes
- Top Horns: Sew the two cream-colored horns on top of the head. Position them slightly forward and angled back for a classic look.
- Side Horns: Sew the large yellow side horns on each side of the head, just below the top horns. Then, sew the small yellow side horns directly beneath the larger ones.
- Spine Spikes: Fold each of the 5 spike circles in half lengthwise to create a soft rounded shape. Sew them evenly along the dragon’s spine, starting from the back of the head and ending around Rnd 32–34 of the tail section.
Attaching the Belly Patch
Pin the cream-colored belly patch so it’s perfectly centered on the dragon’s chest, right between where the front legs are attached. Sew it on using the yarn tail.
Final Touches
Take one last look at your dragon. Check its symmetry and adjust any stuffing if needed. Finally, weave in all your remaining ends securely. Your sleeping baby dragon is now complete!
Tips for Your Best Baby Dragon
You’ve got the pattern, but sometimes a few extra tips can make all the difference. Here are some answers to common questions I get about this project to help you make your baby dragon absolutely perfect.
How Do I Get the Perfect Sleeping Curl?
The “Curl Locking” step is what gives this dragon its signature pose. The trick is to not be afraid to sew it securely. After you’ve pinned the tail in place along the belly, use small, strong stitches. By sewing a good 1-inch section of the tail to the body, you make sure it will hold that sweet, curled-up shape forever and won’t flop open over time. This is what really sells the “sleeping” look.
Stuffing Tips: How to Avoid a Stiff or Lumpy Dragon
Proper stuffing is an art! Here are my rules for this specific pattern:
- Body & Head: Stuff these parts firmly. Use small bits of stuffing at a time and push them into all the corners to avoid lumps. A firm head and body provide a good foundation for all the other parts.
- Legs & Tail: This is important—stuff these parts lightly. The legs only need enough stuffing to give them shape, not to make them rigid. The tail needs to be flexible so it can curve naturally along the body. If you overstuff the tail, it will fight against the curve and look stiff.
What’s the Best Way to Embroider “Sleeping” Eyes?
Embroidering faces can be intimidating, but a sleeping face is the easiest one to do! I use a single strand of black DK yarn or, for even finer detail, black embroidery floss.
- First, decide on your placement. I like to place the eyes around Rnd 9-10 of the head.
- Insert your needle from the back of the head and come out where you want the corner of one eye to start. Leave a tail hanging out the back.
- Create a simple, shallow “U” shape, about 2-3 stitches wide. Go back into the head at the other corner of the eye.
- Repeat for the other eye, making sure they are symmetrical.
- Bring both yarn tails out at the same stitch hole in the back of the head, tie a secure knot, and tuck the ends back inside the head to hide them.
Can I Use a Different Yarn for This Pattern?
Yes, you can! The pattern will work with different yarn weights, but it will change the final size of your dragon.
- For a Bigger, Cuddlier Dragon: Use a worsted or aran weight yarn with a larger hook (like a 4.0mm). Your dragon will be bigger and more plush.
- For a Tiny “Pocket” Dragon: Use a sport or fingering weight yarn with a smaller hook (like a 2.0mm or 2.5mm). This will create a miniature version that can fit in your palm.
Just remember to adjust your safety eye size if you change the yarn weight!
How Do I Keep Track of All the Horns and Spikes During Assembly?
This is where straight pins are your best friend. Before I sew anything, I create the full picture.
- First, I complete the main “Curl Locking” step.
- Then, I use pins to attach all the other pieces: the four legs, the belly patch, all five back spikes, and all four pairs of horns.
- I place the pinned dragon on my table and look at it from every single angle. Is it symmetrical? Is anything crooked? This is the time to make adjustments.
Only when I am 100% happy with the placement do I pick up my needle and start sewing everything down, one piece at a time.
Complete Your Dragon Collection: More Free Patterns
Once you’ve crocheted one dragon, it’s hard to stop! These mythical creatures are so fun to make, each with its own unique personality. If you loved making this sleeping baby, why not create a whole family?
You can find more of my free dragon patterns here on the blog. Each one offers a different style and a fun new challenge. Continue your adventure with these other pattern:
- Free Crochet Dragon Ornament Pattern: A tiny, intricate, advanced-level dragon made with thread for a beautiful, heirloom-quality ornament.
Conclusion: Sweet Dreams, Little Dragon
And there you have it! You’ve turned a simple ball of yarn into a peaceful, dreaming crochet baby dragon. There is something so satisfying about finishing that final stitch and seeing this sweet, curled-up creature resting in your hands. It’s a project filled with charming details that truly create a magical result.
I hope you’ve enjoyed making this little friend as much as I enjoyed designing it. Whether it’s a gift for someone special or a new guardian for your own bookshelf, I know it will be treasured.
I would be so excited to see your finished baby dragon! Once you’re done, please consider sharing a photo with our wonderful community of fellow crocheters. For a friendly and welcoming place to share your projects, ask questions, and see what others are making, please come and join my Facebook Group! We can’t wait to see you there.