This best chili recipe turned a Super Bowl Sunday into pure chaos—in the best way. I walked into a friend’s house with one giant pot, set it on the counter, and within six minutes it was gone. Grown men were scraping the bottom with Fritos, someone yelled “WHO MADE THIS?!”, my husband pointed at me like I’d just scored the winning touchdown, and another guy snapped a photo of the empty pot for his story with the caption “RIP to the best chili I’ve ever had.” By midnight my phone was blowing up with texts begging for the recipe.
That’s the real test: if your chili disappears before halftime and people start offering to do your dishes for life, you’ve nailed it.
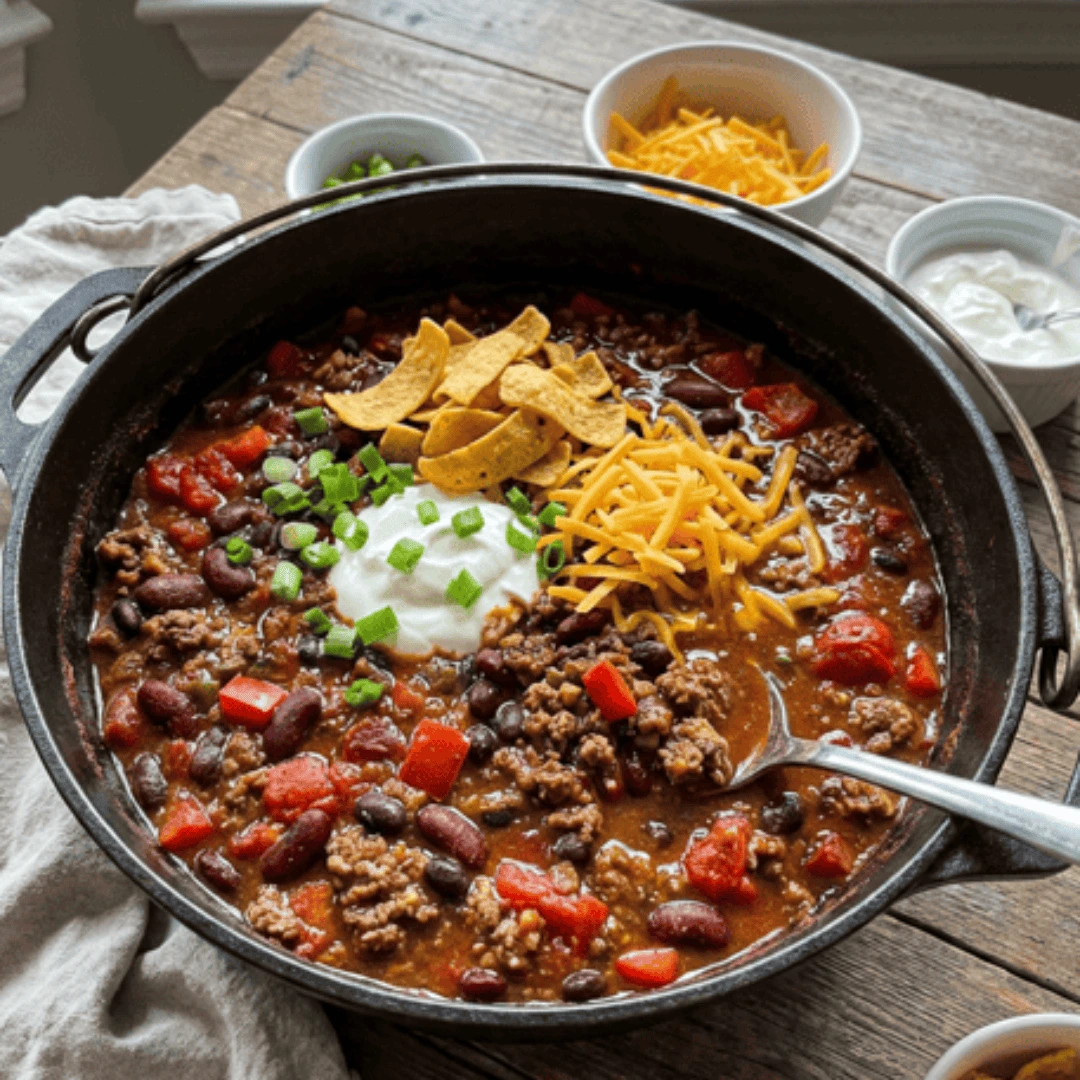
This isn’t thin, bland chili that needs hours on the stove to taste good. This is thick, rich, smoky-sweet-spicy perfection: crispy bacon crisped in the pot for deep flavor (with plenty left for topping), tender ground beef, two kinds of beans for hearty texture, fire-roasted tomatoes and green chilis for that slow-cooked depth in record time, and a perfectly balanced spice blend—brown sugar for subtle sweetness, ancho and regular chili powder for warmth, smoked paprika for smokiness, plus cumin, onion powder, and a touch of cayenne for customizable heat. One pot, about 30 minutes total, and it tastes like you simmered it all day in a cozy flannel shirt.
The bacon fat builds a rich base, blooming the spices with the beef makes every bite pop, and the 30-minute uncovered simmer thickens it naturally while flavors meld. It’s pantry-friendly, crowd-pleasing, and freezes like a dream—perfect for game days, snow days, or any time you want comfort that feels like a hug.
Ready to make the chili that gets you invited to every gathering (and maybe starts a few friendly rivalries)? Grab your Dutch oven or biggest pot, let’s create some legends.
PrintThe Best Chili Recipe

Bacon-loaded, 30-minute chili that tastes like it simmered all day. Perfect for game day or cozy nights!
- Prep Time: 10 minutes
- Cook Time: 20 minutes
- Total Time: 30 minutes
- Yield: 6 1x
- Category: Main Course
- Method: Stovetop
- Cuisine: American
Ingredients
- 5 strips thick-cut bacon, chopped
- 1 large yellow onion, diced (≈1 cup)
- 1 red bell pepper, diced
- 3 cloves garlic, minced (≈1 Tbsp)
- 1 lb ground beef (90/10 lean)
- 1 Tbsp brown sugar
- 1 Tbsp chili powder
- 1 Tbsp ancho chili powder
- 1½ tsp smoked paprika
- 1 tsp cumin
- 1 tsp onion powder
- ¾ tsp black pepper
- ½ tsp salt
- ⅛ tsp cayenne pepper (optional)
- 1¼ cups (295ml) beef broth
- 15 oz can dark red kidney beans, rinsed & drained
- 15 oz can black beans, rinsed & drained
- 14.5 oz can fire-roasted diced tomatoes, undrained
- 7 oz can fire-roasted green chilis
- ¼ cup tomato paste
- 1 Tbsp Worcestershire sauce
Toppings
- Sour cream
- Shredded cheddar cheese
- Corn chips / Fritos
- Chopped green onions
- Jalapeños

Instructions
- Cook chopped bacon in large pot over medium heat until crispy. Transfer to paper towel-lined plate, leave ≈1½ Tbsp fat.
- Add onion and red bell pepper; cook 3–5 min until softened.
- Add garlic; cook 30 sec. Add ground beef, break up, cook until halfway browned.
- Stir in brown sugar and all spices; cook 1 min to bloom.
- Add broth, beans, tomatoes (undrained), green chilis, tomato paste, Worcestershire, and cooked bacon. Stir well.
- Bring to boil, reduce to simmer uncovered 30 min, stirring occasionally.
- Taste/adjust seasoning. Serve hot with toppings.
Notes
- Bacon-free: Use 2 Tbsp butter.
- Gluten-free: Naturally GF (check broth/Worcestershire).
- Freezes up to 4 months.
Nutrition
- Serving Size: 1⅔ cups
- Calories: 611kcal
- Sugar: 11g
- Fat: 32g
- Carbohydrates: 45g
- Protein: 38g
Why You’ll Love This Chili Recipe
This chili has become my absolute go-to for cold days, game nights, and feeding a crowd because it delivers big, comforting flavor with almost no effort. Here’s exactly why it stands out every single time:
- Bacon double impact — Crisped in the pot for smoky richness that flavors everything, with extra bits saved for topping. It’s the secret that makes people go “wow” on the first bite.
- True 30-minute magic — One pot, minimal prep, and it tastes like it simmered all day. Weeknight-friendly but feels like Sunday comfort.
- Perfect sweet-heat-smoky balance — Brown sugar softens the edges, ancho chili powder adds deep warmth, smoked paprika brings that campfire vibe—every spoonful hits all the right notes.
- Fire-roasted depth in half an hour — Tomatoes and green chilis give that slow-cooked richness without waiting hours. No bland canned taste here.
- No weird fillers — Just real beef, two kinds of beans for hearty texture, and a thoughtful spice blend that lets the ingredients shine.
- Feeds a crowd or meal-prep dreams — Makes about 10 cups, so dinner tonight plus lunches all week (it gets even better the next day).
- Heat level totally customizable — Mild for kids (skip cayenne), bolder for spice lovers (double it or add jalapeños).
- Cornbread soulmate — The way it pairs with a slice of buttermilk cornbread is pure magic—creamy, spicy, sweet all in one bite.
I’ve tried every chili variation out there (crockpot, no-bean, turkey, you name it), and this one wins hands-down for flavor, speed, and how often people ask for seconds. Make a double batch—you’ll thank yourself when friends start texting at midnight for the recipe.
Ingredients for the Best Chili Recipe
The beauty of this chili lies in how a handful of everyday ingredients come together to create deep, layered flavor in just 30 minutes—no long simmer required. Everything builds on itself in one pot: the bacon starts the smoky foundation, the beef adds hearty richness, beans bring texture and body, fire-roasted elements give instant depth, and a smart spice blend ties it all into that addictive sweet-smoky-spicy balance. No fillers or complicated extras—just real ingredients doing what they do best.
Key Ingredients Overview
Thick-cut bacon is crisped first, rendering fat that becomes the flavorful base for sautéing veggies and blooming spices—its smoky richness runs through every bite, with extra bits saved for topping. Ground beef (lean but not too lean) browns in that bacon fat, adding savory depth and heartiness without greasiness. A large yellow onion and red bell pepper provide sweet-savory backbone, softening to melt into the mix and balance the richness.
Two types of beans—dark red kidney and black—deliver hearty texture and natural thickening power; they soak up the sauce while adding color and contrast. Fire-roasted diced tomatoes (with their juices) and fire-roasted green chilis bring that slow-cooked, charred depth in minutes—no need for hours on the stove. Tomato paste concentrates the tomato flavor and helps thicken naturally.
The spice blend is the magic: brown sugar softens any sharpness with subtle sweetness, regular chili powder and ancho chili powder build warm layered heat, smoked paprika adds campfire smokiness, cumin and onion powder deepen the earthiness, black pepper and salt enhance everything, and a touch of cayenne (optional) lets you dial up the kick. Beef broth loosens it just enough for simmering, while Worcestershire sauce adds a savory umami punch that makes the whole pot taste richer.
Ingredient Notes & Substitutions
- Bacon-free version — Skip bacon and start with 2 Tbsp butter or olive oil for sautéing. Add ½ tsp extra smoked paprika to keep some smoky depth—still delicious for pork-free eaters.
- Gluten-free — Naturally gluten-free as written; just double-check Worcestershire sauce and broth labels (some brands add gluten).
- Ground turkey swap — Use 1 lb 93/7 turkey instead of beef for a lighter option—drain excess liquid after browning to keep chili thick.
- Vegetarian adaptation — Omit meat, use 2 Tbsp butter or oil, double the beans (or add mushrooms for umami), and swap to vegetable broth. Still hearty and flavorful.
- Low-sodium — Choose low-sodium beef broth and reduce added salt by half—taste at the end and adjust.
- Spice adjustments — Skip cayenne for mild (kid-friendly); double it or add diced jalapeño with veggies for extra heat.
Recipe Success Tips
These are the pro-level tricks and fixes that take this chili from great to legendary—things I wish I knew sooner after making dozens of batches.
- If it’s still too thin after 30 minutes — Keep simmering uncovered 5–10 minutes more, or stir in 1–2 Tbsp extra tomato paste for quick thickening without changing flavor.
- To prevent blandness — Taste broth strength before adding—low-sodium broth needs more salt/spices. A splash of Worcestershire or soy sauce at the end can wake up flat flavor.
- For deeper smokiness without more bacon — Add ½ tsp liquid smoke (optional) with the spices if you want that campfire taste on a bacon-free day.
- Make it ahead — it gets better — Refrigerate 1–3 days before serving. Reheat slowly with a splash of broth; flavors deepen dramatically overnight.
- Freezing pro tip — Portion into flat bags (remove air) and freeze up to 4 months. Thaw in fridge, reheat in pot (not microwave) with extra broth to avoid separation.
- Avoid greasy chili — Use 90/10 beef and drain excess fat after browning if needed. The bacon fat should be flavorful, not oily.
- Kid-friendly rescue — If too spicy, stir in 1–2 Tbsp sour cream or a pinch more brown sugar at the end to mellow heat without dulling flavor.
Step-by-Step Instructions with Photos
This best chili recipe comes together in one pot with straightforward steps that build massive flavor fast. The key is layering: bacon fat starts the smoky base, blooming spices with the beef intensifies everything, and the uncovered simmer thickens naturally while letting tastes meld. Prep everything first so you can move quickly.
Crisp the Bacon & Build the Base
Place chopped thick-cut bacon in a cold large pot or Dutch oven over medium heat. Cook 7–9 minutes, stirring occasionally, until crispy and golden. The slow start renders out maximum fat without burning, creating a rich, smoky foundation that flavors the entire chili. Transfer bacon to a paper towel-lined plate, leaving about 1½ tablespoons of bacon fat in the pot—this is your cooking liquid now.

Sauté Veggies in Bacon Fat
Add diced yellow onion and red bell pepper to the bacon fat. Cook 3–5 minutes until softened and the onion turns translucent. The bacon fat infuses the veggies with smoky depth right away, building sweetness and color that balances the chili’s richness. Add minced garlic and cook 30 seconds until fragrant—don’t let it brown or it turns bitter.

Brown the Beef & Bloom Spices
Add ground beef, breaking it up with a spatula as it cooks. Cook until about halfway browned (some pink remains)—this keeps it tender. Sprinkle in brown sugar and all spices (chili powder, ancho chili powder, smoked paprika, cumin, onion powder, black pepper, salt, cayenne). Stir well for 1 minute. Blooming the spices here releases their oils and aromas, making the chili taste deeper and more complex than if added later.

Add Remaining Ingredients & Bring to Simmer
Pour in beef broth, rinsed/drained kidney and black beans, undrained fire-roasted diced tomatoes, fire-roasted green chilis, tomato paste, Worcestershire sauce, and the reserved crispy bacon. Stir everything thoroughly to combine and scrape up any browned bits from the bottom—these are pure flavor gold. Bring to a boil (stir frequently to prevent sticking), then reduce to a gentle simmer.

Simmer Uncovered for Flavor & Thickness
Simmer uncovered for 30 minutes, stirring occasionally. The open simmer evaporates excess liquid for thick, spoon-coating texture while letting spices meld and fire-roasted elements develop that slow-cooked taste. Taste at 20 minutes—adjust salt, sugar, or heat if needed.

Optional Thickening & Final Taste
If you want it even thicker, gently mash a few beans against the pot side with a spoon or potato masher—this releases natural starches without blending the whole pot. Give one last taste and adjust seasoning (more cayenne for heat, sugar for sweetness). The chili should be rich, glossy, and perfectly balanced.

Serve & Load It Up
Ladle into bowls hot. Top generously with shredded cheddar (let it melt), extra bacon crumbles, sour cream dollops, corn chips/Fritos for crunch, sliced green onions, and jalapeños if you like extra kick. The toppings make it interactive and fun—everyone can customize.

Serve right away—the flavors are at their peak hot, and the bacon stays crisp on top.
Flavor Variations
This chili recipe is already a crowd-pleaser with its perfect balance of smoky, sweet, and spicy, but these simple variations let you adapt it for different tastes, diets, or what’s in your pantry—while keeping the quick 30-minute magic.
- Crockpot / Slow Cooker Version — Crisp bacon, brown beef, and sauté veggies on the stove first (to build flavor). Dump everything into the slow cooker, cook on LOW 6–8 hours or HIGH 3–4 hours. The longer simmer deepens flavors even more—perfect for hands-off game day.
- Instant Pot Adaptation — Use sauté mode to crisp bacon, brown beef, sauté veggies, and bloom spices. Add remaining ingredients, seal, and pressure cook on high for 10 minutes with quick release. Stir and simmer 5 minutes uncovered to thicken if needed—fast and still rich.
- Spicier Kick — Double the cayenne to ¼ tsp or add 1–2 diced jalapeños with the bell pepper. For extra heat at serving, offer hot sauce or crushed red pepper flakes—spice lovers will thank you.
- No-Bean / Texas-Style — Skip both cans of beans, increase ground beef to 1½ lbs, and add an extra ½ cup broth for moisture. It becomes meatier and brothier—great over rice or Fritos.
- Vegetarian / Turkey Swap — Omit bacon (use 2 Tbsp butter), swap beef for 1 lb ground turkey (drain excess) or plant-based crumbles, use veggie broth, and double beans or add mushrooms for umami. Still hearty and full of flavor.
These keep the one-pot ease and let you make it your own every time.
Serving Suggestions
This chili is hearty enough to stand alone, but the right sides and toppings turn it into a full meal everyone loves. Here are my favorites:
- Buttermilk cornbread — The ultimate soulmate; its slight sweetness balances the spice perfectly. Serve warm with butter.
- Corn chips or Fritos — For scooping and crunch; the salty corn flavor pairs like it was made for chili.
- Garlic Butter Chicken Bites — Extra protein on the side; the garlicky bites complement the smoky chili without overpowering.
- Simple green salad — A fresh vinaigrette-dressed salad cuts through the richness—great for lighter balance.
- Sour cream, shredded cheddar, and green onions — Must-have toppings; let everyone pile on their favorites.
- Jalapeños or hot sauce — For those who want more fire right at the table.
Serve family-style in big bowls so people can customize—watch it disappear fast!
Storage and Freezing Instructions
This chili stores beautifully and often tastes better the next day as flavors deepen.
Refrigerate in an airtight container for up to 4–5 days. Reheat on the stove over medium-low, stirring often and adding a splash of broth if it thickens too much. Microwave works in short bursts with stirring.
For freezing: Cool completely (within 2 hours for safety), portion into freezer-safe bags or containers, and freeze flat for up to 4 months. Thaw overnight in the fridge, then reheat on the stove with extra broth to restore consistency.
Food safety note: Cool quickly, store promptly, and reheat to at least 165°F (74°C). Never refreeze after thawing.
FAQ About the Best Chili Recipe
Can I make this chili in a slow cooker or Crockpot?
Yes—crisp bacon, brown beef, and sauté veggies on the stove first, then transfer to the slow cooker with all remaining ingredients. Cook on LOW 6–8 hours or HIGH 3–4 hours. Flavors deepen beautifully—ideal for set-it-and-forget-it days.
What’s the secret to the best-tasting chili?
Three key things:
1) Bacon and its fat for smoky base flavor;
2) Blooming spices with the beef to release oils and aroma;
3) Fire-roasted tomatoes and green chilis for instant slow-cooked depth. The 30-minute uncovered simmer lets everything meld perfectly.
Should I drain the beans for chili?
Yes—lightly rinse and drain both kidney and black beans. This removes excess sodium and prevents the chili from becoming too watery or overly “beany.” The fire-roasted tomatoes already provide plenty of liquid.
How can I make this chili spicier (or milder)?
Spicier: Double cayenne to ¼ tsp, add 1–2 diced jalapeños with the bell pepper, or serve hot sauce. Milder: Skip cayenne entirely and use mild green chilis. Heat is easy to adjust at the table too.
Can I use ground turkey instead of beef?
Absolutely—swap 1:1 with 90/10 or 93/7 ground turkey. Brown as directed and drain excess liquid to keep the chili thick. It’s lighter but still flavorful.
How long does homemade chili last in the fridge?
Up to 4–5 days in an airtight container. It improves on day 2–3 as flavors meld. Reheat to 165°F and add broth if thickened.
How do I thicken chili if it’s too thin?
Simmer uncovered longer to reduce liquid, or mash some beans against the pot side for natural starch. Tomato paste already helps—avoid flour/cornstarch to keep it clean.
Why use two kinds of beans?
Kidney beans add classic texture and color, black beans bring creaminess and earthiness. The combo gives better variety and natural thickening—feel free to use one type if preferred.
Final Thoughts
This best chili recipe is more than dinner—it’s the dish that makes people fight over the last scoop, cancel takeout plans, and start traditions. One pot, 30 minutes, and suddenly you’re the chili hero everyone wants at game day or cozy nights.
Make it soon, load those bowls high with toppings, and enjoy the compliments. When you do, snap a photo of your creation and tag @savorgastronomy—I’m ready for your empty-pot stories and second-helpings selfies!