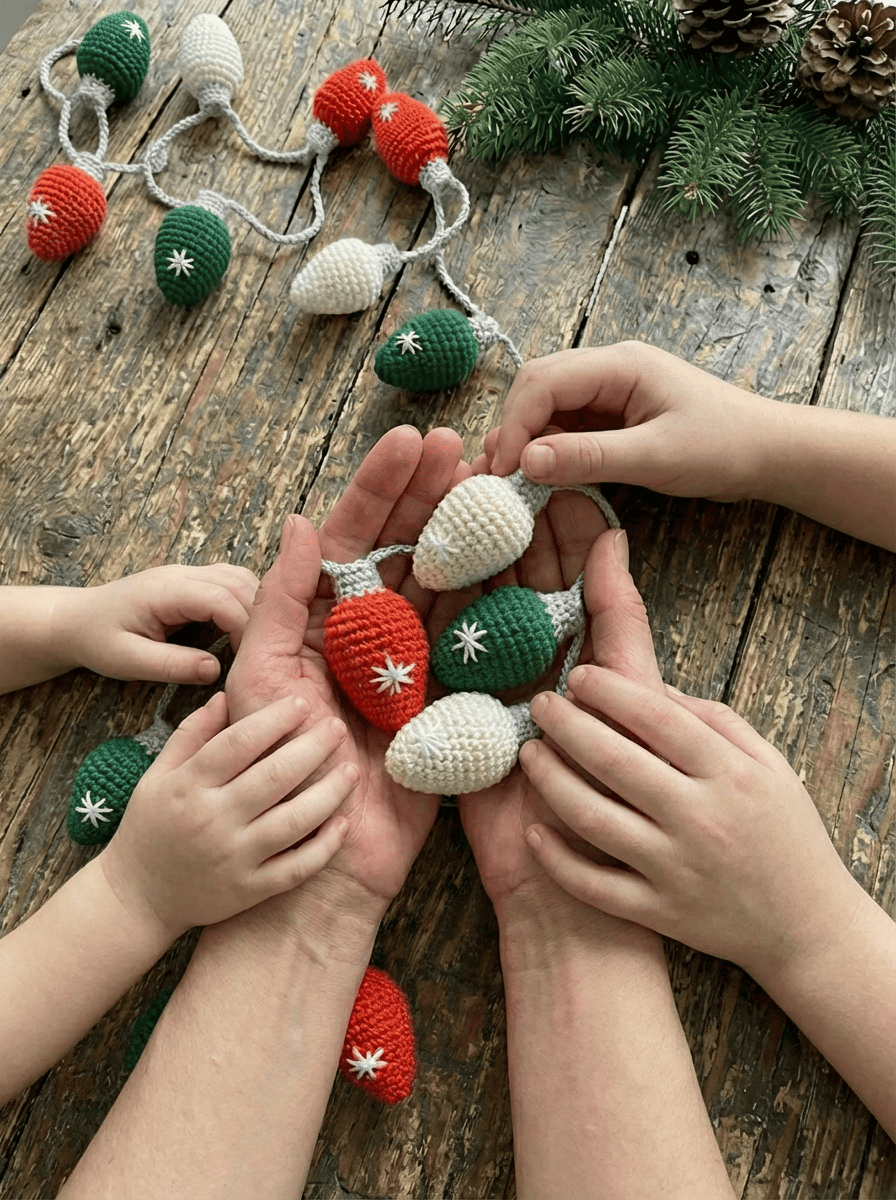
There’s a special kind of magic that comes with decorating for Christmas, especially when you can fill your home with pieces you’ve lovingly made by hand. If you’re looking for the perfect project to get into the festive spirit, you’ve found it! Today, we’re sharing a free crochet Christmas lights pattern that is wonderfully charming and perfect for beginners.
These adorable crochet lights create a garland that adds an instant touch of cozy, handmade warmth to any room. Imagine them draped over your mantle, wrapped around a miniature tree, or hung in a window to welcome guests.
So, put on your favorite Christmas movie, pour a cup of hot cocoa, and let’s get hooking!
Everything You’ll Need for Your Crochet Christmas Lights
This pattern uses a soft cotton-blend yarn, which gives the lights a beautiful modern look. Don’t be afraid to check your stash for other DK-weight yarns—this is a fantastic scrap-buster!
Materials & Tools:
- Yarn: Bernat Softee Cotton (DK Weight #3)
- Yarn 1: Poppy (A classic Christmas red)
- Yarn 2: Forest Green (A deep, festive green)
- Yarn 3: Antique White (A warm cream)
- Yarn 4: White (A crisp, snowy white)
- Yarn 5: Feather Gray (For the caps and string)
- Crochet Hook: 4-mm hook
- Other Supplies:
- Toy Stuffing (Poly-fil is great, but scrap yarn ends also work perfectly!)
- A Stitch Marker
- Darning Needle & Scissors
Pattern Notes for Perfect Crochet Lights
Reading these quick notes first is the secret to a flawless project!
- This pattern is written in standard US crochet terms.
- Keep It Spiraling: The bulbs are worked in a continuous spiral. You will not join your rounds with a slip stitch.
- Your Best Friend: A stitch marker is essential. Place it in the first stitch of every round and move it up as you go to avoid losing your place.
- The Invisible Decrease (invdec): This is the pro-technique for neat amigurumi! To make an
invdec, insert your hook into the front loop only of the next two stitches. Yarn over, pull through those two front loops, then yarn over and pull through the final two loops on your hook.
The Crochet Christmas Lights: Step-by-Step Pattern
Part 1: The Christmas Light Bulb
Your Goal: Make 12 bulbs total (3 of each color: Yarn 1, 2, 3, and 4).
Round 1: Start with a magic loop, ch 1, and make 3 single crochet (sc) into the loop. Pull tight to close. (3 sts)
Round 2: Work 2 sc in each stitch around (an increase in every stitch). (6 sts)
Round 3: sc in each stitch around. (6 sts)
Round 4: [sc in next st, 2 sc in next st] 3 times. (9 sts)
Round 5: sc in each stitch around. (9 sts)
Round 6: [sc in next 2 sts, 2 sc in next st] 3 times. (12 sts)
Round 7: sc in each stitch around. (12 sts)
Round 8: [sc in next 3 sts, 2 sc in next st] 3 times. (15 sts)
Round 9: [sc in next 4 sts, 2 sc in next st] 3 times. (18 sts)
Round 10: sc in each stitch around. (18 sts)
Round 11: [sc in next 4 sts, invdec] 3 times. (15 sts)
Round 12: [sc in next 3 sts, invdec] 3 times. (12 sts)
PAUSE! Time to Decorate & Stuff!
Before closing the bulb, add a little extra charm! Use a contrasting color (like Yarn 3 on a Yarn 2 bulb) and a darning needle to embroider a simple star on the side. Once decorated, firmly stuff your bulb.
Part 2: The Classic Bulb Cap
(Continue directly from where you left off)
Round 13: invdec 6 times. On the final yarn over of the last stitch, change to Yarn 5 (Feather Gray). (6 sts)
Round 14: With Yarn 5, sc in each stitch around. (6 sts)
Round 15: sc in each stitch around. (6 sts)
Fasten off, leaving a 6-inch tail. With your darning needle, weave the tail through the front loops only of the 6 stitches from that last round. Pull the tail firmly to cinch the top closed. Weave in the end securely.
Part 3: Assembling Your Garland
This is where your string of crochet lights comes to life!
- With Yarn 5 (Feather Gray), make a slip knot and chain 20.
- Pick up your first bulb. Slip stitch (sl st) into a front loop from its final round to attach it.
- Chain 4, skip 2 front loops on the bulb, and sl st into the next front loop.
- Chain 14. This creates the space between each of your crochet Christmas lights.
- Repeat steps 2-4 for all 12 bulbs.
- After attaching the last bulb, chain 20 and fasten off.
Weave in your final two ends, and your beautiful garland is complete!
We absolutely love seeing your finished projects! If you share your new crochet Christmas lights on Our Facebook Group, be sure to tag us so we can see and share your beautiful work!
More crochet Christmas lights color festive ideas :

Frequently Asked Questions (FAQs)
What other quick crochet projects can I make for Christmas gifts?
That’s a great question! Quick projects are perfect for stocking stuffers or last-minute gifts. Besides these lights, you can whip up other small, festive items that use very little yarn. For example, these Christmas Crochet Bracelets are super fast and add a fun, wearable touch to any holiday outfit.
Can I make these lights in a different theme?
Absolutely, and that’s such a fun idea! You could easily adapt the colors for any character or theme. For instance, using a bright lime green, red, and white would create a fantastic Grinch-inspired garland. If you’re a big fan of that theme, you should definitely explore these other Best Grinch Crochet Ideas to create a whole set of matching decorations!
What’s the best stuffing to use for these lights?
While Poly-fil (toy stuffing) gives a very even, squishy result, you don’t have to buy it specifically for this project! This is the perfect opportunity to use up your yarn scraps. Just gather all your little leftover ends and use them to stuff the bulbs. It’s eco-friendly and saves you money.
What is a magic loop?
A magic loop is the best way to start projects worked in the round to get a tightly closed center. Search “magic loop crochet tutorial” on YouTube for great videos!
How can I make my lights bigger or smaller?
You have two great options! The easiest way is to change your yarn and hook size. Using a thicker yarn (like worsted weight) with a larger hook (e.g., 5mm) will give you bigger bulbs. Using a thinner yarn (like sport weight) with a smaller hook will create a more delicate, tiny garland.
How do I stop my stuffing from showing through the stitches?
This is a very common issue in amigurumi! The key is to maintain tight tension. If you notice gaps, try going down a hook size (e.g., to a 3.75mm or 3.5mm hook). Using a smaller hook with the same yarn will create a denser fabric, making it much harder for the stuffing to poke through.
How do I make my garland longer?
It’s easy! Simply chain more than 14 stitches between each light bulb, or make more than 12 bulbs to extend the length to fit your space perfectly.