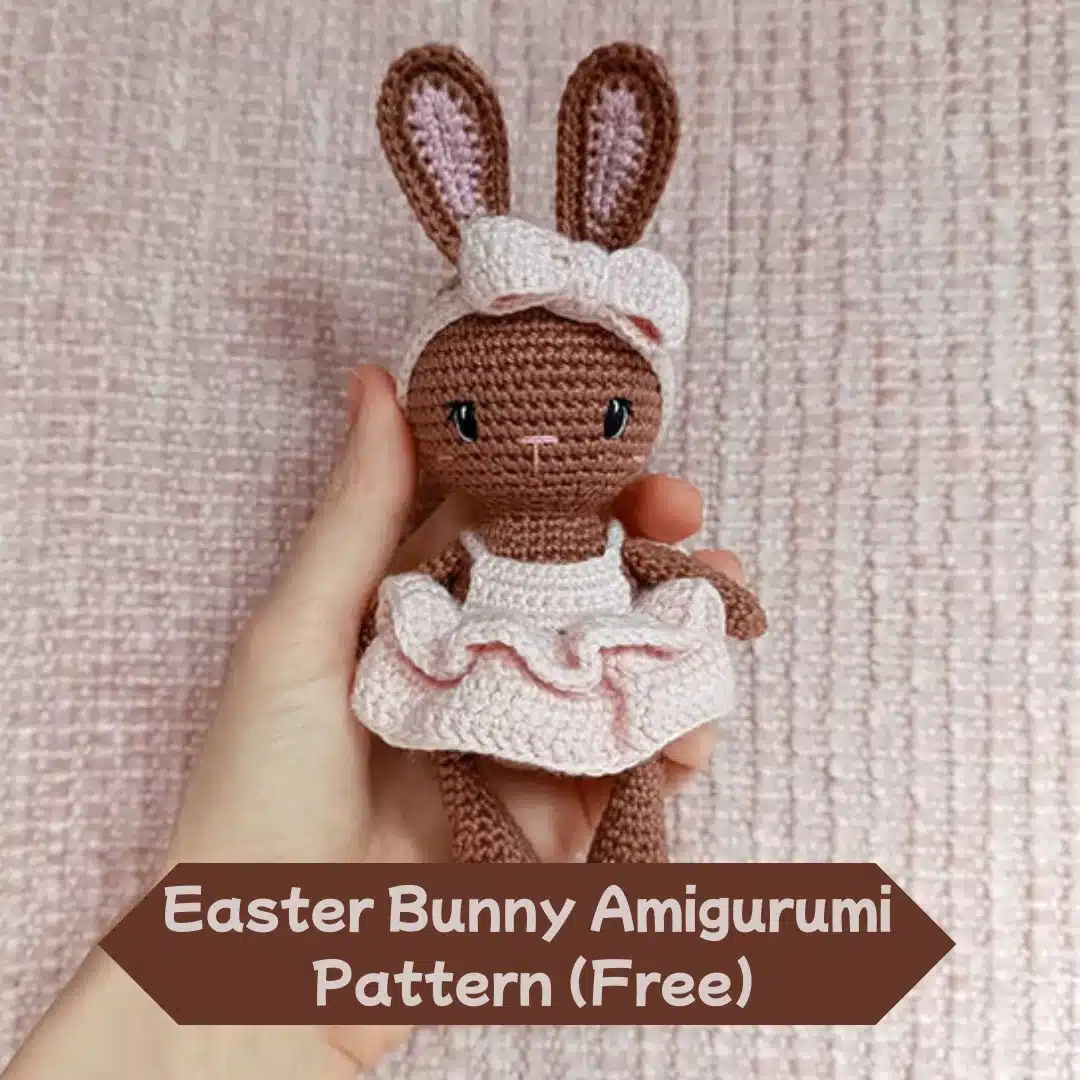
Credit: BabyStarLine, @babystarline
Hey, yarn wranglers! Looking for a bunny amigurumi pattern to make your 2025 Easter extra hoppy? Meet this adorable Easter bunny amigurumi pattern (free), a charming creation by BabyStarLine. This fluffy friend, with its cute dress and perky ears, is perfect for stuffing Easter baskets, gifting to bunny lovers, or crafting a crochet stuffed bunny for your shelf. Whether you’re new to amigurumi bunny projects or a pro at crochet bunny patterns, this free bunny crochet pattern is your ticket to springtime magic. Let’s dive into this crochet easter bunny guide and stitch up some bunny amigurumi pattern joy!
Why You’ll Love This Bunny Amigurumi Pattern
This bunny amigurumi pattern isn’t just a crochet bunny toy—it’s a delight from BabyStarLine, whose creativity sparkles on Instagram and Etsy at yarnacadabra. Here’s why this amigurumi bunny free pattern stands out:
- Easter-Ready: A perfect crochet easter bunny for seasonal fun—dress it up or keep it simple!
- Beginner-Friendly: Basic stitches like sc and dc make it an easy crochet bunny pattern for beginners.
- Customizable: Swap colors or skip the dress for a quick crochet mini bunny.
Over 65% of crafters love amigurumi bunny projects for their gift potential (Ravelry 2024)—and this bunny crochet pattern free is a winner. Ready to hook this crochet amigurumi bunny? Let’s get hopping!
Materials You’ll Need
Here’s what BabyStarLine suggests for this bunny amigurumi pattern:
- Yarn: Cotton or acrylic in:
- Brown (body, ears, legs)
- Light pink (dress, bow, inner ears)
- White (apron straps, optional)
- Crochet Hook: Size to match yarn (try 2.5 mm for tight stitches)
- Stuffing: Fiberfill
- Safety Eyes: 8-10 mm
- Tools: Sewing needle, scissors
Pro Tip: No cotton yarn? Acrylic works too—check YarnSub.com for subs to keep your crochet bunny plush cuddly!
Abbreviations (US Terms)
Bookmark these for your bunny amigurumi pattern journey:
- ch: Chain
- sl st: Slip stitch
- sc: Single crochet
- hdc: Half double crochet
- dc: Double crochet
- inc: Increase (2 sc in one stitch)
- dec: Decrease (invisible method)
- FLO: Front loop only
- BLO: Back loop only
The Free Easter Bunny Amigurumi Pattern
Below is BabyStarLine’s exact bunny amigurumi pattern—unaltered, as shared. Hook it up, and this crochet bunny will hop to life! All credit to BabyStarLine
Head and Body (One Piece)
Yarn: Brown
- Round 1: 6 sc in magic ring (6)
- Round 2: inc in each stitch (12)
- Round 3: (1 sc, inc) x6 (18)
- Round 4: (2 sc, inc) x6 (24)
- Round 5: (3 sc, inc) x6 (30)
- Round 6: (4 sc, inc) x6 (36)
- Round 7: (5 sc, inc) x6 (42)
- Round 8: (6 sc, inc) x6 (48)
- Rounds 9-17: 48 sc (9 rounds)
- Round 18: (6 sc, dec) x6 (42)
- Round 19: (5 sc, dec) x6 (36)
- Round 20: (4 sc, dec) x6 (30)
- Round 21: (3 sc, dec) x6 (24)
Start stuffing the head. - Round 22: (2 sc, dec) x6 (18)
- Round 23: 18 sc
- Round 24: (2 sc, inc) x6 (24)
- Round 25: (3 sc, inc) x6 (30)
- Rounds 26-27: 30 sc (2 rounds)
- Round 28: (4 sc, inc) x6 (36)
- Rounds 29-30: 36 sc (2 rounds)
- Round 31: (5 sc, inc) x6 (42)
- Rounds 32-38: 42 sc (7 rounds)
- Round 39: (5 sc, dec) x6 (36)
- Round 40: (4 sc, dec) x6 (30)
- Round 41: (3 sc, dec) x6 (24)
- Round 42: (2 sc, dec) x6 (18)
- Round 43: (1 sc, dec) x6 (12)
Finish stuffing the body. - Round 44: dec x6
- Close with a tapestry needle, weave in ends.
Ears (Make 4 Total)
- Solid Color Ears (Make 2, Brown)
- Ch 9, work around chain.
- From 2nd ch: sl st, 3 sc, 3 hdc, 5 hdc in last ch; other side: 3 hdc, 3 sc, sl st (18)
- Ch 3, from 2nd ch: 9 sc (2 in chains, 7 in prev row), 6 inc, 9 sc (33)
- Cut yarn, leave tail.
- Pink Inner Ears (Make 2, Start Pink, Switch to Brown)
- Ch 9, work around chain.
- From 2nd ch: sl st, 3 sc, 3 hdc, 5 hdc in last ch; other side: 3 hdc, 3 sc, sl st (switch to brown) (18)
- Ch 3, from 2nd ch: 9 sc (2 in chains, 7 in prev row), 6 inc, 9 sc (33)
- Don’t cut yarn.
- Joining Ears
- Pair one solid ear with one pink ear, right sides out.
- Ch 2, crochet through both: 13 sc, 4 hdc, 13 sc (30)
- Cut yarn, sew to head between rounds 3-5.
Face Embroidery
- Nose: Pink thread, 2 horizontal lines (R 16-17, 3 sts wide), vertical line down 2 sts.
- Eyes: 3 sts from nose, 2-stitch vertical lines; white highlight from top to center.
- Eyelashes: 1 horizontal, 1 diagonal stitch above eyes.
- Cheeks: Pink, 2-stitch horizontal lines, 3 sts from eyes.
Arms (Make 2)
Yarn: Brown
- Round 1: 6 sc in magic ring (6)
- Round 2: (inc, 2 sc) x2 (8)
- Rounds 3-11: 8 sc (9 rounds)
- Flatten, close with 4 sc across both layers.
- No stuffing. Sew to body between R 3-4 from neck.
Legs (Make 2)
Yarn: Brown
- Round 1: 6 sc in magic ring (6)
- Round 2: inc x6 (12)
- Round 3: (inc, sc) x6 (18)
- Rounds 4-6: 18 sc (3 rounds)
- Round 7: 8 sc, dec, 8 sc (17)
- Rounds 8-9: 17 sc (2 rounds)
- Round 10: 7 sc, dec, 8 sc (16)
- Round 11: 16 sc
- Round 12: 3 sc, dec, 6 sc, dec, 3 sc (14)
- Round 13: 14 sc
- Stuff to R 18, leave R 19-24 unstuffed, decrease to 9 sc, flatten, sew to body.
Headband
Yarn: Light Pink
- Ch 49
- Row 1: From 2nd ch, 48 sc, ch 1, turn
- Row 2: 48 sc, ch 1, turn
- Row 3: 48 sc
- Cut yarn, sew ends together.
Bow
Yarn: Light Pink
- Ch 29
- Row 1: From 2nd ch, 28 sc, ch 1, turn
- Rows 2-5: 28 sc, ch 1, turn (3 rows)
- Row 6: 28 sc
- Sew ends together.
- Bow Center:
- Ch 11
- Row 1: From 2nd ch, 10 sc, ch 1, turn
- Row 2: 10 sc
- Sew around bow middle, attach to headband.
Dress
Yarn: Light Pink
- Underskirt:
- Ch 39
- Row 1: From 2nd ch, 38 sc, ch 2, turn (38)
- Row 2: FLO, 38 dc inc (76)
- Rows 3-5: 76 dc (76)
- Top Skirt:
- Attach to FLO of R 2 underskirt:
- Row 1: Ch 2, dc inc in same st, 37 dc inc (76), ch 2, turn
- Row 2: (2 dc, dc inc) x25, 1 dc (101)
- Top Part:
- Attach to 14th ch from left on underskirt:
- Row 1: Ch 1, 11 sc (11), ch 1, turn
- Rows 2-4: 11 sc, ch 1, turn
- Row 5: 11 sc
- Right Strap: Ch 12, cut yarn.
- Left Strap: Attach to R 5 start, ch 12, cut yarn.
- Sew skirt back, secure straps.
Pro Tips for Mastering This Bunny Amigurumi Pattern
Hook this bunny crochet pattern free like a pro:
- Tight Stitches: Use a smaller hook (e.g., 2.5 mm) for a snug crochet bunny plush—5 mins to test tension.
- Stuffing Savvy: Add fiberfill gradually—10 mins for a perfect stuffed bunny pattern.
- Ear Flair: Fold ears slightly for a long eared bunny crochet pattern free vibe—2 mins to shape.
- Color Play: Try pastel blue or yellow—5 mins to customize your crochet easter bunny!
Top 10 FAQs About Bunny Amigurumi Patterns
Got bunny amigurumi pattern queries?
- What’s an easy bunny amigurumi pattern?
This easy crochet bunny pattern free uses basic stitches—ideal for starters! - How long for a crochet bunny toy?
About 4-6 hours—great for a weekend crochet small bunny. - Can I swap yarn in this bunny crochet pattern?
Yes! Cotton or acrylic—10-min gauge check. - How do I attach eyes on a crochet amigurumi bunny?
Safety eyes at R 16-17—5 mins to secure! - Best stuffing for a stuffed bunny pattern?
Fiberfill—10 mins for a plush crochet bunny doll. - Can I sell this easter bunny crochet pattern make?
Check with BabyStarLine—often personal use only. - How to make bunny ears for a crochet bunny hat?
Use the ear pattern—adapt for a bunny hat crochet pattern! - What hook for a mini crochet bunny?
2.5 mm keeps it tight—adjust for yarn weight. - How to embroider a bunny amigurumi pattern face?
Pink nose, black eyes—15 mins of detail!
Hook Your Own Bunny Amigurumi Magic!
There you go, yarn heroes—an easter bunny amigurumi pattern (free) to make ! This bunny amigurumi pattern, crafted by BabyStarLine, is your springtime crochet bunny fix. Whether it’s a bunny lovey crochet pattern gift or a crochet bunny ears keepsake, it’s pure joy. Hook it, snap it, and share your amigurumi bunny in the comments—I’d love to see! Explore more like on my blog—your next bunny pattern awaits!