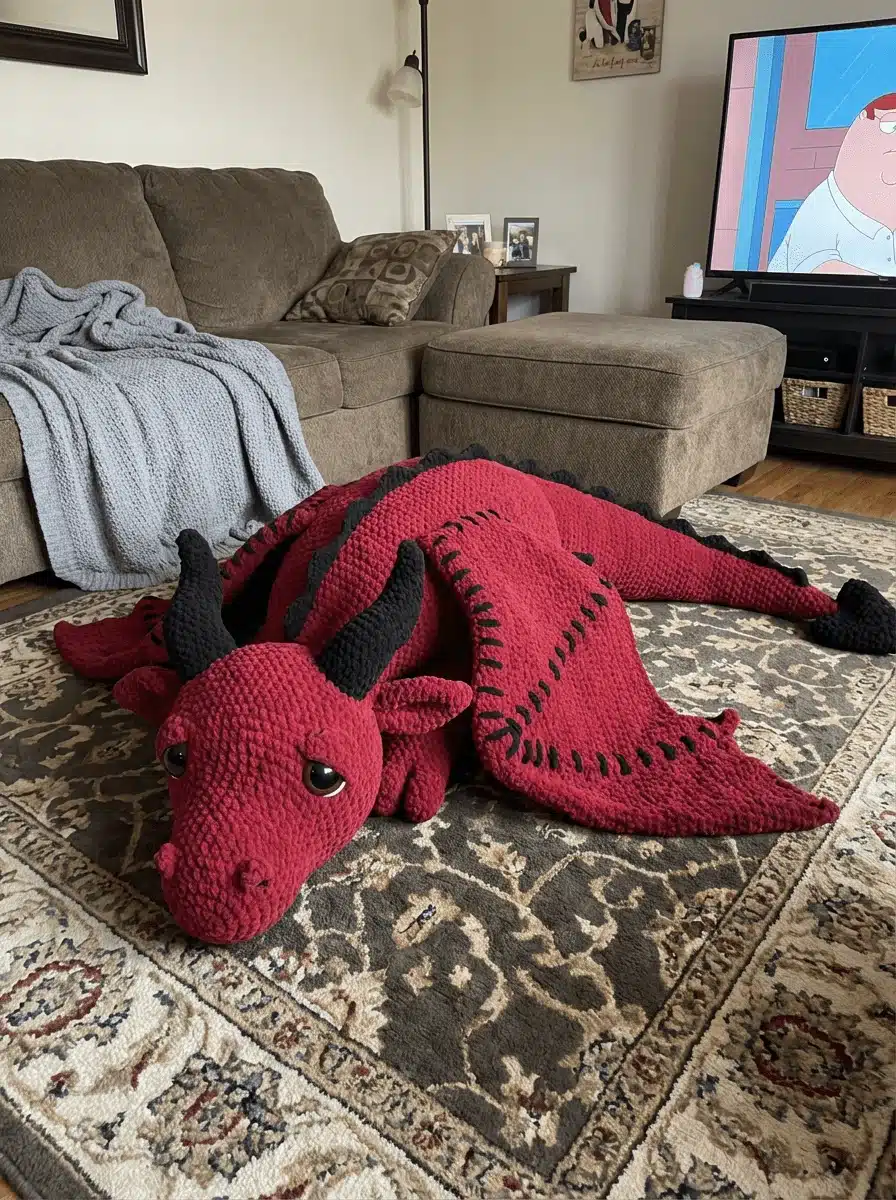
Hello, fellow crafters! For years, I’ve dreamed of creating something truly monumental—a crochet project that steps out of the world of small amigurumi and into our real-world space. I wanted to design not just a toy, but a true companion. Today, I’m thrilled to share the pattern for what might be the most ambitious and advanced crochet dragon you’ll ever make: The Crimson Nap Guardian.
This isn’t a pattern for a small, cute “chibi” dragon. This is a life-size mythical companion designed to sprawl across floors and beds. Using fluid, realistic shaping with soft, super-bulky chenille, I wanted to create a “rug dragon” aesthetic. He is a protector of dreams and the ultimate nap buddy, combining massive scale with an irresistibly soft, velvet-like texture.
This project is a true labor of love, a journey that rewards patience with a breathtaking, legendary friend. Before we begin, let’s go over the scale of this adventure.
Skill Level
Intermediate to Advanced. This project is best for those comfortable with short rounds, sculpting between posts, and managing large, heavy pieces of crochet fabric.
Measurements
- Length: Approximately 4 to 5 feet long from the tip of the nose to the end of the tail.
- Wingspan: Up to 3 feet wide (poseable).
Safety Note: This pattern uses large safety eyes and internal wire. It is not suitable for babies or children under 3. If making for children, replace eyes with embroidery and skip wire.
Critical Pre-Pattern Information (Read Before You Begin)
Before you begin this journey to create your advanced crochet dragon, it is absolutely vital to read and understand the following notes. The Crimson Nap Guardian is a soft-sculpture project where material choice and technique execution are just as important as the stitch counts. Following this guidance will ensure your finished dragon matches the intended size, shape, and sleepy expression.
The Critical Accuracy Notes
The Crimson Nap Guardian is designed as a soft sculptural piece, not a standard plush. While the stitch instructions are precise, the final appearance depends heavily on execution choices. To achieve same result, please observe the following critical notes.
1. Yarn Selection Is Structural, Not Cosmetic
Chenille yarns vary dramatically between brands, even within the same weight category. For best results:
- Use a chenille or blanket yarn with a dense inner core.
- Avoid yarns that feel hollow, overly floppy, or extremely fuzzy.
- The fabric should feel firm when compressed, not spongy.
A softer yarn will produce a dragon that is larger, looser, and less defined than the sample shown.
2. Eye Placement Controls Expression
The Guardian’s sleepy expression depends on precise eye placement.
- Insert safety eyes exactly where instructed in the pattern.
- Eyes must be placed before the facial sculpting rounds begin.
- Even a one-round difference can dramatically change the expression.
If eyes are placed too high or too late, the brow ridge will not form correctly and the dragon may appear alert or cartoonish rather than relaxed.
3. Stuffing Is Directional and Zoned
Do not stuff this dragon uniformly. Think of it as “sculpting with stuffing.”
- Head, snout, and paws: Stuff very firmly.
- Neck and tail base: Use medium firmness.
- Shoulders and hips: Stuff with light to moderate firmness to allow them to flatten.
- Upper limbs: These are intentionally under-stuffed to achieve a relaxed, sprawling pose.
Overstuffing will cause the dragon to “stand.” Understuffing will cause sagging and loss of sculpted form.
4. Wing Support Is Mandatory at This Scale
The wings are intentionally large and fabric-like. They require internal support to maintain their pose over time.
- Use 12–14 gauge galvanized wire.
- Insert the wire deeply into the wing arm.
- Anchor the wire ends securely into the shoulder stuffing.
Substituting thinner wire or skipping the anchoring step will result in gradual wing droop.
5. This Pattern Rewards Patience
This project is large and physically demanding. Take breaks, reposition the piece often, and check your alignment as you work. Small adjustments during assembly have a significant impact on the final silhouette.
The Material Substitution Guide
The following tables are designed to help you safely substitute materials without compromising the final shape and structure of your dragon.
SUBSTITUTION DISCLAIMER
Substituting materials may affect firmness, drape, and final dimensions. For results matching the reference model, follow the recommended materials closely and apply the listed adjustments where substitutions are used.
MAIN BODY YARN (Crimson)
| Yarn Brand | Weight | Match Level | Required Adjustments | Visual Result |
|---|---|---|---|---|
| Bernat Blanket (Original) | #6 Super Bulky | ⭐⭐⭐⭐⭐ Exact Match | None | Matches |
| Premier Parfait Chunky | #6 Super Bulky | ⭐⭐⭐⭐½ Very Close | Stuff 10–15% firmer | Slightly softer drape |
| Hobbii Honey Bunny | #6 Super Bulky | ⭐⭐⭐⭐ | Use smaller hook (–1 mm) | Slightly fuzzier surface |
| Himalaya Dolphin Baby | #6 Super Bulky | ⭐⭐⭐ | Smaller hook + firmer stuffing | Plush, less sculpted |
| Bernat Blanket Extra | #7 Jumbo | ❌ Not Recommended | — | Too floppy, shape loss |
Notes:
- Choose yarns with a dense inner core, not hollow-feeling chenilles.
- Longer pile yarn = a softer look but reduced facial definition.
ACCENT YARN (Black Details & Spikes)
| Yarn Brand | Weight | Match Level | Notes |
|---|---|---|---|
| Bernat Blanket (Black) | #6 | ⭐⭐⭐⭐⭐ | Best color contrast & stitch visibility. |
| Premier Parfait Chunky | #6 | ⭐⭐⭐⭐ | Spikes will be slightly softer. |
| Same brand as main yarn | #6 | ⭐⭐⭐⭐ | Ensures a uniform texture throughout. |
Avoid: Cotton, acrylic, or worsted yarns—they create stiff, mismatched detailing.
HOOK SIZE SUBSTITUTION
| Yarn Behavior | Recommended Hook |
|---|---|
| Dense chenille | 10–12 mm |
| Soft / loose chenille | 9–10 mm |
| Jumbo #7 yarn | ❌ Not advised |
Rule: The fabric should feel firm and opaque with no stuffing visibility when stretched.
SAFETY EYES
| Size | Effect |
|---|---|
| 40 mm | Slightly calmer, more subtle expression. |
| 45 mm | ⭐ Best match |
| 50 mm | Larger, more expressive (still acceptable). |
Important: Do not downsize the eyes if using a softer/larger yarn—a larger dragon requires proportionally large eyes to maintain its expression.
WING SUPPORT (Wire Substitutions)
| Material | Gauge | Approved | Notes |
|---|---|---|---|
| Galvanized steel wire | 12–14 ga | ⭐⭐⭐⭐⭐ | Best long-term support. |
| Aluminum armature wire | 10–12 ga | ⭐⭐⭐ | Must double the strands for strength. |
| Floral wire | — | ❌ | Too weak, will sag. |
| Pipe cleaners | — | ❌ | Unsafe and too weak at this scale. |
Best Practice: Wrap the wire once in scrap yarn before you insert it. This helps it grip the stuffing and prevents shifting over time.
STUFFING SUBSTITUTIONS
| Stuffing Type | Approved | Notes |
|---|---|---|
| High-density polyester fiberfill | ⭐⭐⭐⭐⭐ | Best for shape retention. |
| Cluster fiberfill | ⭐⭐⭐ | Softer, may settle and require re-fluffing. |
| Memory foam chunks | ⭐⭐ | Heavy and can create a lumpy texture. |
| Poly pellets | ❌ | Unsafe weight for a soft sculpture. |
YARN AMOUNT CONVERSION GUIDE
| Yarn Density | Expected Usage |
|---|---|
| Dense chenille | ~3000g MC / 900g CC |
| Softer chenille | +10–20% more yarn |
| Jumbo yarn | ❌ Not supported |
The Free “Crimson Nap Guardian” Crochet Pattern
With all the preparation and material selection complete, it is finally time to pick up our hooks and begin the magical process of bringing this advanced crochet dragon to life. Here is the complete pattern.
Your Dragon’s Hoard: Supplies & Stitches
Supplies Needed
- Yarn: Main Color (MC) in Crimson Red and Accent Color (CC) in Black. Use Super Bulky (Weight 6 or 7) Chenille or Blanket yarn. You will need approximately 3000g of MC and 900g of CC.
- Hook Size: 10.0 mm (N/P) or 12.0 mm. Adjust to ensure your stitches are tight enough that stuffing does not peek through.
- Eyes: 40mm–50mm large black safety eyes.
- Stuffing: 5–10 lbs of high-density polyester fiberfill.
- Wire: 22” of 12-gauge or 14-gauge galvanized wire for the poseable wing frames.
- Notions: Extra-large tapestry needle, scissors, and several 1 ¾-inch T-pins for assembly.
Abbreviations (US Terms)
- Ch: Chain
- Sc: Single crochet
- Hdc: Half double crochet
- Dc: Double crochet
- Inc: Increase (2 sc in one st)
- Dec: Decrease (Invisible decrease recommended)
- MR: Magic Ring
- BLO / FLO: Back Loop Only / Front Loop Only
- St(s): Stitch(es)
Special Stitch Guide
- Bobble Stitch: [Yarn over, insert hook into stitch, pull up a loop, yarn over, pull through 2 loops] 5 times in the same stitch, yarn over, pull through all 6 loops on hook.
- Extended Sc (esc): Insert hook, yarn over, pull up loop, yarn over, pull through first loop only (creating a ch-1), yarn over, pull through both loops on hook.
- Crab Stitch: Also known as Reverse Single Crochet. It is worked from left to right to create a thick, reinforced corded edge.
Part 1: The Head & Facial Architecture
We begin with the most character-defining part of the dragon. The head is sculpted with a wide snout, deep nostrils, and a heavy brow to give the Guardian its signature sleepy, ancient look.
The Head (1 Piece)
The head is worked in a continuous spiral using Main Color (MC). We begin with a foundation chain to create the wide, powerful snout.
Rnd 1: Ch 5. Starting in 2nd ch from hook: 3 sc, 3 sc in last ch. Working along the opposite side of the chain: 3 sc, 3 sc in the last ch. (12)
Rnd 2: 3 sc, inc, 1 sc, inc, 3 sc, inc, 1 sc, inc. (16)
Rnds 3–4: Sc evenly around. (16)
Rnd 5 (The Nostrils): 2 sc, bobble, 6 sc, bobble, 6 sc. (16 sts total; includes 2 bobble sts)
Note: Press the bobbles inward to create nostril pits. Stitch count remains 16 (each bobble uses 1 stitch).
Rnd 6: (Sc, inc) around to end of round. (24)
Rnd 7: (2 sc, inc) around. (32)
Rnds 8–14: Sc evenly around. (32)
Rnd 15 (Eye Placement): (4 sc, inc) x 6. (36)
Stop here and insert your 40mm–50mm safety eyes between Rnds 7 and 10, spaced approximately 12 stitches apart. Remember the Critical Accuracy Notes: this placement is vital for the correct expression.
Rnds 16–20 (Face Sculpting): For these rounds, work HDC between the posts (shove the hook between the vertical bars of the stitches rather than the top loops). This flattens the eye sockets and creates the realistic brow ridge.
Rnd 21: (4 sc, dec) x 6. (30)
Rnd 22: (3 sc, dec) x 6. (24)
Rnd 23: (2 sc, dec) x 6. (18)
Rnd 24: (Sc, dec) x 6. (12)
Rnd 25: Dec x 6. (6)
Finish: Fasten off, leaving a very long tail for sewing. Stuff the snout and head firmly.
Folded Ears (Make 2)
Using MC. These are flat and slightly pointed.
Rnd 1: 4 sc in MR. (4)
Rnd 2: (1 sc, inc) x 2. (6)
Rnd 3: (2 sc, inc) x 2. (8)
Rnds 4–7: Sc around. (8)
Rnd 8: Flatten the ear and sc through both layers to close.
Finish: Fasten off. Fold the ear vertically to create an internal indent before attaching to the head later.
Thick Curved Horns (Make 2)
Using Accent Color (CC). These use “Short Rounds” to force a natural backward curve.
Rnd 1: 4 sc in MR. (4)
Rnd 2: (Sc, inc) x 2. (6)
Rnds 3–5: Sc around. (6)
Rnd 6: [3 sc, inc] x 2, turn. (10)
Rnd 7 (Short Rnd – Wrong Side): Do not ch, 5 sc, leave remaining 5 sts unworked, turn. (5)
Rnd 8 (Short Rnd – Right Side): Do not ch, 5 sc, do not turn. (5)
Rnd 9: Working on the Right Side, work all the way around the base, including the unworked stitches from Rnd 7. (10)
Rnds 10–18: Repeat the short round cycle (Rnds 7–9), increasing every 3rd round until the horn is thick and curved. “Place the increase in the first full round after each short-round cycle.”
Finish: Stuff firmly and leave a long tail for sewing.
Part 2: The Structural Core (Neck, Body, & Tail)
Before we begin this section, it’s important to understand the unique “textile engineering” we’re about to use to ensure your dragon lies flat.
Section Pattern Notes
- The Flat-Belly Logic: To ensure the dragon lies flat on the floor and doesn’t roll, we use Half Double Crochet (HDC) for the back to add volume and arch, and Single Crochet (SC) for the belly to keep it tight and flat.
- Integrated Construction: This section starts at the base of the head/neck and works downward as one continuous piece.
- Stuffing Strategy: Stuff the torso firmly to maintain the sprawling shape, but stuff the neck and tail transitions with medium firmness to allow the natural “S-curve” bend.
The Integrated Neck
Using Main Color (MC). The neck is a stocky pillar that will cup the back of the head.
Rnd 1: 30 sc in a ring (or you can work directly from the head opening if you prefer). (30)Keep the stitch marker
Rnds 2–5: Sc evenly around. (30)
Rnd 6 (The Arch – Part A): 5 sc, 5 hdc, 10 dc, 5 hdc, 5 sc. (30)
Note: The double crochet (dc) stitches create the “arch” at the top of the neck, giving it a muscular look.
Rnd 7 (The Arch – Part B): 5 sc, 2 hdc in each of next 5 sts, 2 dc in each of next 10 sts, 2 hdc in each of next 5 sts, 5 sc. (50)
Rnds 8–18: Top 25 sts = hdc between posts; bottom 25 sts = sc. (50)
Note: Keep the stitch marker at the start of the round so the belly/back split stays aligned.
Rnd 19: (8 sc, dec) × 5. (45)
Rnds 20–25: sc around. (45)
The Sprawling Torso
The torso is long, wide, and designed to sprawl. We now expand to the dragon’s maximum width.
Rnd 26 (Shoulder Expansion): (4 sc, inc) x 9. (54)
Rnd 27: (8 sc, inc) x 6. (60)
Rnd 28: (9 sc, inc) x 6. (66)
Rnds 29–70 (The Flat-Belly Sprawl):
This is a 42 rounds total that forms the massive body. For each round:
- Stitches 1–33 (The Belly): Work in Single Crochet (sc).
- Stitches 34–66 (The Back): Work in Half Double Crochet (hdc).
This height difference creates a “bean” cross-section, forcing the dragon to lie flat on its stomach without being lopsided.
Rnd 71: Sc evenly around. (66)
Stop and stuff the neck and torso firmly. Ensure the “back” (the HDC side) is aligned with the top of the head.
The Gradually Tapered Tail
The tail is continuous with the body, using short rounds to force a natural twist so it can lay organically over the floor or objects.
Rnd 72 (Begin Taper): (9 sc, dec) x 6. (60)
Rnds 73–77: Sc evenly around. (60)
Rnd 78 (Tail Curve – Part A): 15 sc, turn. (15)
Rnd 79 (Short Rnd – Wrong Side): Do not ch, 13 sc, turn. (13)
(You are intentionally leaving 2 stitches unworked at each edge to build asymmetry.)
Rnd 80 (Short Rnd – Right Side): Do not ch, 13 sc, do not turn.
Rnd 81: Work all the way around the tail base, including the unworked stitches from Rnd 78. (60)
Note (important): After Round 80, you are back on the Right Side. Continue crocheting in the round as normal into the remaining unworked stitches from Round 72–77 until you reach the start marker again. That completes Round 81 (60 sts).
Rnds 82–140 (The Marathon Taper): Work the tail in 8-round blocks:
- Rounds 1–7: sc evenly around
- Round 8: decrease round (total decreases = 6 per decrease round)
This means you will work 7 even rounds between each decrease round, reducing the stitch count by 6 every 8th round. Continue stuffing the tail with medium firmness as you go.
Decrease rounds (examples):
- Rnd 90: (8 sc, dec) × 6 (54)
- Rnd 98: (7 sc, dec) × 6 (48)
- Rnd 106: (6 sc, dec) × 6 (42)
- Rnd 114: (5 sc, dec) × 6 (36)
- Rnd 122: (4 sc, dec) × 6 (30)
- Rnd 130: (3 sc, dec) × 6 (24)
- Rnd 138: (2 sc, dec) × 6 (18)
Rnds 141–150: Sc evenly around. (18)
Rnd 151 (The Blunt Tip): (1 sc, dec) x 6. (12)
Rnd 152: Dec x 6. (6)
Finish: Fasten off. The tip should be rounded and blunt; the decorative flail will be attached here later.
Part 3: The Sprawling Limbs
The limbs of the Nap Guardian are designed for sprawling, not standing. The key to this section is creating heavy, rounded paws while keeping the upper joints soft and flexible.
Section Pattern Notes
- The Rounded Aesthetic: The Crimson Nap Guardian uses massive, rounded amigurumi-style paws. This maintains the “nap buddy” softness and matches the heavy, plush look.
- Posing Logic: To ensure the dragon looks relaxed, you must stuff the paws and lower legs firmly but keep the upper thighs and shoulders loose and flat (approximately 1.5 inches or 4 cm thick when pressed). This is not a mistake; it is essential for the final pose.
- Symmetry: You will make two identical front legs and two identical back legs. The “mirrored” aspect comes from how you position and sew them onto the body later.
Front Legs (Make 2)
Using Main Color (MC). The front legs are long tubes that start with a heavy, rounded paw.
Rnd 1: 6 sc in Magic Ring (MR). (6)
Rnd 2: inc in each st around. (12)
Rnd 3: (1 sc, inc) x 6. (18)
Rnd 4: (2 sc, inc) x 6. (24)
Rnd 5: (3 sc, inc) x 6. (30)
Rnds 6–12: Sc evenly around. (30)
This creates the massive, rounded paw that will support the weight of the head.
Rnd 13 (Wrist Taper): (8 sc, dec) x 3. (27)
Rnd 14: Sc evenly around. (27)
Rnd 15: (7 sc, dec) x 3. (24)
Rnds 16–35 (The Leg): Sc evenly around. (24)
Rnd 36 (Shoulder Shaping): (2 sc, dec) x 6. (18)
Rnd 37: dec x 9. (9)
Finish: Fasten off, leaving a very long tail for sewing.
Stuffing Tip: Stuff the paw (Rnds 1–12) very firmly. Stuff the middle leg with medium firmness. Leave the top 3 inches (the shoulder) completely empty so it can be sewn flat against the body.
Back Legs (Make 2)
Using Main Color (MC). These consist of a separate wide Thigh and a Lower Leg joined together to support the dragon’s wide midsection.
The Lower Leg & Paw (Make 2)
Rnds 1–12: Repeat the rounded paw instructions from the Front Leg (Rnds 1–12). (30)
Rnd 13: (3 sc, dec) x 6. (24)
Rnds 14–22: Sc evenly around. (24)
Finish: Stuff the paw and lower leg firmly and set this piece aside. Do not fasten off if you plan to join directly; otherwise, leave a tail for sewing.
The Wide Sprawling Thigh (Make 2)
This piece creates the “hip” that allows the back legs to spread outward from the torso.
Rnd 1: 6 sc in MR. (6)
Rnd 2: inc in each st. (12)
Rnd 3: (1 sc, inc) x 6. (18)
Rnd 4: (2 sc, inc) x 6. (24)
Rnd 5: (3 sc, inc) x 6. (30)
Rnd 6: (4 sc, inc) x 6. (36)
Rnd 7: (5 sc, inc) x 6. (42)
Rnd 8: (6 sc, inc) x 6. (48)
Rnds 9–14: Sc evenly around. (48)
Rnd 15 (Decrease for Hip): (6 sc, dec) x 6. (42)
Rnd 16: (5 sc, dec) x 6. (36)
Finish: Leave the top of the thigh open. Do not stuff yet. Fasten off, leaving a very long tail for assembly.
Limb Assembly & Positioning
This is not part of the final assembly; it is a guide for how to think about positioning the limbs as you prepare to attach them later. To get the exact sprawling result of the Guardian Nap Buddy, placement is more important than stitch count.
- Front Leg Positioning: The front legs will be aligned just below the neck-to-body join. The flat, unstuffed shoulders will be pinned approximately 7 stitches apart on the underside of the torso. You’ll want to position the elbows so they point slightly forward, making the dragon look as if it is resting its head on its paws.
- Back Leg Positioning: The wide thighs will be sewn over the largest curve of the torso (around Rnd 75 of the body). They will be angled outward, away from the tail.
- The “Flat-Fold” Join: When sewing the thighs to the body later, you will allow the front part of the upper leg to fold in on itself. This creates the natural curve of a sprawling animal and is critical to prevent the dragon from appearing like it is standing.
- Foot-to-Thigh Join: You will sew the open top of the Lower Leg/Paw to the bottom edge of the thigh piece. Ensure the paw is facing forward, toward the head.
Part 4: The Grand Wings & Character Details
This is where your dragon’s personality truly emerges. We will create the massive, poseable wings, the sharp dorsal ridge, and the signature tail flail.
Section Pattern Notes
- The Poseable Frame: To prevent the massive wings from sagging, we use a wire armature. This allows you to “drape” the wings over the dragon’s arms or pose them upright majestically.
- Extended Single Crochet (esc): This special stitch is used for the wing membranes. It is slightly taller than a standard sc, which allows the large surface area to work up faster and creates a more uniform, fabric-like texture.
- Color Contrast: For the classic “Crimson Guardian” look, use Main Color (MC: Crimson) for the wing arms and membranes, and Accent Color (CC: Black) for the spikes and tail ornament.
Grand Guardian Wings (Make 2)
The wings are created in two parts: the structural Wing Arms and the fabric-like Membranes.
A. The Wing Arms (The Skeleton)
Using MC (Crimson). These are long, thin tubes that will house the wire.
Rnd 1: 6 sc in Magic Ring (MR). (6)
Rnds 2–85: Sc evenly around. (6)
Note: Continue until the tube is approximately 25–30 inches long to match the scale of your 5-foot body. The round count is a guide; length is the goal.
Finish: Fasten off. Insert a 22-inch piece of 12-gauge or 14-gauge galvanized wire into the tube. Using pliers, fold and crimp the wire ends to ensure they are blunt and not sharp.
B. The Grand Membranes
Using MC (Crimson). This large, triangular piece is worked in rows.
Row 1: Ch 3, 4 dc in 3rd ch from hook. (4 sts)
Row 2: Esc in each st across. (4 sts)
Row 3 (Increase Row): Esc inc in first st, esc in next 2 sts, esc inc in last st. (6 sts)
Place a marker on one edge so you can track orientation while the wing grows.
Row 4: Esc in each st across. (6 sts)
Row 5 (Increase Row): Esc inc in first st, esc in next 4 sts, esc inc in last st. (8 sts)
Rows 6–45: Repeat Rows 4–5 (plain row, increase row).
Note: Always increase at the same edge to maintain a clean triangular shape.
You will increase 2 stitches total every other row, maintaining a triangular shape. Continue until the base of the wing is wide enough to span from the dragon’s shoulder to its mid-back.
Finishing Row: Work Crab Stitch (Reverse Single Crochet) along the long outer diagonal edge only to create a reinforced border.
C. Wing Assembly
1. Join: Pin the long, straight edge of the Membrane to the wire-filled Wing Arm tube. Use a tapestry needle and matching yarn to sew them together stitch-for-stitch.
2. Attach: You will later sew the base of the Wing Arm to the dragon’s shoulder area. Push the internal wire slightly into the body stuffing before securing the base to the torso for maximum structural stability.
Dorsal Ridge (Back Spikes)
Using CC (Black). This creates the saw-tooth ridge running from the head to the tail.
Foundation: Ch 100 (or the length needed to span from the back of the horns to the tail tip).
Row 1: Sc in 2nd ch from hook and each ch across.
Row 2 (The Picot Series): *Ch 3, sl st in first ch (this makes a picot), skip 1 st, sc in next 2 sts.* Repeat from * to * across the entire length.
Assembly: Later, you will pin the ridge in a straight line along the dragon’s spine. You must sew down both sides of the foundation chain to ensure the spikes stand upright and do not flop to one side.
Heart-Shaped Tail Flail
Using CC (Black). This matches the specific spade/heart ornament at the end of the tail.
Rnd 1: 6 sc in MR. (6)
Rnd 2: (sc, inc) x 3. (9)
Rnd 3: (2 sc, inc) x 3. (12)
Rnd 4: (sc, inc) x 6. (18)
Rnds 5–7: Sc evenly around. (18)
Rnd 8 (The Split): To create the two “humps” of the heart, you will now work on two separate sections of 9 stitches each.
Rnds 9–10: Sc around the first 9-stitch hump, decreasing to close. Fasten off. Rejoin yarn to the second 9-stitch hump and repeat.
Finish: You will sew the open base of this heart ornament over the blunt tip of the tail during final assembly.
Artisan Surface Embroidery
Using CC (Black) and a tapestry needle. This optional step provides the “visual stitching” seen on the professional models and adds incredible character.
- Wing Detail: Work large, decorative whip-stitches along the outer border and down the “veins” of the crimson wing membranes.
- Body Detail: Work similar large “V” or whip-stitches along the sides of the tail and torso.
- Pro Tip: Keep these stitches slightly loose; they should sit on top of the chenille yarn fibers without pulling tight into the stuffing, ensuring they remain highly visible.
Part 5: Belly Armor & Final Refinement
The final pieces are not just decorative; they are structural and soulful, completing the form and character of your advanced crochet dragon.
Section Pattern Notes
- The Structural Plate: The belly scales are not just for looks; they act as a structural anchor that prevents the weight of the large dragon from stretching the torso fabric over time, ensuring your Guardian keeps its shape for years to come.
- The “Sleepy” Look: Final embroidery is what transforms a generic dragon into the Guardian. Focus on soft, downward angles for the eyes to match the intended aesthetic.
- Invisible Finishing: When sewing these final pieces, always use the same color yarn as the piece you are attaching (e.g., use black yarn to sew the black belly plate) for a seamless, professional finish.
Ribbed Belly Scales (Make 1)
Using Accent Color (CC: Black). This panel is worked in rows to create a wide, textured shield for the dragon’s entire underside.
Row 1: Ch 11, starting in 2nd ch from hook, sc in each ch across. (10)
Row 2: Ch 1, turn. In BLO (Back Loop Only), sc across. (10)
Rows 3–10 (The Throat): Repeat Row 2.
Row 11 (Expansion): Ch 1, turn. In BLO: inc, 8 sc, inc. (12)
Rows 12–20 (Upper Chest): Repeat Row 2. (12)
Row 21 (Main Body Expansion): Ch 1, turn. In BLO: inc, 10 sc, inc. (14)
Rows 22–100 (The Long Shield): Repeat Row 2. (14)
Note: Continue repeating Row 2 until the panel is long enough to cover the flat underside of your dragon from its chin to the start of the tail taper. The row count is a guide; measure it against your dragon’s body.
Row 101 (Tail Taper): Ch 1, turn. In BLO: dec, 10 sc, dec. (12)
Rows 102–120: Repeat Row 2. (12)
Finish: Fasten off, leaving a very long tail (at least 4 yards) for sewing the entire panel to the belly.
Final Facial Refinement
Using CC (Black) yarn and a tapestry needle. These simple details provide the “soul” of the character.
- The Eyelids: Above each safety eye, embroider a thick black line that slants slightly downward toward the ears. This reinforces the “sleepy guardian” aesthetic and gives the eyes a heavy-lidded look.
- The Nostril Slits: Locate the nostril pits created by the bobble stitches in Part 1. Embroider two heavy vertical “V” shapes over them, approximately 3 stitches long.
- Muzzle Detail: Add 3 small black “freckle” stitches on each side of the snout for added realism and character depth.
The Final Assembly Master List & Checklist
You have forged every piece of your Guardian. Now, you will bring it all together. Follow this specific sequence to ensure the weight of the dragon is balanced and the pose remains realistic and stable. Use your T-pins to hold pieces in place before committing to sewing.
Assembly Order (The Master List)
- Establishing the Top: Attach the Horns and Ears to the head first. This helps you find the center line for the rest of the body.
- The Neck Join: Sew the Head to the neck, tilting the nose slightly downward so it will naturally rest on the floor or its paws.
- The Under-Armor: Center the Ribbed Belly Scales along the flat underside. Pin the entire length before sewing to ensure no twisting occurs. This is a long but critical seam.
- The Spine: Sew the Dorsal Ridge (Back Spikes) starting from the base of the horns and running all the way down the tail.
- Front Limbs: Position the Front Legs so the flat, unstuffed shoulders are sewn against the floor-facing side of the torso, allowing the paws to “cradle” the head.
- Back Limbs: Sew the wide Thighs over the body’s largest curve. Ensure the feet point outward to create the signature sprawling pose.
- The Wings: Push the internal 12-gauge wires from the wing arms into the shoulder stuffing for stability, then sew the base of the Wings firmly to the back.
- The Flail: Secure the Heart-Shaped Ornament over the blunt tip of the tail to complete the silhouette.
Closing Checklist
- Double-Stitching: Because life-size dragons are heavy, double-stitch the wing and thigh joins for maximum durability.
- Posing: Bend the internal wing wires and the tail curve to “spread” the Guardian out realistically across your floor.
- Firmness Check: If the neck or tail base feels floppy after assembly, you can add a small amount of extra stuffing through a seam before your final closure.
Congratulations! You have completed the Crimson Nap Guardian. You now have a magnificent, 5-foot floor companion ready for a lifetime of naps and magic.
The Technical Deep Dive (Advanced Techniques Explained)
Creating a life-size floor dragon requires more than basic amigurumi skills. This project utilizes “textile engineering” techniques to sculpt heavy chenille yarn into a realistic, fluid form. Understanding these methods will not only help you with this project but will also add valuable skills to your crochet toolkit.
1. Anatomical Shaping with Short Rounds
Short rounds (or short rows) are the secret to the Guardian’s realistic curves. Unlike standard rounds that go all the way around a piece, a short round ends early, leaving some stitches unworked before you turn.
- How it works: By adding extra rows of fabric to only one side of a tube, you force the piece to bend away from the “taller” side.
- Why it’s used: This is used in the horns to create a natural backward arch and in the tail to ensure it twists and drapes organically over furniture or shoulders, rather than sticking straight out.
2. Extended Single Crochet (esc)
The extended single crochet is a hybrid stitch that is taller than a single crochet but denser and more flexible than a half-double crochet.
- How it works: You insert your hook and pull up a loop, yarn over and pull through the first loop only (this creates a “chain” at the base of the stitch), then yarn over and pull through both remaining loops.
- Why it’s used: This stitch creates a more flexible, uniform fabric that looks less like a grid and more like a leathery skin. It is the primary stitch for the massive wings, allowing them to be large and impressive without becoming too heavy or stiff.
3. Sculpting “Between the Posts”
Standard crochet involves inserting the hook under the top ‘V’ of the stitch. However, for the Guardian’s face, we work “between the posts.”
- How it works: You physically shove the hook into the space between the vertical bars (the posts) of the stitches in the row below.
- Why it’s used: This technique packs the stitches tighter together and creates a flat, dense, structural surface. It is essential for defining the brow ridges and eye sockets, giving the dragon a realistic skeletal structure rather than a perfectly round, “chibi” head.
4. Surface Crochet and Detailing
Surface crochet is the art of adding 3D textures and lines directly onto a finished piece.
- How it works: With a slip knot on your hook held behind your work, you pull loops up through the fabric and work slip stitches or single crochets across the surface of the dragon.
- Why it’s used: This is used to create the optional raised veins in the wings and the nostril flares. It provides a professional, artisan look that cannot be achieved by simple sewing.
5. The Crab Stitch (Reverse Single Crochet)
The Crab Stitch is worked from left to right, which is the opposite direction of normal crochet. It feels awkward at first, but the result is unmatched.
- How it works: Without turning your work, you insert your hook into the stitch to the right, pull up a loop, and complete a single crochet.
- Why it’s used: This stitch creates a thick, corded edge. It is used for the outer borders of the wings, reinforcing the fabric against the internal wire frame and preventing the edges from curling or sagging over time.
Frequently Asked Questions
1. What is the finished size of the dragon?
The Crimson Nap Guardian is a “life-size” companion. When using super-bulky yarn, he typically measures 4 to 5 feet long (approx. 120–150 cm) from the nose to the tip of the tail. Depending on how you pose the internal wire frame, the wingspan can reach up to 3 feet wide.
2. What type of yarn is recommended for the “Nap Buddy” look?
To achieve the ultra-soft, velvet texture seen in the photos, you must use Super Bulky (Weight 6 or 7) Chenille or “Blanket” yarn. These yarns fill in gaps quickly and create a plush, seamless surface that is perfect for cuddling.
3. Is this pattern suitable for beginners?
This project is rated Intermediate to Advanced. While the individual stitches are simple (sc, hdc, dc), the massive scale of the project and the use of shaping techniques like short rounds and wire armatures require some experience and confidence in your skills. If you are a determined fast learner, the step-by-step instructions will guide you through the more difficult sections.
4. Do I really need to use wire in the wings?
Yes, absolutely. Because of the massive scale of the wings, stuffing alone will not keep them from sagging. Using 12-gauge or 14-gauge galvanized wire is what allows you to pose the wings realistically—draping them over the dragon’s arms or spreading them out wide. It is a critical structural element.
5. How much stuffing will I need?
Large-scale projects require a significant amount of structure. Expect to use between 5 to 10 lbs (3–5 kg) of high-density polyester fiberfill. For the best results, remember to “zone” your stuffing as directed in the Critical Accuracy Notes.
6. How do I clean a dragon this large?
Since the Guardian is a “floor dragon,” spot cleaning with a damp cloth and mild detergent is the best method for chenille yarn. If a deep clean is ever necessary, hand-wash the dragon in a bathtub and allow it to air-dry completely over several days. Do not machine wash, as this will damage the internal wire frame and stuffing structure.
Conclusion — Your Guardian Awakens
If you are reading this, then a monumental undertaking is complete. Take a moment to step back and admire what you have accomplished. You have not just finished a crochet pattern; you have wrestled with yarn and hook, battled gravity with wire and stuffing, and sculpted a creature of myth into being. You have created a true work of fiber art.
This advanced crochet dragon was designed to be more than just a project; it was designed to be a presence in your home. Whether it’s sprawled majestically at the foot of a bed, guarding a cozy reading nook, or becoming the most legendary nap-buddy a child could ever wish for, your Crimson Nap Guardian is now a part of your world. It is a testament to your skill, your patience, and the magic that can be woven from a simple strand of yarn.
Thank you for joining me on this incredible journey. May your Guardian watch over many peaceful naps.
I would be absolutely overjoyed to see your finished Guardian! Creating something this large is a massive achievement, and it deserves to be celebrated. Please, come and share photos of your magnificent dragon in our wonderful crafting community.
Join Our Facebook Group and Share Your Dragon!
We are all waiting to be inspired by your creation. Happy crocheting